For Kubernetes services, various distinct port configurations are available, including Port, TargetPort, and NodePort. The Kubernetes service is accessible through the cluster’s chosen port, and other pods can communicate with this server using the configured port. On the TargetPort, the service will send requests, and the pods will listen for them. This port will also need to be open for your container’s application. If the port field is not supplied, NodePort is used by default. We’ll go over how to expose ports in Kubernetes in this article. You need to understand Pod and Deployment to follow the hands-on exercises on this topic.
Make sure you have kubectl installed. You will also need a Kubernetes cluster, as well as the kubectl command-line tool configured to connect with it. To get started, open the minikube cluster, which is installed on your Ubuntu 20.04 LTS OS. To run minikube, execute the minikube start command on the command line.
Create a file with the touch command.
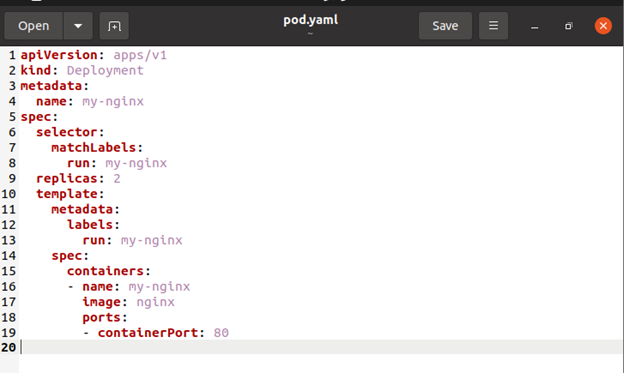
The pod.yaml file is created, as shown in the accompanying screenshot.
Now make an Nginx Pod with the following container port specification:
As a result, it can be accessed from any node in your cluster. Examine the nodes on which the Pod is operating, and use the commands below to do so.
To see the complete status of the Kubernetes pods, you can run the get pod command as mentioned below.
With the command shown in the screenshot, you may check the IP addresses of your pods.
You can ssh into any node that is present in your cluster and curl both IP addresses. It’s worth noting that the containers don’t use port 80 on the node, and there aren’t any specific NAT rules in place to direct traffic to the pod. This means that you can run many Nginx pods on the same node, each with its container port, and access them through IP from any other pod or node in the cluster. Ports can still be exposed to the host node’s interfaces, just like Docker, although this requirement is greatly reduced due to the networking model.
How to Create a Service?
So, on a flat, cluster-wide address space, we have pods executing Nginx. You could theoretically communicate directly with these pods, but what happens if one of them dies? The pods will perish as a result, and the Deployment will generate new ones with alternative IP addresses. The problem that a Service solves is this one.
A Kubernetes Service is a logical set of Pods that all do the same task and run somewhere in your cluster. When a service is created, it is given a specific IP address, and this address is fixed throughout the Service’s existence and will not change. Pods can be set to communicate with the Service, with the certainty that communication will be load-balanced to a Service member pod. With kubectl expose, you may build a Service for your two Nginx replicas:
A set of Pods supports a Service. Endpoints provide access to these Pods. The Service’s selection will be evaluated regularly, with the results POSTed to an Endpoints object named my-nginx. If a Pod dies, it is separated from the endpoints. After that, it is replaced with new Pods with the same selector.
How to Access the Service?
Environment variables and DNS are the two basic methods for finding a Service in Kubernetes. The former requires the CoreDNS cluster addon, whereas the latter does not.
Environment Variables
The kubelet creates a collection of environment variables for each current Service when a Pod starts on a Node. As a result, there might be difficulty occur in the order process. Examine the environment of your running nginx Pods (the name of your Pod will differ) to understand why:
It’s worth noting that your Service isn’t mentioned. Because you made the replicas before the Service, this is the case. This step could bring your entire Service down if it didn’t work. By destroying the two Pods and waiting for the Deployment to recreate them, we can complete the task properly. The Service is present before the replicas this time. This will provide you with scheduler-level Service spreading for your Pods, as well as the appropriate environment variables:
DNS
Kubernetes has a DNS cluster addon service that assigns DNS names to other services automatically. You can see if it’s running on your cluster by executing the following command:
Conclusion
In this article, you have learned that for Kubernetes services, there are various distinct port configurations available, including Port, TargetPort, and NodePort. In addition, we have included a complete description of how you can successfully expose ports in Kubernetes.


