So, the first tool(MongoDB) revolutionizes data management, whereas Nodejs is famous for developing scalable applications. Following the importance of these fruitful tools, this guide will demonstrate the use of Nodejs with MongoDB.
MongoDB and Nodejs
Although the Nodejs environment works with several SQL and NoSQL databases. Here, we will only target MongoDB. The Nodejs assists you by performing several operations in MongoDB that are listed below:
- The number of database connections of MongoDB managed by Nodejs.
- Managing the connections to a database; creating a database connection, terminating the connection.
- The CRUD operations supported by MongoDB can be carried out by using it with Nodejs.
Prerequisites
With the help of this section, you would be able to set up an environment where you can use MongoDB with Nodejs. The following list of packages must be present on your Linux system to get started with Nodejs along with MongoDB.
Install Node.js : You must install Node.js version “4.x” or greater. However, it is recommended to get the latest version available.
Firstly, update the packages list by issuing the following command:
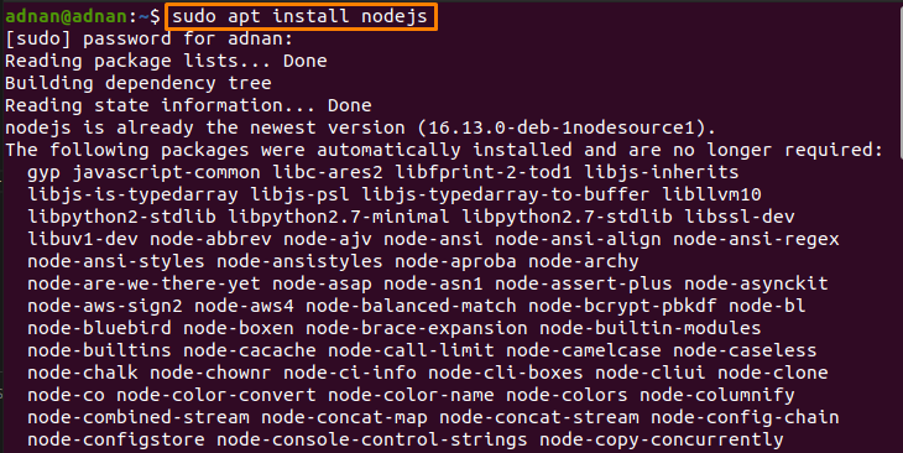
After updating, get Node.js on Ubuntu with the help of the below-mentioned command:
Note: We have already installed the nodejs.
Mark your node version as well by issuing the following command:
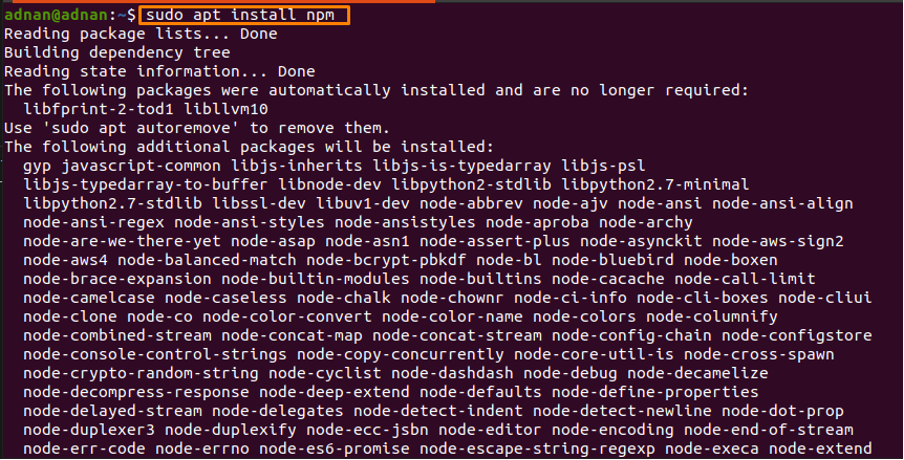
Get Node.js Package Manager: The npm support of Node.js allows the installation of several modules or packages that are to be used with Node.js. So, execute the following command to install npm on your Ubuntu:
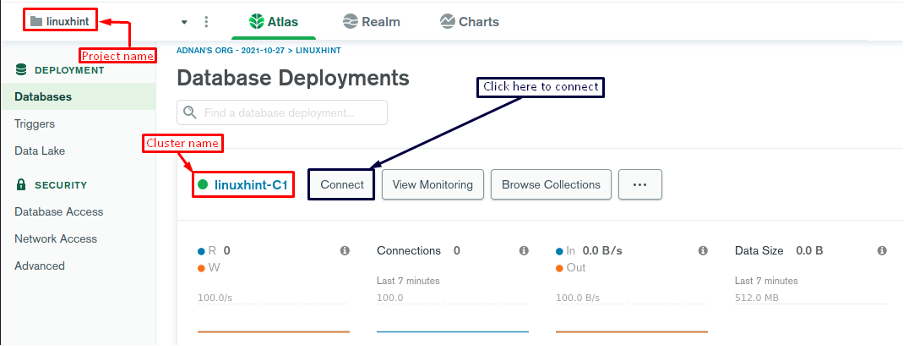
MongoDB Atlas : After installing the above instances, you have to go to MongoDB Atlas and make an account over there. Once the account is created successfully, you will be asked to name your project and create a cluster inside that project. After this, you will see an interface as shown below:
You can observe the project name and the cluster of that project as well:
Note: In our case, the project name is set to linuxhint, and the cluster associated with this project is named linuxhint-C1.
Moreover, for connection, you must follow the steps provided below:
Step 1: Click on the “Connect” button to configure the connection:
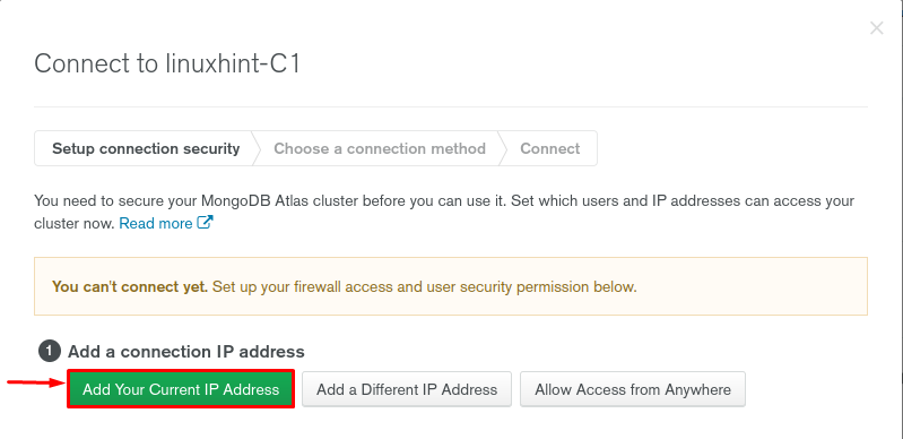
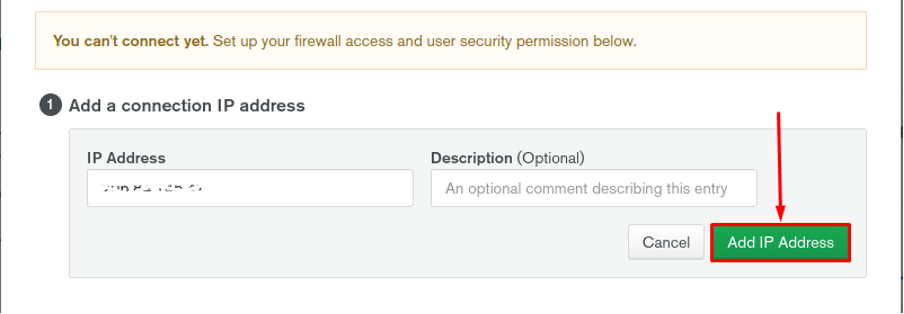
Step 2: On the next page click on “Add Your Current IP Address” to set the current IP for connection.
Now, click on “Add IP Address” to complete this step.
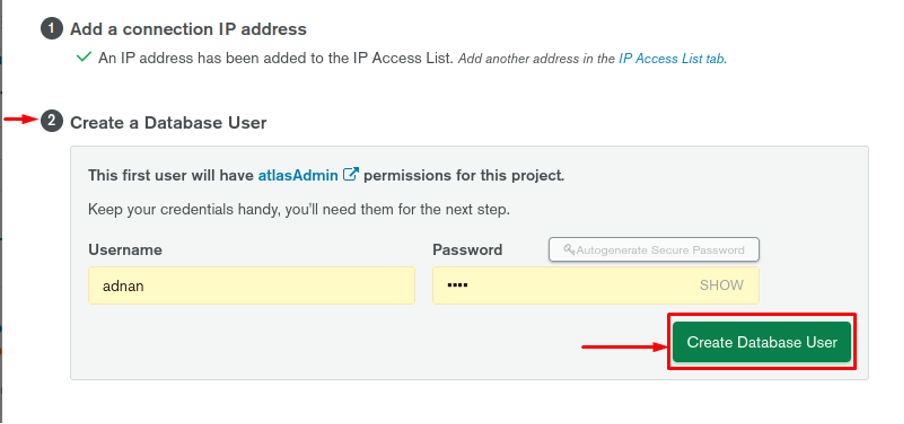
Step 3: After setting the IP Address, navigate to the “Create a Database User” option. Enter the name of the user in the “Username” and password in the “Password” option, and then click on “Create Database User” to complete this step.
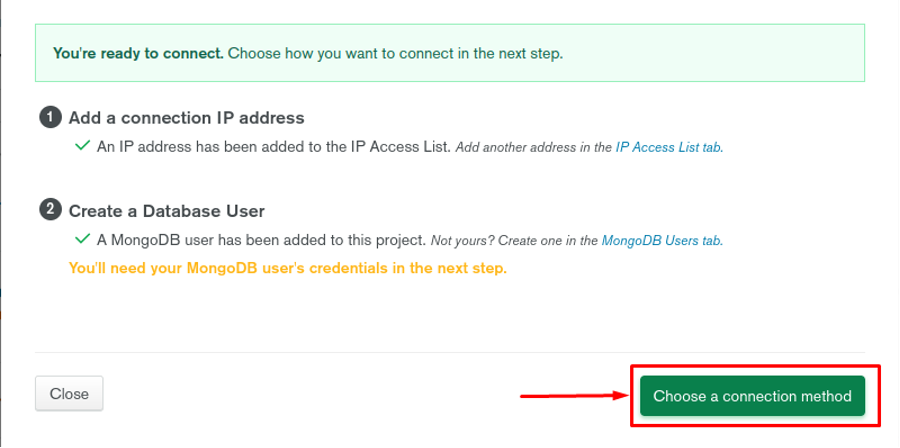
Now, choose the connection method by clicking on “Choose a connection method“:
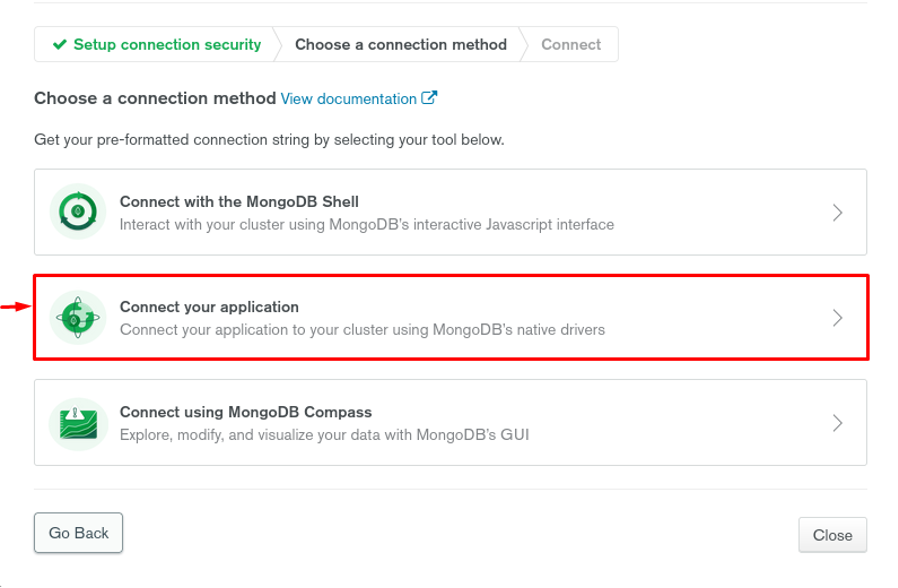
Step 4: Nex click on “Connect your application“.
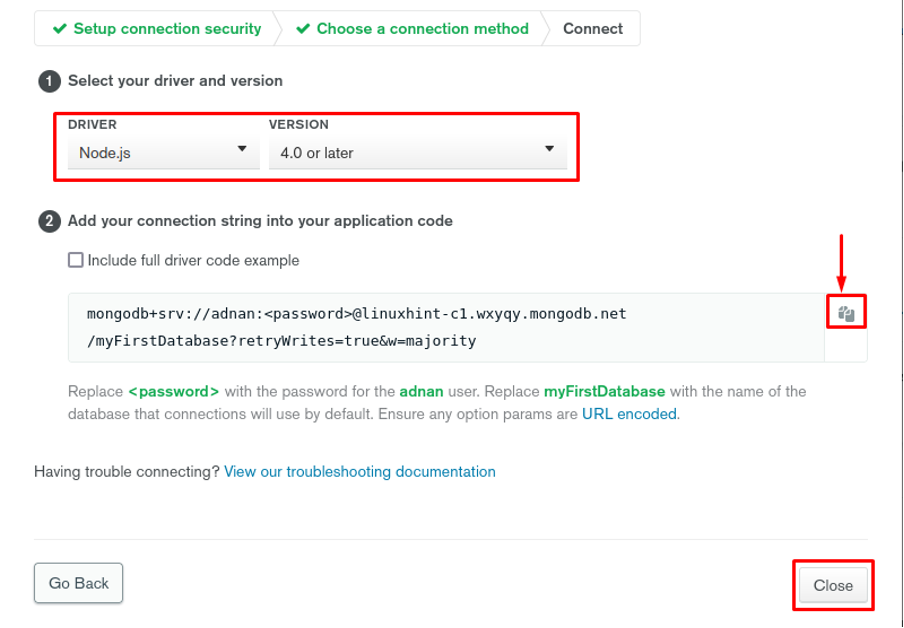
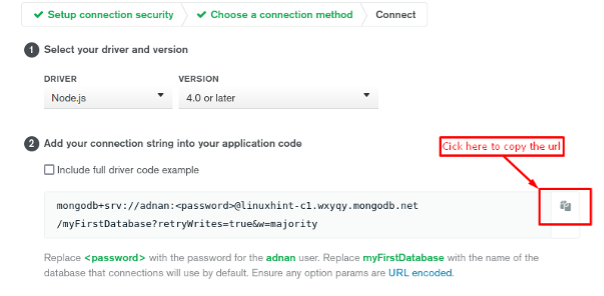
We want nodejs with MongoDB, for that choose “Node.js” from the dropdown menu named “DRIVER” and select the relevant version from the “VERSION” option. Moreover, you must copy the connection url to use it inside the Nodejs application (or you can copy it later as well).
Once you have performed all these steps, you are set to connect your nodejs application with MongoDB.
Setting up environment
This section briefly describes the MongoDB operations using Nodejs. For this, you must create a node project so that its connection with MongoDB can be established.
The steps provided below will guide you to create a new node project and install a MongoDB module.
Step 1: Open your Ubuntu terminal. Make a new directory and change the present working directory to that folder. For instance, we have created a directory “node-mongo” and shifted PWD to “node-mongo” by issuing the following commands:
$ cd node-mongo
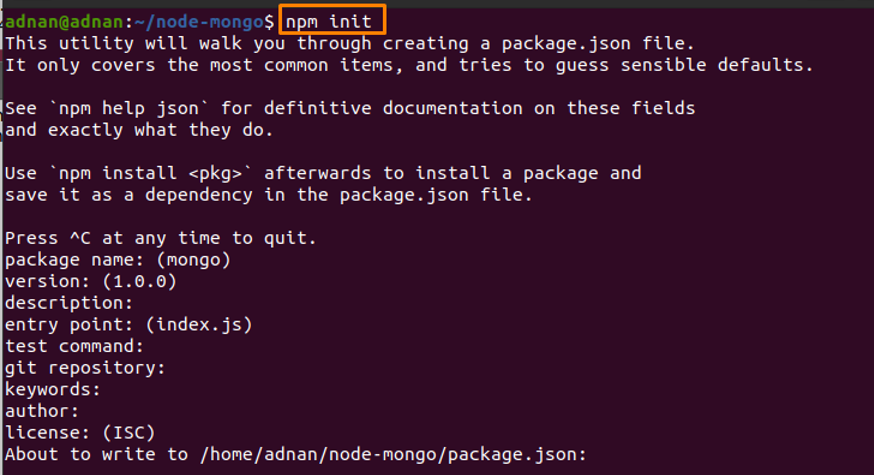
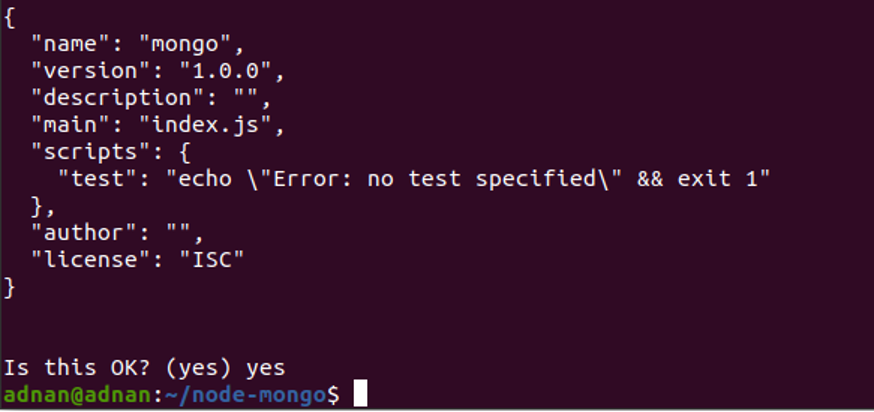
Step 2: Once you are into the “node-mongo” directory; create a Node project using the following command:
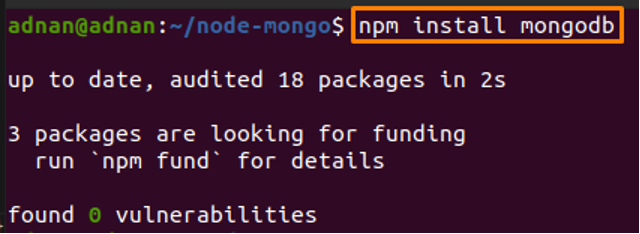
Step 3: After that, execute the following command to install the MongoDB module that is necessary for running MongoDB queries (We have already installed this driver):
Note: It is recommended that you must have the node version greater than v14 to add mongodb driver.
Establishing a connection between MongoDB and Nodejs
After setting up the environment, you are all set to connect Nodejs with MongoDB. Moreover, the code editor used here is “Visual Studio Code“.
You must follow the steps provided below to make the connection successful:
Step 1: Open the folder in the “Visual Studio Code” application. It is observed that two files are already there, one is named “package.json” and “package-lock.json“. These files are created when you initialized npm and installed the mongodb driver. You can create these files by following Step 2 and Step 3 of “How to set up the environment“.
Create a new “.js” file into “node-mongo” and name it “index.js“.
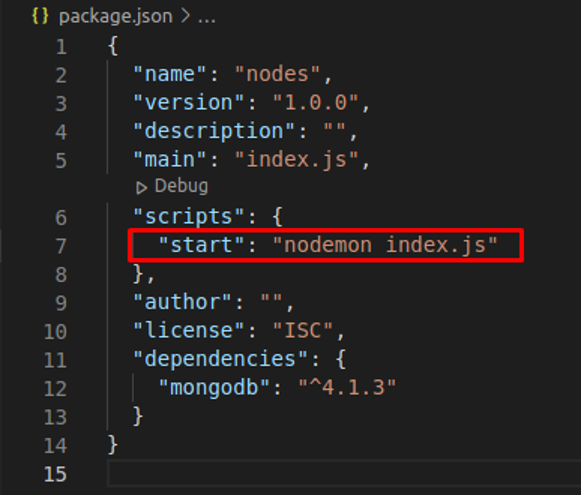
After that, open the “package.json” file and perform the following changes to make the “index.js” file executable.
Once you are done, save the changes (Ctrl+S).
Step 2: Open your “index.js” file. After that, use the following code to make the connection attempt. The connection url must be copied from the MongoDB Atlas.
For connection url, you must go to “Step 4” of sub-section “– MongoDB Atlas” in the “Pre-requisites” section. For ease, the image is attached below:
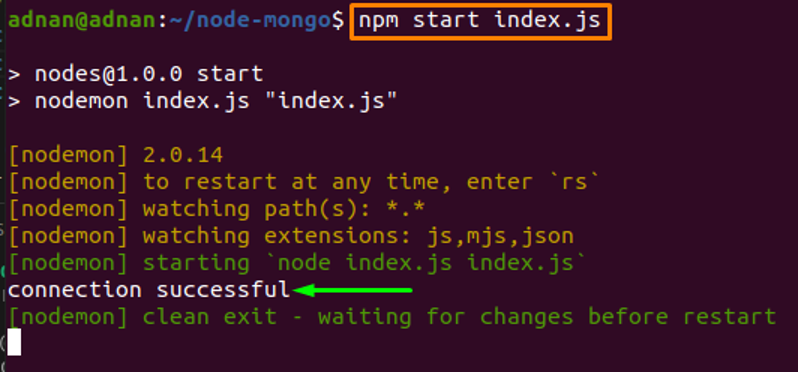
Step 3: Now, open your terminal (or you can use terminal inside “Visual Studio Code” as well) and run the following command to test the connection:
The image below shows that the connection is successful as the command returns a “connection successful” message.
Creating a database and collection using Nodejs and MongoDB
Once you have established a connection successfully. Now you can perform various MongoDB operations using Nodejs. Here we have performed a few steps to create the database and collection.
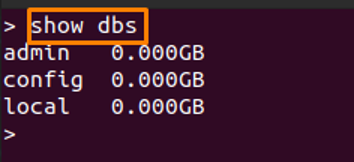
Step 1 (Optional): Before database creation, let’s have a look at the database list using the following command in Mongo shell.
It can be observed there are only 3 databases.
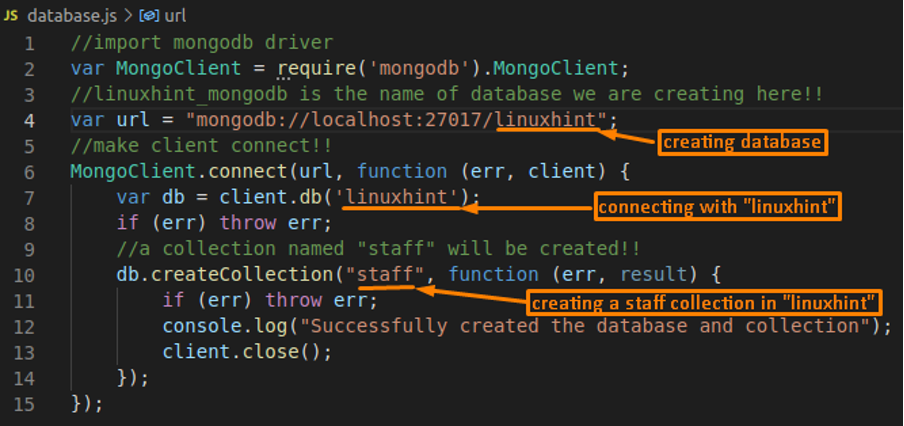
Step 2: We have created a new .js file and named it “database.js“. Embed the following code in the “database.js” file. The code will create a database named “linuxhint ” and a collection named “staff“.
Code
var MongoClient = require('mongodb').MongoClient;
//linuxhint_mongodb IS the name OF DATABASE we are creating here!!
var url = "mongodb://localhost:27017/linuxhint";
//make client CONNECT!!
MongoClient.connect(url, FUNCTION (err, client) {
var db = client.db('linuxhint');
IF (err) throw err;
//a collection named "staff" will be created!!
db.createCollection("staff", FUNCTION (err, RESULT) {
IF (err) throw err;
console.log("Successfully created the database and collection");
client.close();
});
});
Image
Open your terminal and test the code by executing the “database.js” file in your terminal:
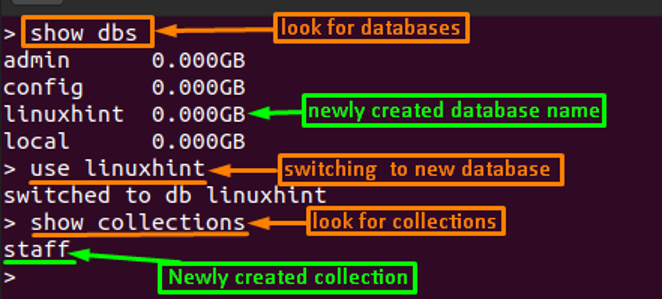
Step 3 (Optional but recommended): Although the file has been executed successfully, it is recommended to check the existence of the newly created database and the collection. For that, execute the following commands:
> USE linuxhint
> SHOW collections
Inserting documents using Nodejs and MongoDB
In MongoDB, there are two possibilities to insert documents:
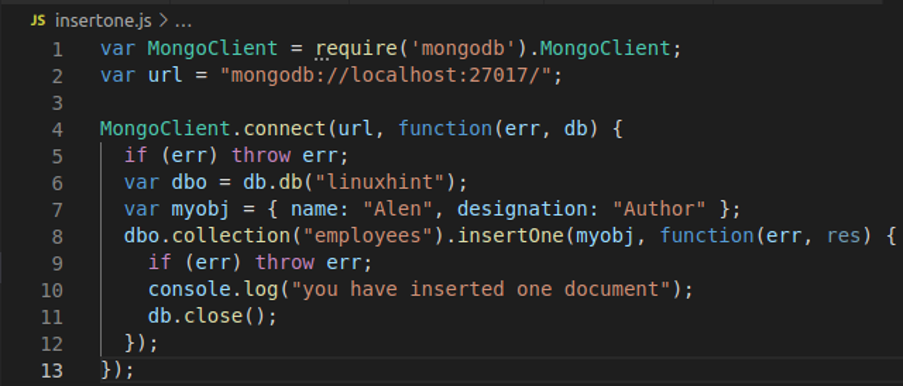
Insert One document: For insertion of one document, the insertOne() method of MongoDB is used. For this, a new file “insertone.js” is created, inside the “node-mongo” directory. The following code will add only one document to the “employees” collection of the “linuxhint” database.
Code
var url = "mongodb://localhost:27017/";
MongoClient.connect(url, FUNCTION(err, db) {
IF (err) throw err;
var dbo = db.db("linuxhint");
var myobj = { name: "Alen", designation: "Author" };
dbo.collection("employees").insertOne(myobj, FUNCTION(err, res) {
IF (err) throw err;
console.log("you have inserted one document");
db.close();
});
});
Image
Now, open your terminal and run the below-mentioned command:
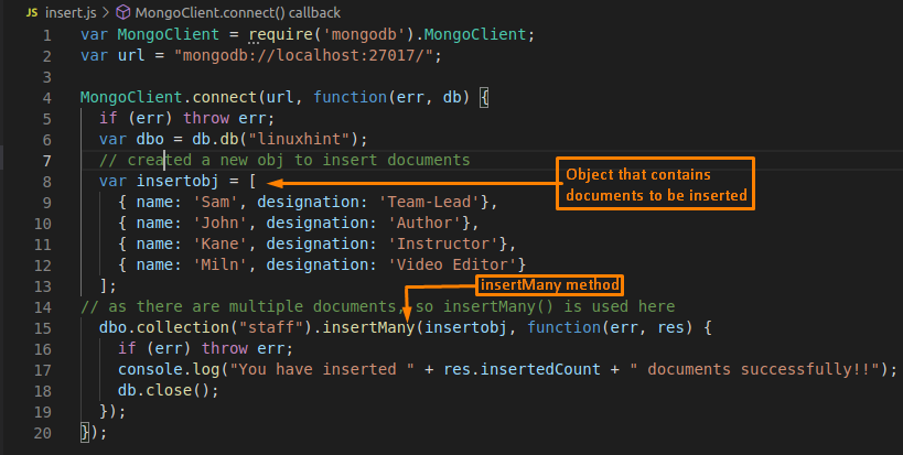
Insert Multiple documents: For insertion of multiple documents, we have created a new .js file and named it “insert.js“. The following code will help you to insert multiple documents in the “staff” collection of the “linuxhint” database.
Code
var url = "mongodb://localhost:27017/";
MongoClient.connect(url, FUNCTION(err, db) {
IF (err) throw err;
var dbo = db.db("linuxhint");
// created a NEW obj TO INSERT documents
var insertobj = [
{ name: 'Sam', designation: 'Team-Lead'},
{ name: 'John', designation: 'Author'},
{ name: 'Kane', designation: 'Instructor'},
{ name: 'Miln', designation: 'Video Editor'}
];
// AS there are multiple documents, so insertMany() IS used here
dbo.collection("staff").insertMany(insertobj, FUNCTION(err, res) {
IF (err) throw err;
console.log("You have inserted " + res.insertedCount + " documents successfully!!");
db.close();
});
});
Image
Use the below-mentioned command to run the “insert.js” file:
Finding documents in Nodejs and MongoDB
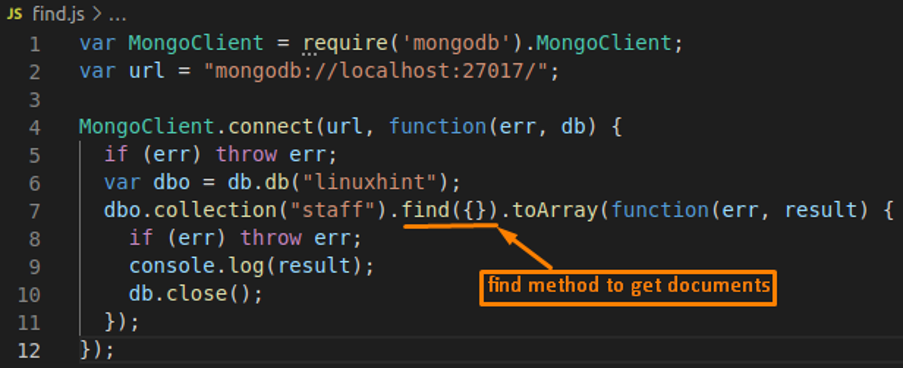
In MongoDB, the find() method is used to retrieve documents from any collection of a database. We have created a “find.js” file that contains the code to fetch documents from the “staff” collection of the “linuxhint” database. The code to find() method is provided below:
Code
var url = "mongodb://localhost:27017/";
MongoClient.connect(url, FUNCTION(err, db) {
IF (err) throw err;
var dbo = db.db("linuxhint");
dbo.collection("staff").find({}).toArray(FUNCTION(err, RESULT) {
IF (err) throw err;
console.log(RESULT);
db.close();
});
});
Image
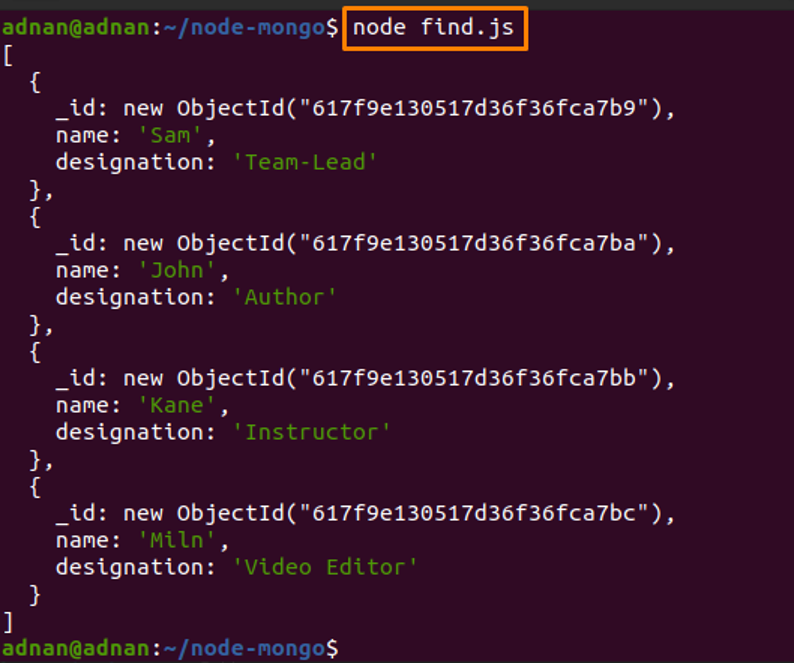
Execute the following command to run the file “find.js” and the output will show the documents of the “staff” collection:
Updating documents in Nodejs and MongoDB
The data management of any organization is said to be good enough if they keep their data updated. MongoDB provides several methods for updating documents like, updateOne(), updateMany().
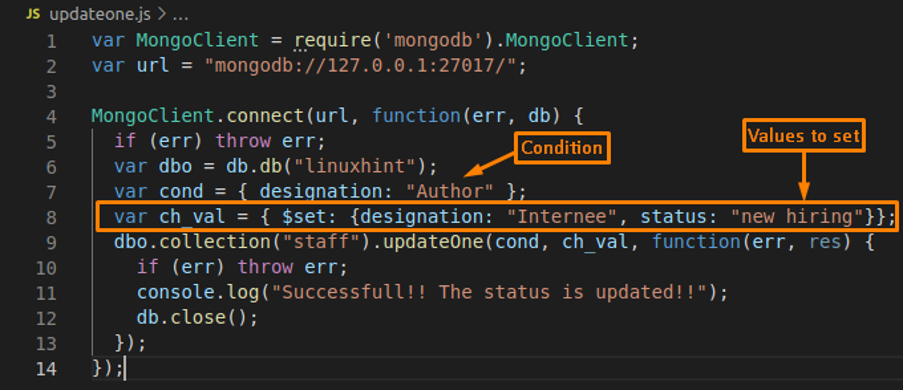
Update one document : For this, we have created a new file and named it “updateone.js“. As there may exist multiple documents that have “designation” value equals “Author”, but updateOne() will update the first document that matches the condition. This operation is carried by using the following code:
Code
var url = "mongodb://127.0.0.1:27017/";
MongoClient.connect(url, FUNCTION(err, db) {
IF (err) throw err;
var dbo = db.db("linuxhint");
var cond = { designation: "Author" };
var ch_val = { $set: {designation: "Internee", STATUS: "new hiring"}};
dbo.collection("staff").updateOne(cond, ch_val, FUNCTION(err, res) {
IF (err) throw err;
console.log("Successfull!! The status is updated!!");
db.close();
});
});
Image
You can run the “updateone.js” file by using the following command in the terminal:
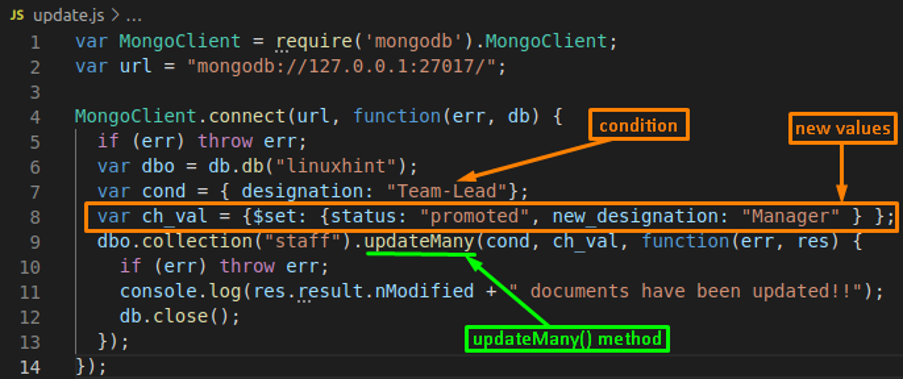
Update Multiple documents: To update multiple documents, MongoDB provides support of the updateMany() method. We will use this method in this section as well.
A new file (update.js) is created that resides inside the “node-mongo” directory. We are updating only those documents that have the designation field value “Team-Lead” and the following code will help us in this regard:
Note: The operation is applied on the “staff” collection of database “linuxhint“.
Code
var url = "mongodb://127.0.0.1:27017/";
MongoClient.connect(url, FUNCTION(err, db) {
IF (err) throw err;
var dbo = db.db("linuxhint");
var cond = { designation: "Team-Lead"};
var ch_val = {$set: {STATUS: "promoted", new_designation: "Manager" } };
dbo.collection("staff").updateMany(cond, ch_val, FUNCTION(err, res) {
IF (err) throw err;
console.log(res.result.nModified + " documents have been updated!!");
db.close();
});
});
Image
Deleting documents in Nodejs and MongoDB
Like insert, and update methods, you can delete one as well as multiple documents. So, we have two possibilities here:
Delete One document: To delete a single document, you must use the deleteOne() method of MongoDB. For this, a new “deleteone.js” file is created that contains the code. The code shown below will delete the document that matches “name” value equals to “Miln“:
Image
var url = "mongodb://localhost:27017/";
MongoClient.connect(url, FUNCTION(err, db) {
IF (err) throw err;
var dbo = db.db("linuxhint");
var cond = { name: 'Miln' };
dbo.collection("staff").deleteOne(cond, FUNCTION(err, obj) {
IF (err) throw err;
console.log("one document deleted!!");
db.close();
});
});
Code
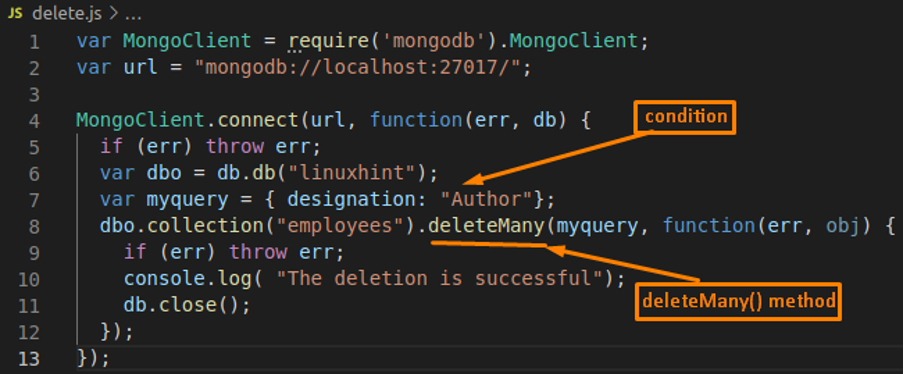
Delete Multiple documents: MongoDB provides support to delete multiple documents at once and one can use the deleteMany() method to do so. We have created a new file “delete.js” and this file is placed in the “node-mongo” directory. The code that will delete multiple documents, upon successful execution of the command. The command looks for the documents where the “designation” field equals “Author“.
Note: The database name used in this example is “linuxhint” and the collection used here is “employees“.
Code
var url = "mongodb://localhost:27017/";
MongoClient.connect(url, FUNCTION(err, db) {
IF (err) throw err;
var dbo = db.db("linuxhint");
var myquery = { designation: "Author"};
dbo.collection("employees").deleteMany(myquery, FUNCTION(err, obj) {
IF (err) throw err;
console.log( "The deletion is successful");
db.close();
});
});
Image
To run the “delete.js” file, execute the following command in your Ubuntu terminal:
Conclusion
Nodejs is a well-known run time environment that is primarily used for server-side programming. Whereas MongoDB is a well-known NoSQL database that stores as well as manages the stored data. In this article, we have presented a tutorial of Nodejs and MongoDB. By following this guide, you have learned to connect the MongoDB server with the Nodejs environment and some basic operations of MongoDB. Once the connection is established successfully, you can perform all MongoDB-related operations as we have demonstrated the ways, to insert, update, delete, find documents in the Nodejs MongoDB environment. This guide will also assist several programmers that are working on Nodejs and MongoDB.


