Network bridging is a category of routing that allows the creation of an aggregated network from multiple networks or network segments. You can facilitate communication between different networks using a network bridge. This article will share all the steps for creating a network bridge in CentOS 8.
Steps for Creating a Network Bridge in CentOS 8
If you want to create a network bridge in CentOS 8, then you will have to follow the following steps:
Step # 1: Identify All the Network Interfaces of Your System
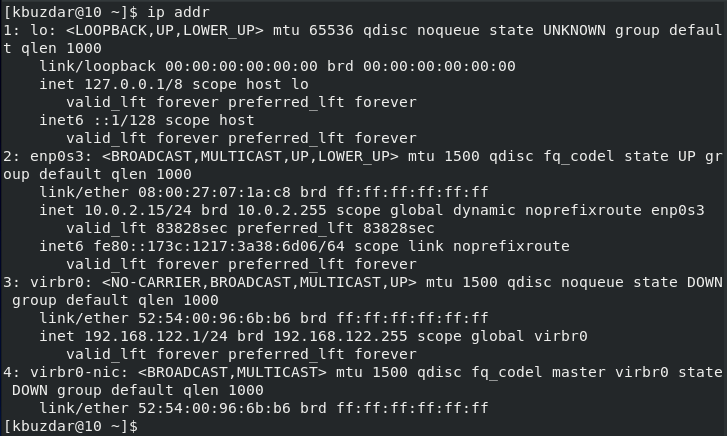
First, you need to identify all the network interfaces of your CentOS 8 system. This can be done with the help of the following command:
1 | $ ip addr |
![]()
All the network interfaces of our system are shown in the following image:
Step # 2: List Down the Active Network Connections of Your System
Now, you need to list the active network connections so you can verify that a network bridge has been added to this list later on. For this, you will have to execute the following command:
1 | $ nmcli conn show --active |
![]()
The active network connections of our system are shown below. You can see we only have two active network connections at the moment.

Step # 3: Create a New Network Bridge
Then, you can create a network bridge by running the following command:
1 | $ nmcli conn add type bridge con-name br0 ifname br0 |
![]()
If this command executes successfully, you will receive the message shown in the following image, indicating that a network bridge has been successfully created:

Step # 4: Set the Static IP Address for the Network Bridge
Now, you need to set up the static IP address of your network bridge, which you will have to run the following four commands one by one:
1 | $ nmcli conn modify br0 ipv4.addresses ‘192.168.1.1/24’ |
![]()
1 | $ nmcli conn modify br0 ipv4.gateway ‘192.168.1.1’ |
![]()
1 | $ nmcli conn modify br0 ipv4.dns ‘192.168.1.1’ |
![]()
1 | $ nmcli conn modify br0 ipv4.method manual |
![]()
Step # 5: Add an Ethernet Interface to the Network Bridge as a Portable Device
After that, you must add your Ethernet interface as a portable device to your network bridge. For that, you will have to run the command shown below:
1 | $ nmcli conn add type ethernet slave-type bridge con-name bridge-br0 ifname enp0s3 master br0 |
![]()
This command will display the following message on the CentOS 8 terminal upon a successful execution:

Step # 6: Activate Your Network Bridge Connection
Now, you need to activate your network bridge connection with the command shown below:
1 | $ nmcli conn up br0 |
![]()
The output is shown in the following image, indicating the network bridge connection’s successful activation.

Step # 7: Deactivate Your Ethernet or Wired Connection
Then, you need to deactivate your Ethernet or wired connection so your network bridge can work perfectly. For that, we will use the following command:
1 | $ nmcli conn down enp0s3 |
![]()
We want to deactivate the “enp0s3” Ethernet connection. You can replace it with your Ethernet or wired connection.
The following message will indicate your particular Ethernet or wired connection has been deactivated successfully:

Step # 8: List the Active Network Connections (Verification Step)
Now, to verify the creation of a new network bridge in CentOS 8, you will have to list down all the active network connections again with the following command:
1 | $ nmcli conn show --active |
![]()
This time, you can see a third active network connection, “br0”, in this list, i.e., our newly created network bridge, as shown in the following image:

Step # 9: Display the Bridge Port Configuration and Flags (Verification Step)
Now, to display the bridge port configuration and flags, you will have to run the following command:
1 | $ bridge link show |
![]()
The following image shows the output of this command:

Pro Tip
As a pro tip, we would like to share with you the method of deactivating and deleting the newly created network bridge, which is as follows:
Step # 1: Reactivate the Ethernet or Wired Connection
First, you will have to reactivate your Ethernet or wired connection with the command shown below:
1 | $ nmcli conn up enp0s3 |
![]()
Step # 2: Deactivate the Network Bridge
Then, you need to deactivate the network bridge with the following command:
1 | $ nmcli conn down br0 |
![]()
Step # 3: Delete the Network Bridge
After that, you can delete the network bridge with the command shown below:
1 | $ nmcli conn del br0 |
![]()
Step # 4: Perform the Final Deletion of the Network Bridge
Then, you can perform the final deletion of the network bridge by running the following command:
1 | $ nmcli conn del bridge-br0 |
![]()
Step # 5: Verify the Deactivation and Deletion of the Network Bridge
You can list the active network connections to verify the network bridge’s deactivation and deletion. However, you will not be able to see your newly created network bridge in the list this time, as shown in the following image:

Conclusion
The article discussed a convenient way to create a network bridge in CentOS 8. Moreover, as a treat, we have shared the complete procedure of deactivating and deleting a network bridge in this article.