Sometimes it’s required to organize an application process and some repetitive work like sending emails, notifications, and verifications. It is possible just to have one or more editions of the same service in a load-balanced scenario. In this scenario, Kubernetes works differently. A crontab should execute only once, irrespective of the number of instances. However, it is required for crontab to run once for each process with one or more pods. CronJob is a feature in Kubernetes that addresses this issue.
We commonly utilize a cron on a server because it is simple to set up and manage. CronJobs are often used to run jobs according to a schedule. We run Cron jobs on Linux platforms. Cron jobs are handy for automating tasks that occur regularly. For instance, establishing a backup, sending emails, and so on. Instead of initiating jobs manually, you may use a CronJob object to manage their execution. To organize a job, it employs the Cron format. In essence, a CronJob is a higher-level concept that contains a Job template, a schedule (cron format), and other characteristics. In this tutorial, we are going to elaborate on the usage of cron jobs in Kubernetes.
Method to use cron jobs in Kubernetes
Before you start working on the usage of cron jobs, you must check that you have installed the Ubuntu 20.04 Linux system. Also, you must check that the minikube cluster should be installed in it. Now, you have to follow all steps to get the basic understanding and usage of cron jobs in Kubernetes
Step 1: Sart minikube cluster
To start the minikube cluster, you have to login into the Ubuntu 20.04 Linux system. After logging in, you have to reach the terminal window. For opening the terminal window, you can utilize the shortcut key of “Ctrl+Alt+T” or utilize the Ubuntu application’s search bar area. By using either of these methods, the terminal window will be open. Now, you have to write the below-listed command to start the minikube cluster simply.
During the above-written command, the system will display the version of the minikube cluster installed in it.
Step 2. Create a configuration file
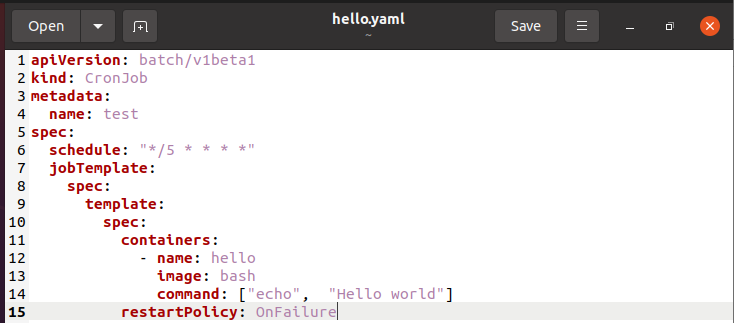
After starting the minikube cluster, you now have to create a configuration file. Using your preferred text editor, create a new file called hello.yaml. You can name your file as per your desire but make sure only to use the .yaml extension. We have created this file in the home directory. Here is a sample from the file that you may use to make a Kubernetes cron job:
You can see that we have mentioned every compulsory detail in the configuration file. The schedule time is also mentioned here.
Step 3: Run configuration file
After creating the configuration file, we can now run it in the terminal of our Ubuntu 20.04 terminal window. You have to execute the below-mentioned command in the terminal simply.
In the output of the above-executed command, you can see that the cron job has been successfully created.
Step 4: Check status
Now you have to check the status of an already created job after its creation. Write down the below-stated command in your Ubuntu terminal window.
In the command’s output, you can view the active cron jobs, the last schedule, and the age of the already created job.
Step 5. Create watch for the created cron job
Now we are ready to create a watch for our created cron job. For this particular purpose, you have to write the following command in the terminal of your Ubuntu Linux system.
From the above output shown in the attached screenshot, you can view the name, completion total duration, and the age of the cron job.
Delete the cron job from your system
When you delete a cron job, it deletes all of the jobs and pods it produced and prevents it from creating new ones. We can delete a cron job with the help of the following command. Execute it in the terminal as follows:
From the attached image, you can see the cron job has been deleted successfully.
Conclusion
In this tutorial, we taught you about the Kubernetes job scheduler. CronJob resources can be used to build jobs that need to run in the future. In most cases, a CronJob generates only one Job for each execution defined in the schedule, but two Jobs may be generated simultaneously, even though no Jobs are created at all. We have also implemented a few steps to clear the usage of cron jobs in Kubernetes. Now, I hope that you will find this tutorial very helpful while using cron jobs in Kubernetes.


