
You may sometimes find errors while using any Linux operating system such as denied while editing a file. This is because of fewer rights on that particular file. Chown is usually abbreviated as “change ownership”, which means that the Chown is an instruction for changing the owner of a group of files and folders on Linux. Moreover, you need to modify the owner of a folder that holds all of the documents in certain situations. You might have to consume recursive chown, which is one of the choices of the chown instruction. Recursive means chown will be done for all documents in the specified directory, and also files and folders inside all sub-directories. You’ll discover how to recursively modify the directory and file authorizations while using the chown instruction in this guide.
Syntax:
Example 01: Simple Chown
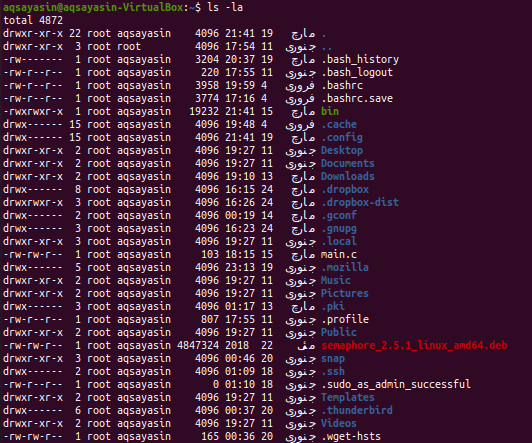
First, we need to see how the chown command works. Open the command-line terminal from the Applications. Arrange all the folders and files from the home directory of user “aqsayasin” using the list command. The output shows a list of files and folders as shown.

We have a file “main.c” in the Home directory of the user “aqsayasin”. We have to check the owner of a specific file to further apply changes. For this particular purpose, we will be using the “ls –lart” instruction. As shown below, we can say that the user “aqsayasin” is its owner and it resides in the group “aqsayasin”.
![]()
Let’s modify it by changing its owner to “root” user. We will be using the below “chown”command to do so.
![]()
Now, upon checking the file owner and group using the same “ls –lart” command, you can see the owner has been changed. The output shows that “root” user as its owner, and it belongs to the same group “aqsayasin”.
![]()
Chown Recursive Using –R Flag:
The first and easiest way is to use the -R flag to specify the recursive nature of chown instruction. Let’s first check the owners of all the files and folders residing in the Home directory of the user “aqsayasin” using the below “ls” command. From the below output, we can view that the owner of all the files except two of them is the user “aqsayasin”.

Example 01: Change Owner
Now, it’s time to change the owner of all the files and folders using the –R flag with chown query. So we will be using sudo privileges to do this. Try the below “chown” command followed by the “-R” flag along with the name of the owner which is “root”. We have provided the directory location within this instruction. This means all the files and folders residing in the “aqsayasin” folder of the “Home” directory will have an owner “root” instead of the user “aqsayasin”. It may require your root account password to apply the changes.
![]()
After the execution of the chown command, it’s time to check whether the changes have been made effectively or not. For this particular purpose, we will be using the same list command as we used before. So the output shows that all the files are changed into “root”.

Example 02: Change Group
After changing the owner, it’s time to change the group of all files and folders using the –R flag within chown instruction. First, list all the files and folders using the list command. You can observe all the files and folders lies in the group “aqsayasin”.
We will change the group to “root” from “aqsayasin”. For this, we will be using the chown command with the –R flag. There is a slight change in this command. To change the group we will be using the “:” before the group name. We will provide the location of the directory for which we want to change the group of its subfolders. Use the “sudo” keyword to apply the group name. It may require your sudo account password to apply these changes as below.
![]()
After applying the changes, we will list again all files and folders to check the update. Use the below list command to do so. You can see the group of all files and folders has been changed to “root”.

Example of Simple Chown:
Let’s take a simple example other than chown. You have to create two files name “one.txt” and “scnd.txt” using the touch command as follows:
$ touch filename2
![]()
Let’s check the owner and group of both the files using the list command as below:
$ ls –l filename2
You can see both the files have the same owner and group, e.g., “aqsayasin”.

Let’s first change the owner of file “one.txt” to “root” user using the simple “sudo chown” command followed by the owner name and file name as below:
![]()
Upon checking the first file again using the list command, you can see the owner has been changed to “root”.
![]()
Now we will assign the same rights of the first file to the second file using the “reference” in the chown command followed by the first filename. After that, you have to provide the name of the second file upon which the changes will be applied as below:
![]()
Now, check the owner and group of the second file using the same list command as shown below:
![]()
From the output below, we can see that the owner has been changed to ‘root’.
Conclusion:
We have done the chown recursive using the “-R” flag. Hopefully! You will get no problem while using this guide.