It’s not every day that you get the easy way of setting up your monitors. When using Linux, you may encounter different problems with the screens, resolutions, or even your second monitor failing to work to your expectation. If that’s the case, don’t get frustrated. There is a way out of this – using the xrandr utility.
The xrandr is a command-line Linux utility that allows you to set your display size, refresh rates, and orientation, and fix the other issues with your monitor. Today’s guide offers a hands-on tutorial on how to best utilize the xrandr utility to your needs. Let’s get started!
Displaying the Attached Monitors
Before you get to diagnose the issues affecting your monitors, you need to list first the available display monitor that is currently attached to your system. To display the available monitors, use the following arguments:
1 | $ xrandr --listmonitors |
I only have one display monitor in my case, but your case may be different.
Displaying Information About the Monitors
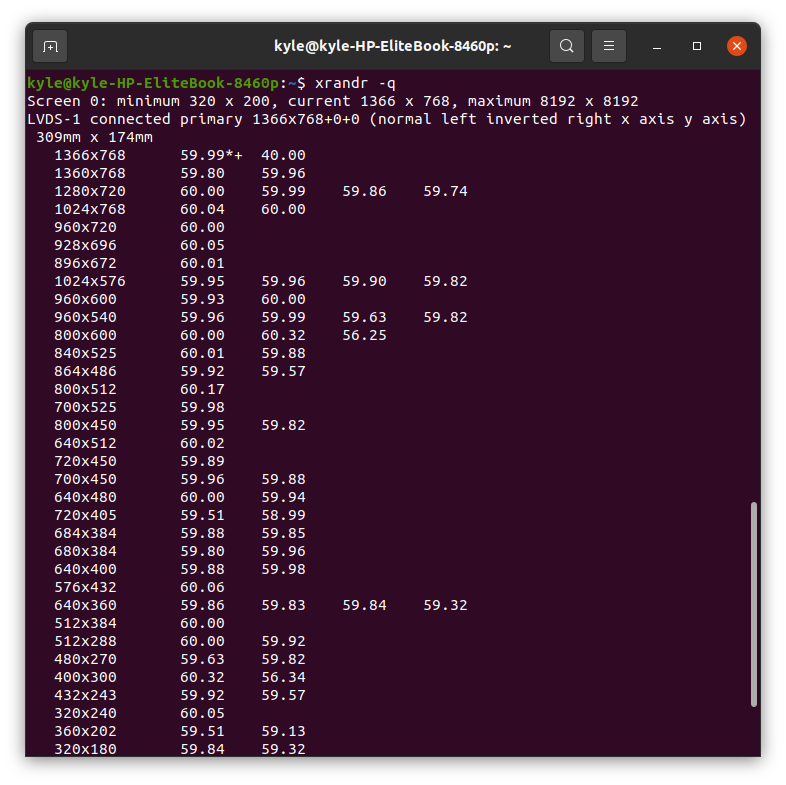
Now that we know which monitors are attached to our system, how about extracting some information about them? You can display all the available details such as resolutions, refresh rate, and how the monitors get referenced, by adding the -q flag.
1 | $ xrandr -q |
The output may seem overwhelming, but it’s simple to understand. Depending on the number of monitors you have, you should see the list of those connected and disconnected monitors at the bottom. Moreover, note that each monitor has x and y coordinates representing the display size. We will see how we can adjust these settings later on.
Note that, for each of your displays, you can view the current settings at the left of each resolution. For instance, the refresh rate displays an * next to the currently set rate.
Setting a Monitor to Receive an Output
Previously, we saw how we list the connected monitors. You can define the resolution for a specific monitor and choose to send an output to it. You only need to know the name of the monitor. For instance, if you have the DVI-D-O as your monitor, you can use the following command:
1 | $ xrandr --output DVI-D-O --mode 1024x768 |
Here, you need to replace the DVI-D-O with the name of your preferred monitor and set your preferred resolution rate.
Xrandr Setting Monitor Refresh Rate
To set the refresh rate for your monitor, you need to get the information available for your monitor. We already set the resolution to 1024×768. The refresh rate to use for the monitor is next to the resolution.
We can set our refresh rate as 60.00 for the 1024×768 resolution in the image above.
To set the refresh rate, use the –rate flag.
1 | $ xrandr --output DVI-D-O --mode 1024x768 --rate 60.00 |
Using Xrandr to Switch Off Display
Once you successfully send your output to your monitor, using xrandr, you can turn off the display of your other monitor. Besides, if you use two screens, you can turn off the other using the same command.
You need to get the monitor’s name that you need to turn off and replace its name with the one in the example. In our case, we are turning off the HDMI-1 monitor.
Use the –off flag as shown:
1 | $ xrandr --output HDMI-1 --off |
Once the command executes, the monitor will get disconnected from your laptop. If you need to restore it, run the – -auto flag.
1 | $ xrandr --output HDMI-1 --auto |
Adjusting the Monitor’s Brightness
If you prefer to reduce the brightness of your device than turning off its display, you can achieve that using the –brightness followed by the brightness level.
For instance, to set the brightness of your laptop’s monitor to 0.5, the command is as follows:
1 | $ xrandr --output LVDS-1 --brightness 0.5 |
Changing the Position of the Monitor Display
Xrandr allows you to define where you want your monitor to be positioned. For instance, if you have two monitors connected, you can set one to either the left or the right side of the screen.
Use the –right-of flag to set the screen to the right side.
1 | $ xrandr --output DVI-D-0 --right-of HDM1-1 |
The previous command sets the DVI-D-0 monitor screen to the right side and the HDMI-1 screen to the left. Use the –left-of flag to put it to the left side.
Setting the Same Display Screen
You can set the two screens to display the same. For instance, if you have two monitors, DVI-D-0 and HDMI-1, use the –same-as flag.
1 | $ xrandr --output DVI-D-0 –same-as HDMI-1 |
Conclusion
Setting up the interfaces of your monitor has never been this easy using xrandr. We’ve covered some of the things that xrandr helps you achieve. Using the examples above, you should now have the solution for your troubles. You can now comfortably manage your monitors.


