
The newer generation UEFI motherboards come with UEFI Interactive Shell. The UEFI interactive shell is a simple shell program (like bash) responsible for booting your operating system. You can also use the UEFI interactive shell to run EFI shell commands and scripts. It can be used to update the System Firmware of your motherboard as well.
This article will show you how to access the UEFI interactive shell on UEFI motherboards and use some of the common EFI commands on the UEFI interactive shell. So, let’s get started.
Table of Contents:
- Things You Need to Know
- Reading USB Thumb Drives from UEFI Shell
- Starting the UEFI Interactive Shell
- The cls Command
- The echo Command
- The alias Command
- The help Command
- The set Command
- The map Command
- The cd and ls Commands
- The cp Command
- The mv Command
- The rm Command
- The edit Command
- The exit Command
- The reset Command
- Other EFI Shell Commands
- Output Redirection
- Conclusion
- References
Things You Need to Know:
I have used 2 different prompts to write the EFI Shell commands in this article.
Shell> – I have used this prompt for the commands that you can run from anywhere.
fs1:\*> – I have used this prompt to clarify that you need to select a certain storage device (fs1 in this case) or be in a specific directory before running the commands.
Make sure you keep that in mind while you read this article.
Reading USB Thumb Drives from UEFI Shell:
The UEFI interactive shell can read USB thumb drives if you format it as FAT16 or FAT32. So, suppose you have written some EFI scripts or downloaded any EFI scripts from the official website of your motherboard manufacturer. In that case, you will have to put them in a FAT16 or FAT32 formatted USB thumb drive to access and run them from the UEFI interactive shell.
Starting the UEFI Interactive Shell:
First, shut down your computer. Then, power on your computer. Just after pressing the power button, keep pressing the <F2> or <Delete> key of your keyboard to enter the BIOS/UEFI Firmware of your motherboard.
Then, in the boot selection section of the BIOS/UEFI Firmware of your motherboard, you should find an option to enter the UEFI Interactive Shell.
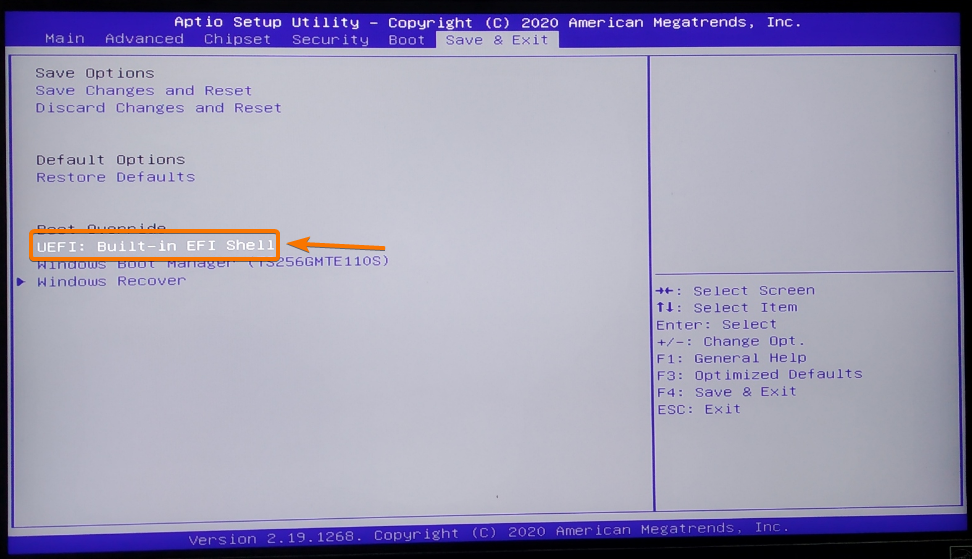
On my Odyssey X86 single-board computer, the option is in the Save & Exit > UEFI: Built-in EFI Shell, as you can see in the image below.
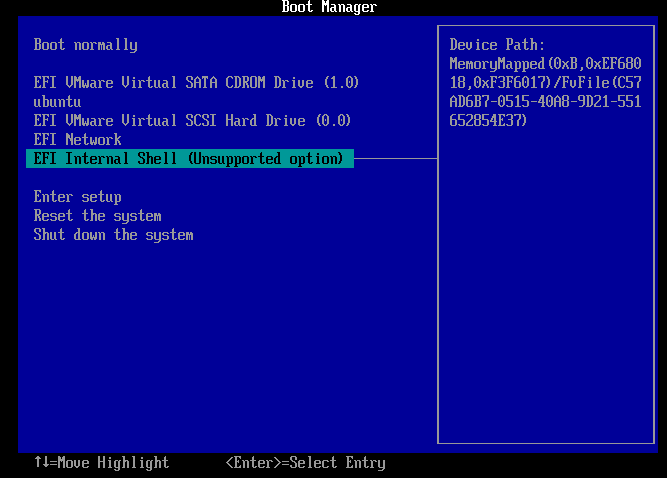
The option is EFI Internal Shell on my VMware virtual machine, as you can see in the screenshot below.
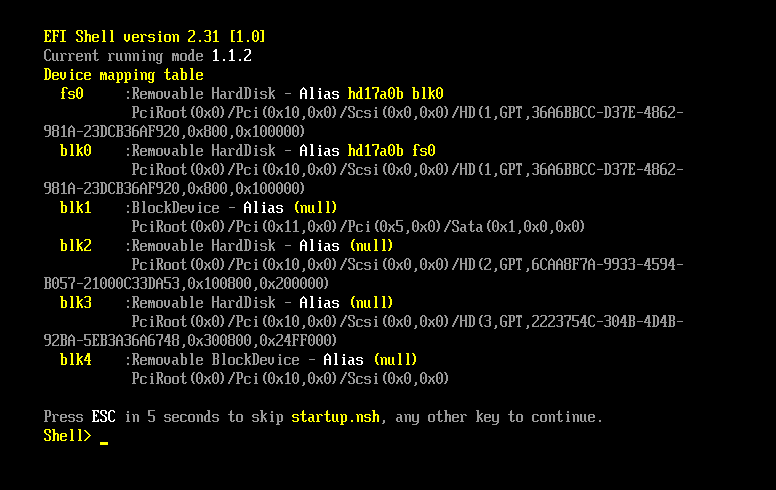
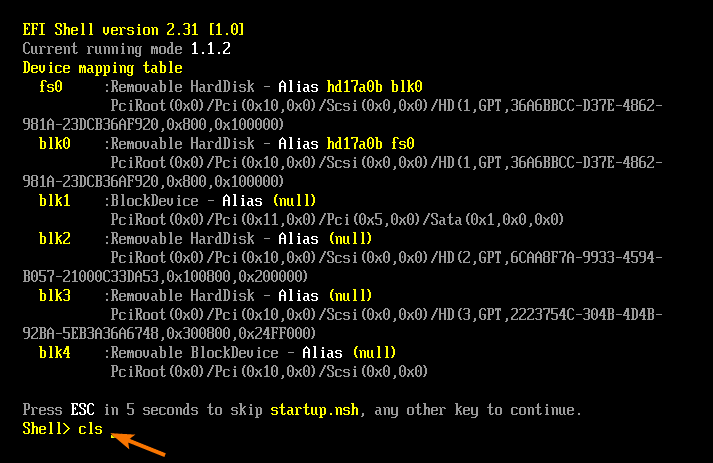
When you enter the UEFI Interactive Shell for the first time, it will print all the storage devices that your computer detected, as you can see in the screenshot below.
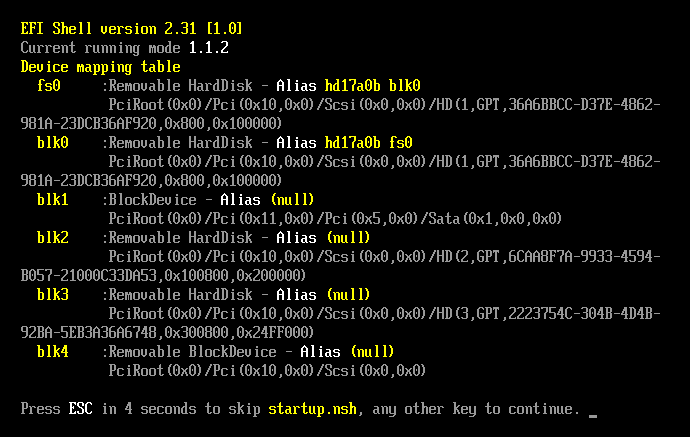
Once you press any key other than <Esc> or wait for 5 seconds, the EFI Shell should be ready to execute commands.
In the next sections, I will show you how to use some of the most common EFI Shell commands. So, let’s move on.
The cls Command:
cls command is mainly used to clear the outputs of the screen.
You may have many texts on the screen, as you can see in the screenshot below.

To clear the texts of the screen, run the cls command as follows:
The texts on your screen should be cleared.

You can also change the background color of the EFI Shell using the cls command.
To change the background color of EFI Shell, run the cls command as follows:
At the time of this writing, the cls command supports the following <color_code>.
0 – Black
1 – Blue
2 – Green
3 – Cyan
4 – Red
5 – Magenta
6 – Yellow
7 – Light Gray
For example, to change the background color to Blue (1), run the cls command as follows:
![]()
The background color should be changed to Blue (1), as you can see in the screenshot below.

To change the background color to black, run the cls command as follows:
![]()
The background color should be changed to Black (0), as you can see in the screenshot below.

The echo Command:
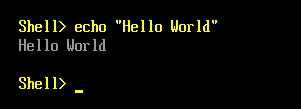
The echo command is used to print a line of text on the EFI Shell.
For example, to print the text Hello World, run the echo command as follows:
![]()
As you can see, the text Hello World is printed on the EFI Shell.
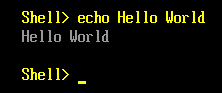
If you wish, you can choose not to use any quotes as well.
The alias Command:
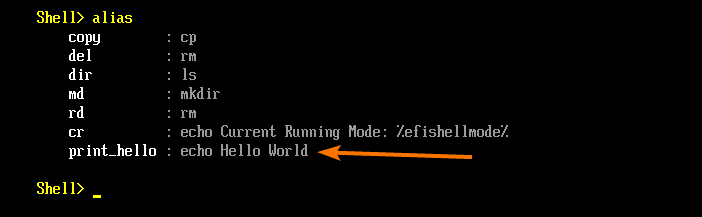
You can list all the command aliases of the EFI Shell with the alias command.
To list all the command aliases of the EFI Shell, run the alias command as follows:
![]()
As you can see, all the EFI Shell command aliases are listed.

You can also use the alias command to create or delete aliases.
To create a command alias print_hello that runs the command echo Hello World, you can run the alias command as follows:
![]()
As you can see, a new alias print_hello is created.
Now, you can run the print_hello command as follows:
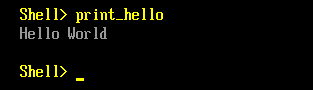
By default, the aliases you create will survive system reboots. That’s a good thing, of course. But if you don’t want your aliases to survive system reboots, you can create a volatile alias using the -v option.
You can create the same alias print_hello as a volatile alias using the -v option as follows:
![]()
You can delete an alias using the -d option of the alias command.
To delete the alias print_hello, run the alias command using the -d option as follows:
![]()
As you can see, the alias print_hello is removed from the alias list.

The help Command:
The help command is used to find EFI Shell commands using patterns.
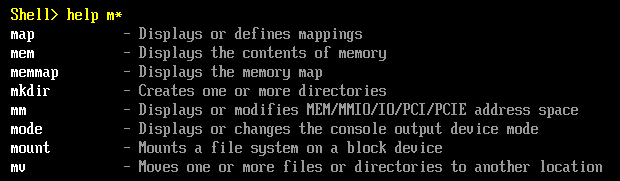
For example, to find all the EFI Shell commands that start with m, you can run the help command as follows:
![]()
All the EFI Shell commands that start with m are listed, as you can see in the screenshot below.
In the same way, you can find all the EFI Shell commands that end with m as follows:
![]()
All the EFI Shell commands that end with m are listed, as you can see in the screenshot below.

You can also learn how to use an EFI Shell command, what options they support, and what each option does use the help command. Finally, you can compare it to the Linux man command.
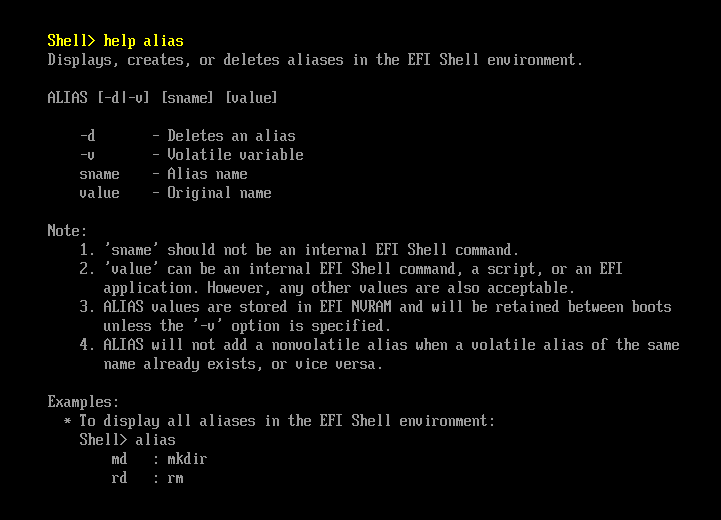
For example, to learn how to use the alias command, run the help command as follows:
![]()
A lot of information about the help command should be displayed.
If the help information of a certain command is very long, you can press the <Page Up> and <Page Down> keys of your keyboard to scroll up and down, respectively.
If the output is way too long, then you will need a pager to read it. Again, you can compare it to the Linux less program. But unlike the Linux less program, the EFI Shell pager scrolls page by page instead of lines.
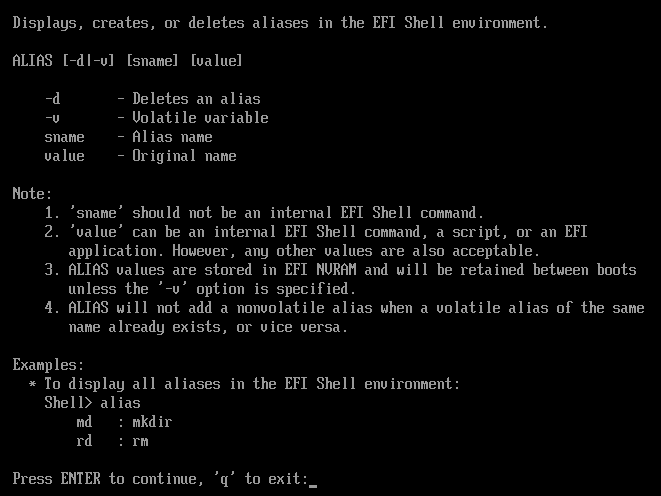
To use a pager for the help command, use the -b option of the help command as follows:
![]()
The usage information of the alias command is displayed in a pager, as you can see in the screenshot below.
You can press <Enter> to go to the next page.
To close the pager, press q and then press <Enter>.
The set Command:
The set command is used to list all the available environment variables of the EFI Shell.
To list all the available environment variables of the EFI Shell, run the set command as follows:
![]()
All the environment variables of the EFI Shell are listed, as you can see in the screenshot below.

You can also create your own EFI Shell environment variables.
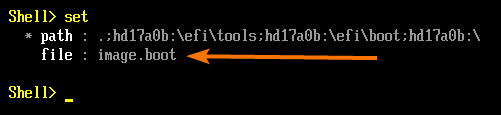
To create an EFI Shell environment variable file with the content boot.img, run the set command as follows:
![]()
The environment variable file is set, as you can see in the screenshot below.
By default, the EFI Shell environment variables you create will survive system reboots. However, you can create volatile EFI Shell environment variables using the set command’s -v option if you don’t want that.
For example, to create the same file environment variable as a volatile environment variable, run the set command as follows:
![]()
You can remove EFI Shell environment variables as well.
To remove the EFI Shell environment variable file, run the set command as follows:
![]()
The file environment variable should no longer be available, as you can see in the screenshot below.

The map Command:
The map command prints the mapping table of all the storage devices of your computer. From the mapping table, you can find the device name of the storage devices of your computer. To access a storage device from the EFI Shell, you will need the device name of that storage device.
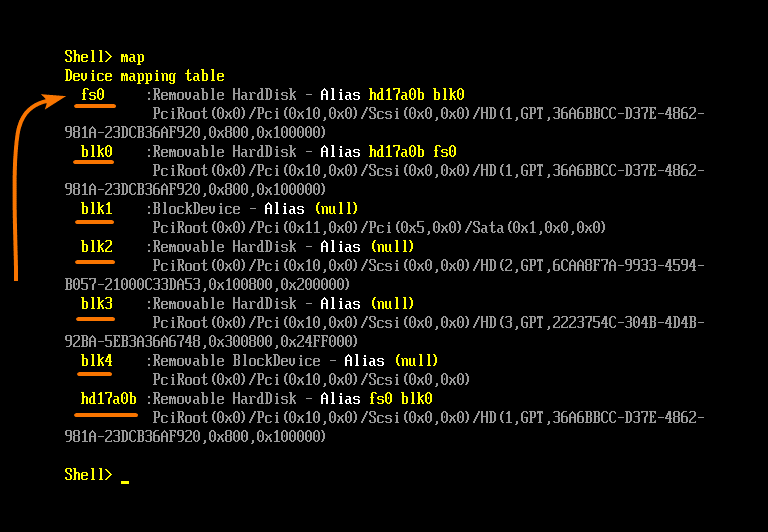
To list all the storage devices of your computer from the EFI Shell, run the map command as follows:
![]()
All the storage devices and their name should be listed, as you can see in the screenshot below.
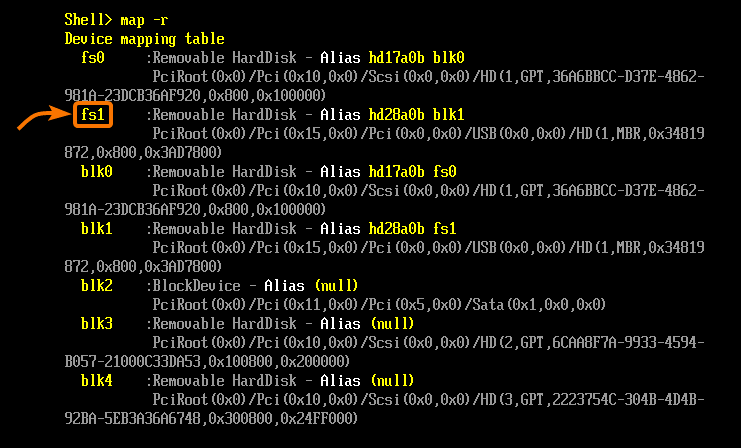
If you insert a new storage device like a USB thumb drive on your computer, it won’t automatically be listed in the mapping table. Instead, you will have to refresh the mapping table manually.
You can refresh the mapping table of the EFI Shell using the -r option of the map command as follows:
![]()
The mapping table of the EFI Shell should be refreshed, and your new storage device should be listed in the new mapping table, as you can see in the screenshot below.
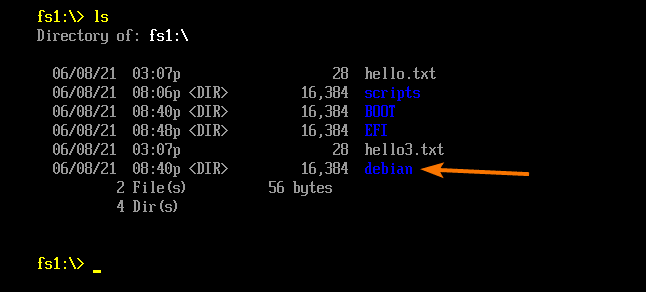
The cd and ls Commands:
You can select a storage device using the name of the storage device.
For example, to select the storage device fs1, you can run the following command:
![]()
The prompt should be changed to fs1:\> as you can see in the screenshot below.

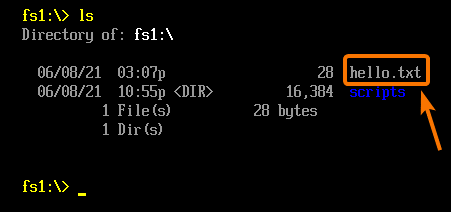
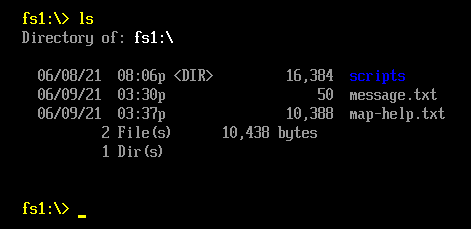
Now, you can list all the files and directories you have on the storage device fs1 (the current working directory) as follows:
![]()
As you can see, all the files and directories of the storage device fs1 are listed.

You can also use relative directory paths with the ls command to list the files and directories of that directory.
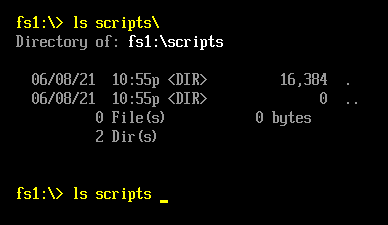
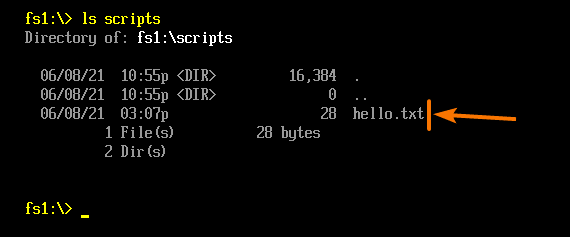
For example, to list the files and directories of the scripts\ directory (relative to your current working directory), you can run the ls command as follows:
![]()
The files and directories of the scripts\ directory should be listed.
The scripts\ directory is empty in my case.
You can use absolute paths with the ls command as well.
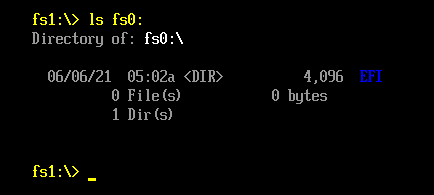
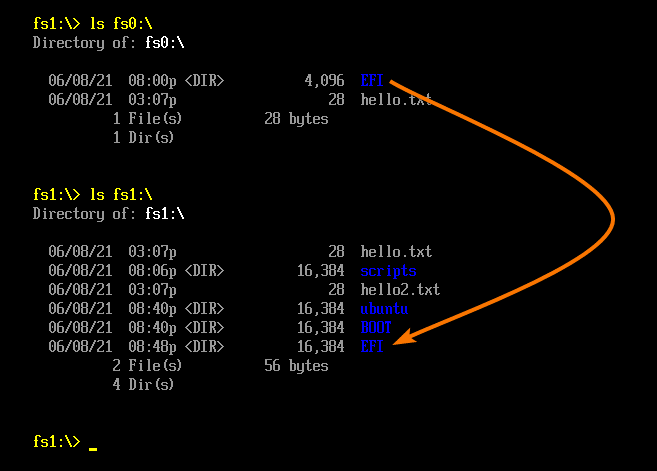
For example, to list all the files and directories of the fs0 storage device, run the ls command as follows:
![]()
All the files and directories of the fs0 storage device should be listed, as you can see in the screenshot below.
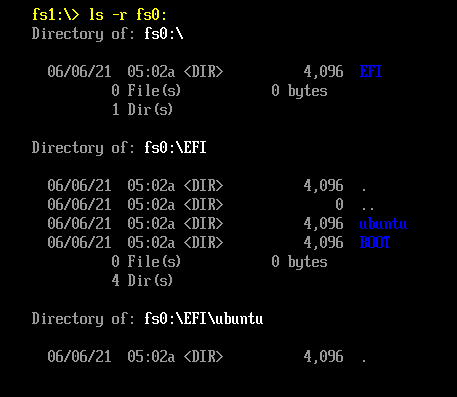
You can list files and directories recursively using the -r option of the ls command.
For example, to list all the files and directories of the fs0 storage device recursively, run the ls command as follows:
![]()
All the files and directories of the fs0 storage device should be listed recursively, as you can see in the screenshot below.
If the file and directory listing is too long to fit on the screen, you can use the -b option of the ls command to use a pager.
You can list all the files and directories of the fs0 storage device recursively and use a pager for the output as follows:
![]()
The ls command should use a pager to display the output, as shown in the screenshot below.

You can use the cd command to navigate to a different directory of your selected storage device. This will make your commands shorter as you won’t have to type in long directory paths.
For example, to navigate to the scripts\ directory of the selected storage device fs1, you can run the cd command as follows:
![]()
The current working directory should be changed to fs1:\scripts\, as you can see in the screenshot below.

To go back one directory – to the parent directory, you can run the cd command as follows:
![]()
You should be one directory upward, as you can see in the screenshot below.

The cp Command:
The cp command is used to copy files from one storage device to another or within the same storage device.
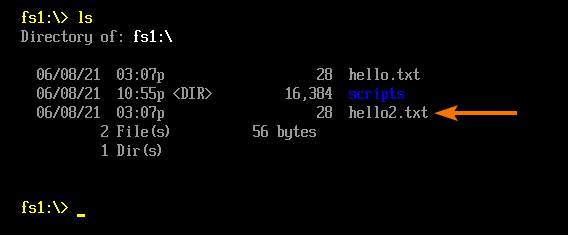
I have a hello.txt file in the storage device fs1, as you can see in the screenshot below.
To make a new copy of hello.txt, run the cp command as follows:
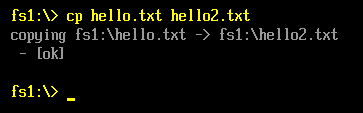
A new file hello2.txt should be created, and the contents of the hello.txt file should be copied to the hello2.txt file.
If you want to copy the hello.txt file to the scripts\ directory on the same storage device using a relative directory path, run the cp command as follows:
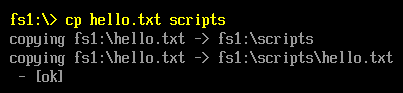
As you can see, the hello.txt file is copied into the scripts\ directory.
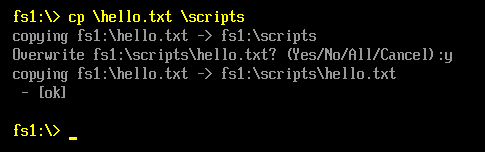
You can also use an absolute path to copy the hello.txt file to the \scripts directory as follows:
![]()
As the file already exists, the cp command will ask you whether you want to overwrite it.
If you want to overwrite the file, press y and then press <Enter>.
If you don’t want to overwrite the file, press n and then press <Enter>.
If you want to overwrite all the files that already exist, press a and then press <Enter>.
If you don’t know what to do, press c and press <Enter> to cancel the copy operation.

The hello.txt file should be copied to the \scripts directory.
In the same way, if you want to copy the hello.txt file to the root directory of another storage device fs0, you can run the cp command as follows:
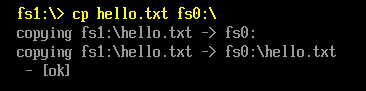
As you can see, the hello.txt file is copied to the root of the fs0 storage device.

You can also recursively copy the contents of a directory to another directory or storage device using the -r option of the cp command.
To recursively copy the contents of the fs0:\EFI directory to the storage device fs1, run the cp command as follows:
![]()
All the files and directories in the fs0:\EFI directory should be copied to the storage device fs1, as you can see in the screenshot below.
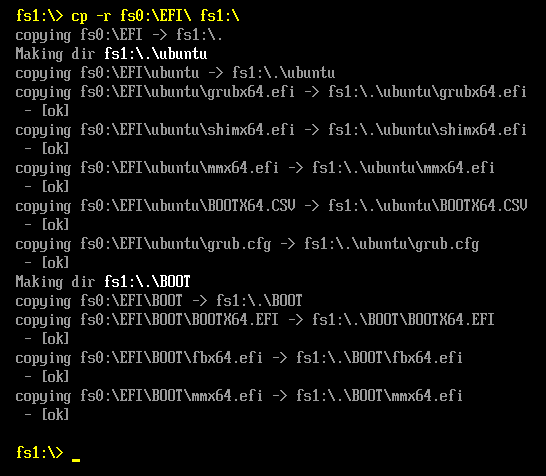
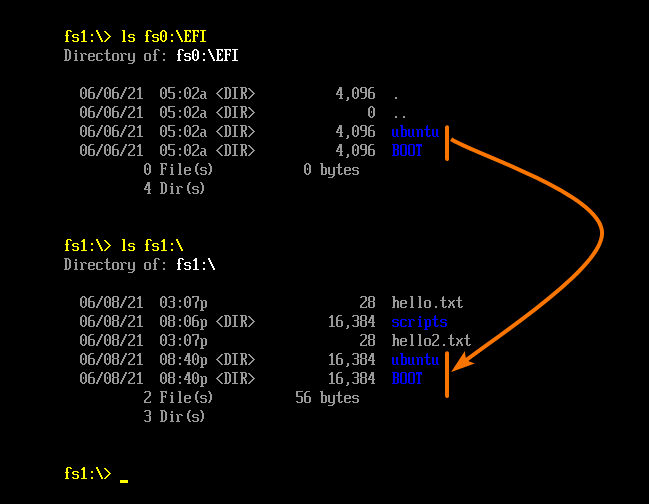
As you can see, the ubuntu\ and BOOT\ directories from the fs0:\EFI directory are recursively copied to the fs1 storage device.
Shell> ls fs1:\
If you want to copy the fs0:\EFI directory as well as the contents of that directory to the fs1 storage device, run the cp command as follows:
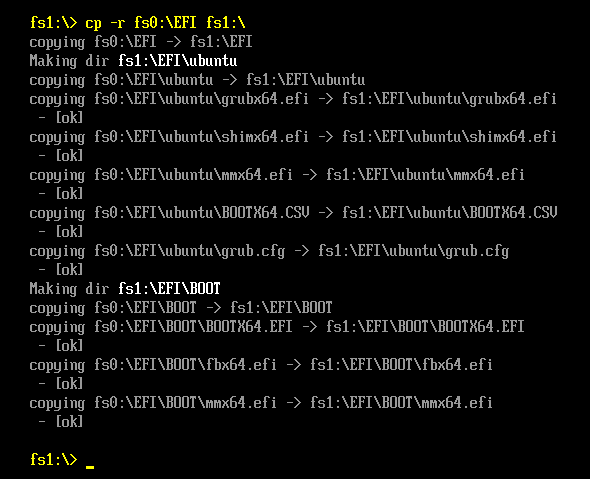
As you can see, the fs0:\EFI directory is recursively copied to the fs1 storage device.
Shell> ls fs1:\
The mv Command:
The mv command works the same way as the cp command. The only difference is that the mv command moves the files or directories from the source to the destination instead of copying them.
As the mv command and the cp command are similar, I will not explain them here. Just read The cp Command section and replace the cp commands with the mv command. You will be good to go.
There is another use case for the mv command. The mv command is used to rename files and directories as well.
For example, to rename the file hello2.txt to hello3.txt, run the mv command as follows:
![]()
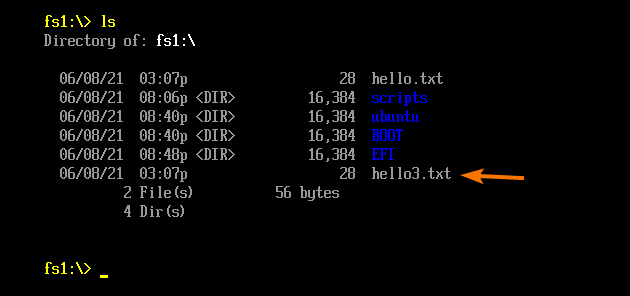
The hello2.txt should be renamed to hello3.txt.
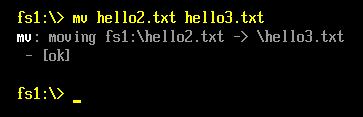
As you can see, the hello2.txt file is no longer in the fs1 storage device and was renamed to hello3.txt.
In the same way, you can rename a directory using the mv command.
For example, to rename the directory ubuntu\ to debian\, run the mv command as follows:
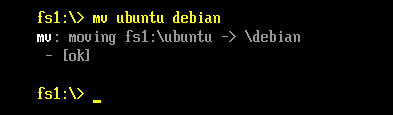
As you can see, the ubuntu\ directory is renamed to debian\.
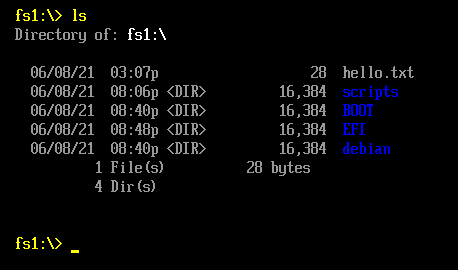
The rm Command:
The rm command is used to remove files and directories from your storage devices.
To remove a file hello3.txt from the fs1 storage device, run the rm command as follows:
![]()
The hello3.txt file should be removed.

As you can see, the hello3.txt file is not in the fs1 storage device anymore.
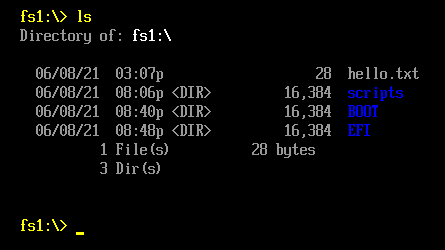
In the same way, you can remove the debian\ directory from the fs1 storage device as follows:
![]()
As you’re removing a directory that may contain other files and directories, the rm command asks you whether you want to remove them. This is a safety measure so that you don’t accidentally delete important files.
To confirm the removal operation, press y and then press <Enter>.

The debian\ directory and its contents should be removed.
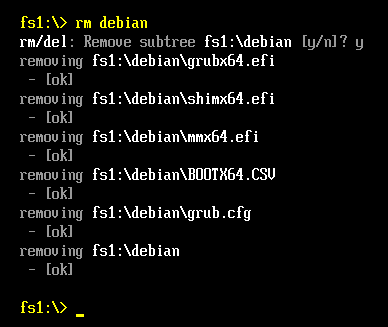
As you can see, the debian\ directory is not available in the fs1 storage device anymore.
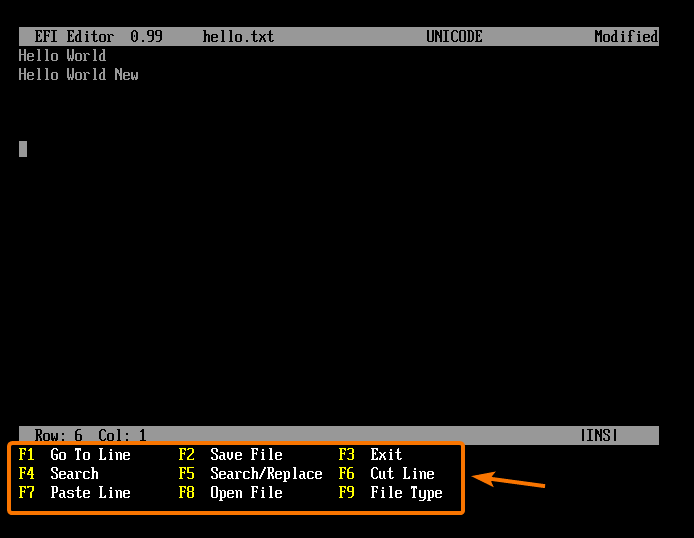
The edit Command:
The EFI Shell comes with a basic text editor program called EFI Editor. It is very useful as you can edit configuration files very easily from the EFI Shell.
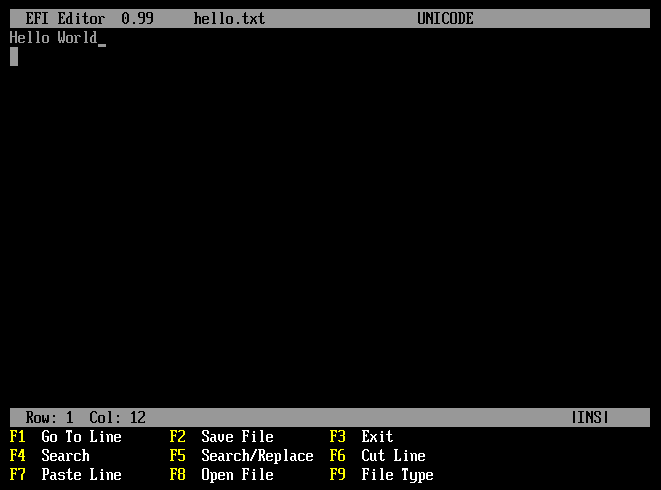
You can open the hello.txt file from the fs1 storage device with the EFI Editor program as follows:
![]()
The hello.txt file should be opened with the EFI Editor program. You can edit your text/configuration file from here.
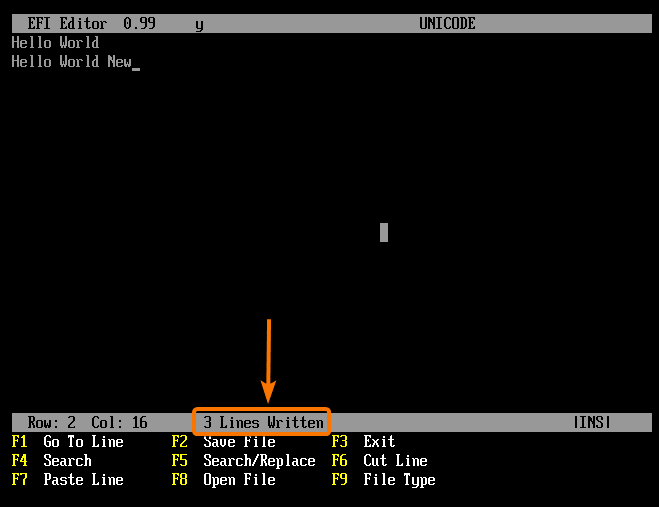
Once you’ve edited the hello.txt file, press <F2> followed by <Enter> to save the file.
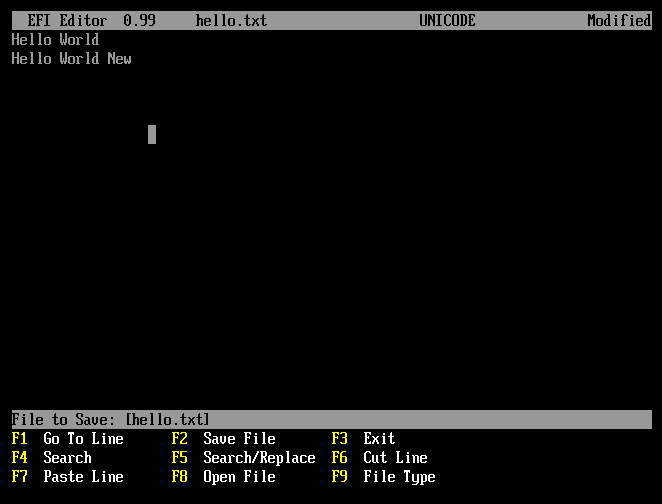
The file hello.txt should be saved.
To close the EFI Editor program, press <F3>.
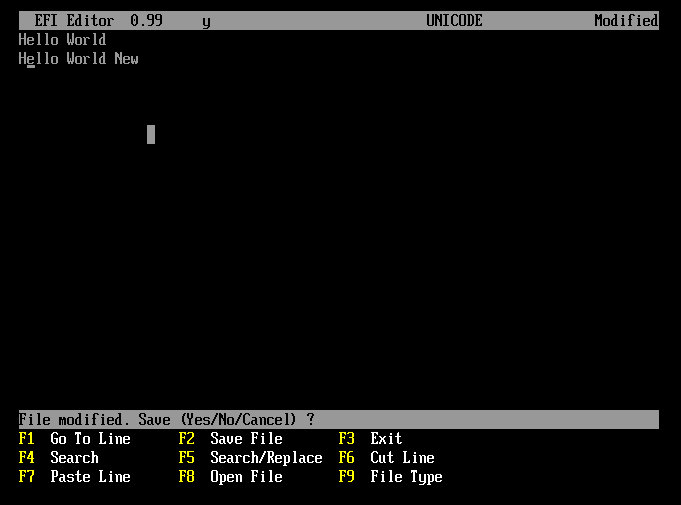
If you have unsaved changes, the EFI Editor program will ask you whether you want to save them.
Press y to save the changes and close the EFI Editor program.
Press n to discard the changes and close the EFI Editor program.
Press c if you’ve changed your mind and don’t want to close the EFI Editor program anymore.
The EFI Editor program has many other amazing features. Unfortunately, it is out of the scope of this article to show them all.
You can look at the bottom of the EFI Editor program, and you should find all the information you need to use the other features of the EFI Editor program. In addition, you can compare the EFI Editor program with the nano text editor of Linux. It’s amazing.
The exit Command:
The exit command is used to close the EFI Shell go back to the BIOS/UEFI Firmware of your motherboard.
To close the EFI Shell, run the exit command as follows:
![]()
It would be best if you were back to the BIOS/UEFI Firmware of your motherboard, as you can see in the screenshot below.

The reset Command:
The reset command is used to reset or restart your computer.
To restart your computer from the EFI Shell, run the reset command as follows:
![]()
The reset command can also be used to shut down your computer.
To shut down your computer from the EFI Shell, run the reset command with the -s option as follows:
![]()
Other EFI Shell Commands:
There are many other EFI Shell commands. It is out of the scope of this article to cover them all. But, you can read the EFI Shell documentation[1] to learn about them. You can also use the help command to find out the available EFI Shell commands. You can use the help command to read the documentation of the EFI Shell commands as well. The EFI Shell documentation is very extensive and full of information and examples. It is also very simple and easy to follow. You should not have any trouble reading it.
Output Redirection:
Just like bash and other Linux shells, the EFI Shell also supports output redirection. Thus, you can redirect the output of an EFI Shell command to a file using the output redirection feature of the EFI Shell.
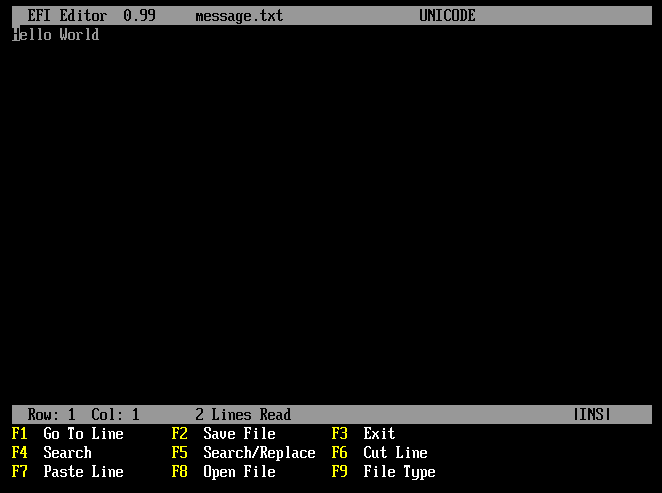
For example, you can redirect the output of the echo “Hello World” command to a file message.txt as follows:
![]()
A new file message.txt should be created, as you can see in the screenshot below.
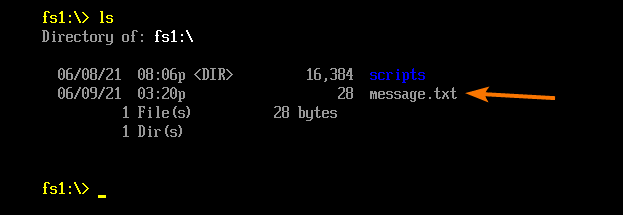
As you can see, it has the content Hello World.
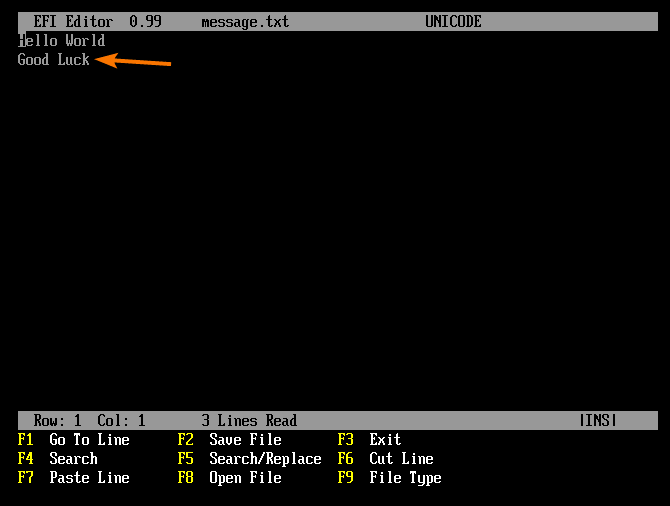
If you want to append (add to the end of a file) the output of another command echo “Good Luck” (let’s say) to the message.txt file, you can use the >> symbol instead of the > symbol as follows:
![]()
As you can see, the text Good Luck is added to the end of the message.txt file.
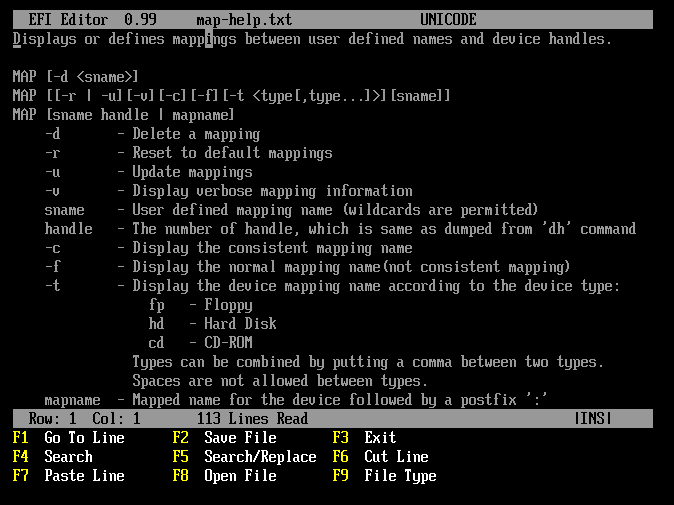
In the same way, you can redirect the output of the help map command to a file map-help.txt as follows:
![]()
As you can see, a new file map-help.txt is created.
As you can see, the output of the help map command is redirected to the map-help.txt file.
NOTE: When you do output redirection, you must remember the difference between the > and >> symbol. It is very important. If you don’t have enough knowledge of these symbols, you may lose important data.
Let’s say you’ve run the following command on EFI Shell:
Here, the > symbol will redirect the output of the command to the file. If the file does not exist, it will be created. If the file does exist, the file’s contents will be replaced with the command’s output. This is very important to remember.
Now, let’s say you’ve run the EFI Shell command above using the >> symbol as follows:
Here, the >> symbol will append (add to the end of the file) the command’s output to the file if the file exists. If the file does not exist, it will be created, and the command’s output is added to the file.
So, if the file does not exist, the > and >> symbol will do the same thing – create the file and add the command’s output to the file.
If you have many files on your storage device, it’s not too difficult to make a mistake and lose important data. So, I recommend using the >> symbol instead of the > symbol for output redirection unless you have specific requirements. Then, it will do the same thing. This way, if you make mistakes, you can always remove the extra lines that were appended to the file to go back to the previous state.
Conclusion:
This article shows you how to start the UEFI Interactive Shell and use the common EFI Shell commands. I have also shown you how to use the output redirection feature of the EFI Shell. Finally, I have shown you how to access your computer’s storage devices from the EFI Shell and how to create, copy, move, rename, and edit files from the EFI Shell. This article should help you get started with the UEFI Interactive Shell and EFI Shell commands.
References:
[1] Shell Command Reference Manual – Intel
[2] Basic Instructions for Using the Extensible Firmware Interface (EFI)