Django framework can be used to create a web application with a database by writing script in models.py and views.py files of the Django app. The data can be inserted into the database tables by using Django Administration Dashboard or by writing a script in the views.py file. Django Administration Dashboard requires a login for an authenticated user to access the tables of the database. Single or multiple records can be inserted into the database tables by writing a script. bulk_create() method is one of the ways to insert multiple records in the database table. How the bulk_create() method is used to insert the multiple data in a Django database table will be shown in this tutorial.
Prerequisites:
Before practicing the script of this tutorial, you have to complete the following tasks:
- Install the Django version 3+ on Ubuntu 20+ (preferably)
- Create a Django project
- Run the Django server to check the server is working properly or not
Setup a Django app:
Run the following command to create a Django app named bookapp.
Run the following command to create the user to access the Django database. If you already created one, then you don’t need to run the command.
Add the app name in the INSTALLED_APP part of the settings.py file.
…..
'bookapp'
]
Create a folder named templates inside the bookapp folder and set the template’s location of the app in the TEMPLATES part of the settings.py file.
{
….
'DIRS': ['/home/fahmida/django_pro/bookapp/templates'],
….
},
]
Create a model for the database table:
Open the models.py file from the bookapp folder and add the following script to define the structure of books tables. Book class is defined to create a table named books with title, author, price, and published_year fields. According to the script, title and author fields will store character data, and price and published_year fields will store the integer data. Here, the title field is defined with the unique attribute. That means that the value of the title field will not accept any duplicate data.
models.py
from django.db import models
# Define the Book class for the books table
class Book(models.Model):
title = models.CharField(max_length=100, unique=True)
author = models.CharField(max_length=100)
price = models.IntegerField()
published_year = models.IntegerField()
Run the makemigrations command to create a new migration based on the changes made by the models.
Run the migrate command to execute the SQL commands and create all tables in the database that are defined in the models.py file.
Modify the content of the admin.py file with the following content. Here, the Book class of the models is registered using the register() method to display the books tables in the Django administration dashboard.
admin.py
from django.contrib import admin
# Import Book model
from .models import Book
# Register Book model
admin.site.register(Book)
Create a template file named DisplayBookList.html inside the bookapp/templates/ folder with the following script. This script will display all data of books table in tabular form. Other than that, for loop is used in the script to iterate the data passed from the views.py file.
DisplayBookList.html
<head>
<title>
Django bulk_create() Tutorial
</title>
<style>
th { text-align:left; }
table, th, td { border: 1px solid;}
h1{ color:Blue;}
#name{ width:350px;}
</style>
</head>
<body>
<center><h1 style="margin-left:20px;">Python Book List</h1></center>
<center>
<table>
<tr>
<th>ID</th><th id="name">Name</th><th>Author</th><th>Publication Year</th><th>Price</th>
</tr>
{% for book in object_list %}
<tr>
<td>{{book.id}} </td> <td>{{book.title}}</td> <td>{{book.author}}</td><td>{{book.published_year}}</td><td style="text-align:right">${{book.price}}</td>
</tr>
{% endfor %}
</table>
</center>
</body>
</html>
Modify the content of the views.py file with the following script. The model and template names are defined in the BulkInsert class. get_queryset() method of the class is defined in the script to return all records of the books table. On the other hand, Book.objects.all() method is used to return all records of the books table. exists() method is used in the script to check the books table is empty or not. If this method returns False then five records will be inserted into the books table using the bulk_create() method.
views.py
# Import ListView module
from django.views.generic import ListView
# Import Book model
from .models import Book
# Define class for inserting multiple data
class BulkInsert(ListView):
# Define model
model = Book
# Define template
template_name = 'DisplayBookList.html'
# Read all existing records of books table
queryset = Book.objects.all()
# Check the books table is empty or not
if queryset.exists() == False:
# Insert 5 records in the books table at a time
Book.objects.bulk_create([
Book(title='Python Crash Course, 2nd Edition', author='Eric Matthes', price=15, published_year=2019),
Book(title='Automate the Boring Stuff with Python, 2nd Edition', author='Al Sweigart', price=30,
published_year=2019),
Book(title='Learning Python', author='Mark Lutz', price=15, published_year=2019),
Book(title='Head First Python', author='Paul Barry', price=45, published_year=2016),
Book(title='A Byte of Python', author='Swaroop C H', price=15, published_year=2013),
])
# Return all records of the books table
def get_queryset(self):
# Set the default query set
return Book.objects.all()
Modify the content of the urls.py file with the following script. In the script, the ‘admin/’ path is defined to open the Django Administration Dashboard and the ‘books/’ path is defined to call the BulkInsert.as_view() method that will insert five records to the books table and return the records to the template file.
urls.py
from django.contrib import admin
# Import path and include module
from django.urls import path
from bookapp import views
urlpatterns = [
# Define the path for admin
path('admin/', admin.site.urls),
path('books/', views.BulkInsert.as_view()),
]
Open the Django Administration Dashboard to check whether the data is inserted properly or not using the bulk_create() function.

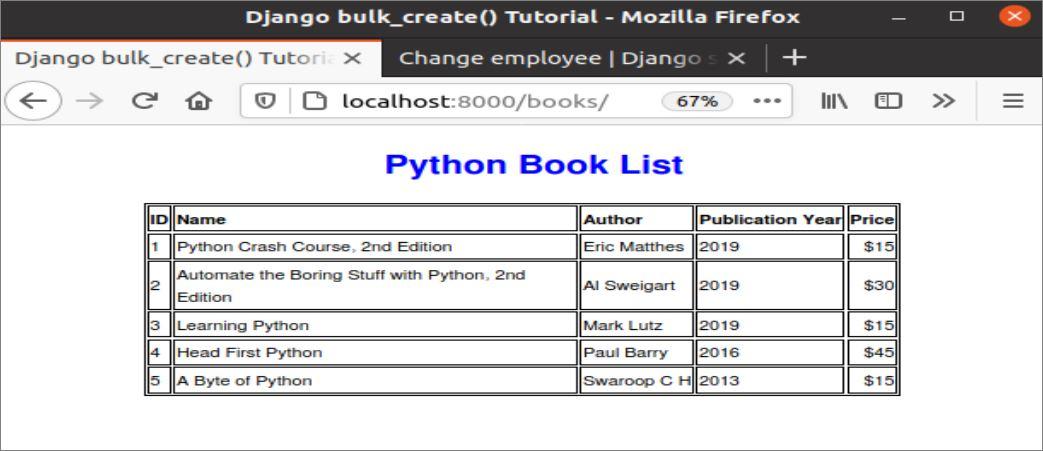
The inserted records of the books table will be displayed in the browser after executing the following URL.
Conclusion:
Multiple records can be inserted into the Django database table in different ways using the bulk_create(). A simple way of inserting multiple records in the database table using this method was shown in this tutorial to help Django users understand the logic behind the process.