
Configuring Automatic Updates:
By default, automatic update or unattended upgrade is enabled in Ubuntu 20.04 LTS.
If you want to configure automatic update, open the configuration file /etc/apt/apt.conf.d/20auto-upgrades with the following command:
![]()
Here, the first line APT::Periodic::Update-Package-Lists “1”; is used to tell APT package manager to automatically keep the package cache up to date.
The second line, APT::Periodic::Unattended-Upgrade “1”; is used to tell APT package manager to automatically update the packages.

To disable automatic update or unattended upgrade, set APT::Periodic::Update-Package-Lists and APT::Periodic::Unattended-Upgrade to 0 as shown in the screenshot below.
Once you’re done, press <Ctrl> + X followed by Y and <Enter> to save the configuration file.

Updating Package Repository Cache:
Before you attempt to install, update or remove any packages, you must update the APT package repository cache. This will update the package database of your Ubuntu 20.04 LTS machine and check if any newer version of the installed packages is available.
To update the APT package repository cache, run the following command:
![]()
The APT package repository cache should be updated. As you can see, 35 packages can be updated to new versions.

Updating Specific Packages:
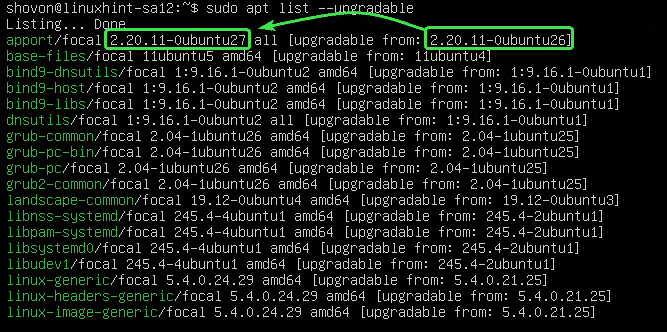
You can check the list of packages for which updates are available with the following command:
![]()
The list of upgradable packages should be displayed. On each line, the package name is printed in green text color.
On the right of each line, the older package version is printed. On the left of each line, the newer available version is printed as marked in the screenshot below.
Now, to upgrade a single package (let’s say apport), run the following command:
![]()
As you can see, apport and its dependencies (python3-apport) will be upgraded. These 2 packages are about 212 KB in size. So, about 212 KB of packages will be downloaded from the internet. Once they are installed, about 1024 B (bytes) of additional disk space will be used.
To confirm the upgrade, press Y and then press <Enter>.

The package apport and its dependencies should be upgraded.

Updating All Packages:
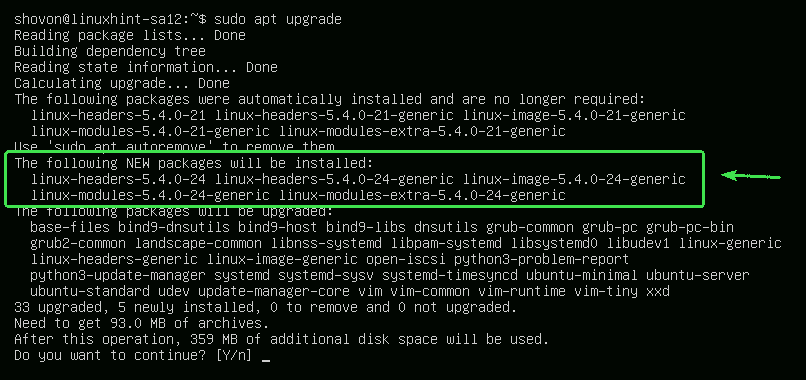
Instead of upgrading the packages one by one, you can upgrade all the available packages at once with the following command:
![]()
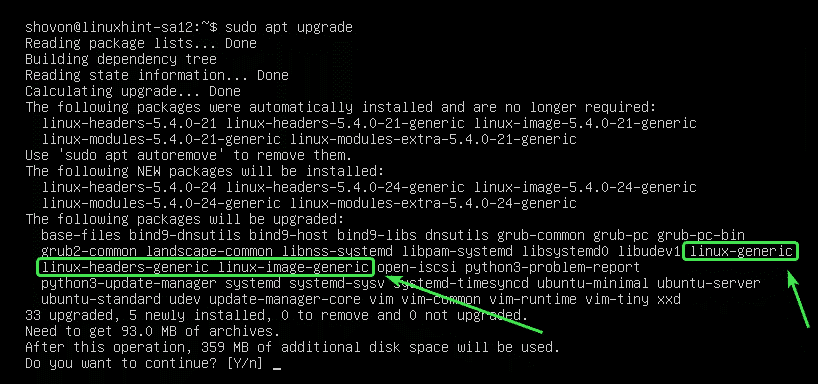
APT will show you the summary of the upgrade. Here, 33 packages will be upgraded. 5 packages will be newly installed. The upgrade is about 93.0 MB in size. So, about 93.0 MB of packages will be downloaded from the internet. After the upgrade, about 359 MB of additional disk space will be required.

APT will show you the new packages which will be installed. Mostly new kernel and kernel header packages are displayed in this section.
APT will show you the list of packages that will be upgraded.

APT will also show you the old packages that are no longer required. You can safely remove them after the upgrade is complete.

Once you’re ready, press Y and then press <Enter> to confirm the upgrade.
APT should start downloading all the required packages from the internet.

After all the new packages are installed, the upgrade should be complete.
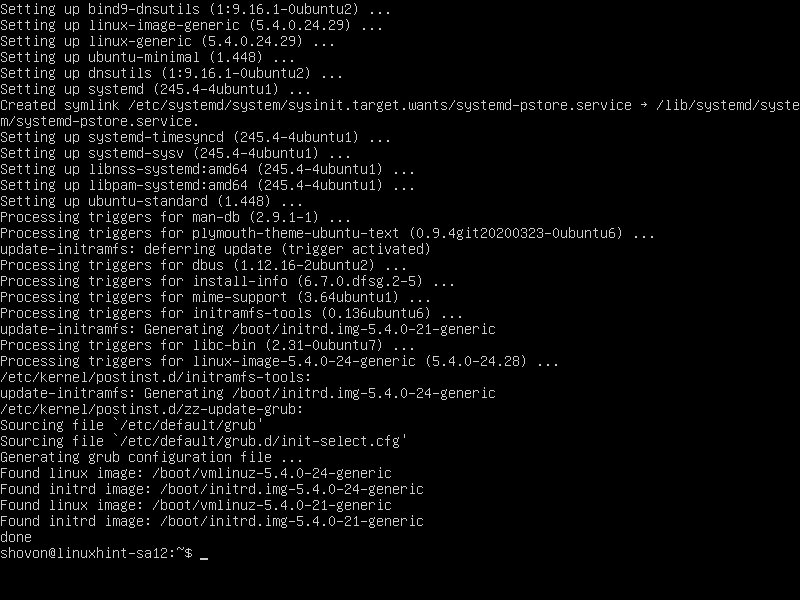
Now, reboot your computer for the changes to take effect with the following command:
![]()
Locking Packages:
You can lock specific packages if you don’t want to upgrade them when you are upgrading all the packages using the sudo apt upgrade command.
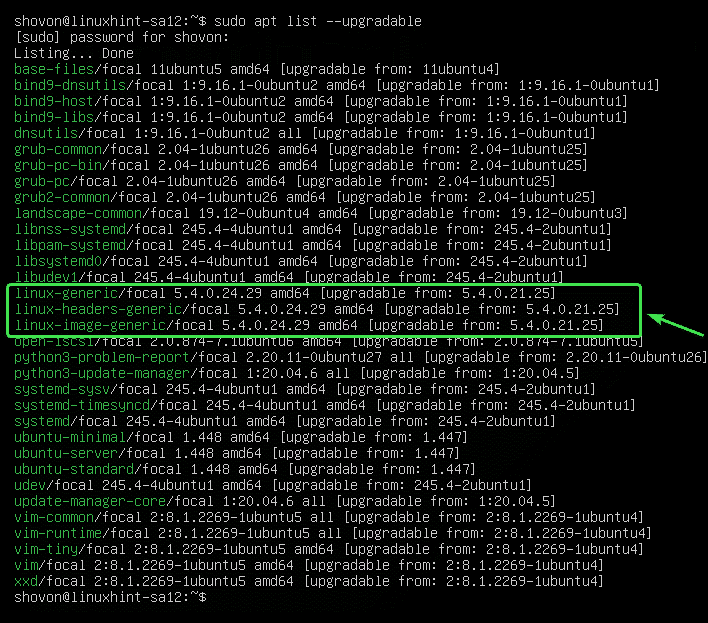
First, list all the upgradable packages with the following command:
![]()
All the upgradable packages should be listed.
Now, let’s say, you don’t want the Linux kernel packages (linux-generic, linux-headers-generic and linux-image-generic) to be upgraded. You will have to mark these packages as hold.
To hold upgrades for the package linux-generic, run the following command:
![]()
The package linux-generic should be set on hold.

The same way, you can hold upgrades for the packages linux-headers-generic and linux-image-generic as follows:
![]()
The packages linux-headers-generic and linux-image-generic should be set on hold.

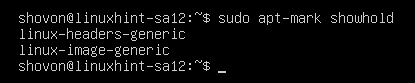
You can list all the packages which are set on hold with the following command:
![]()
As you can see, all the packages which I have set on hold are listed.

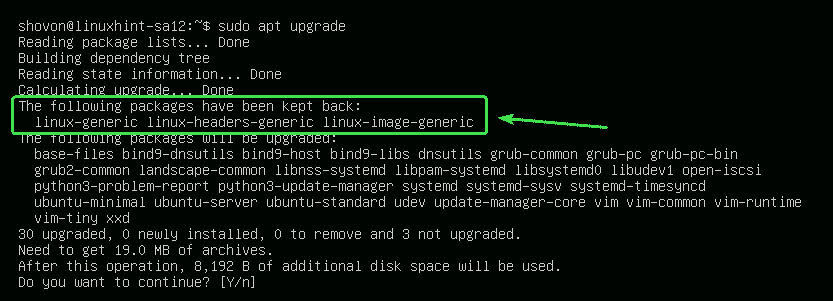
Now, try to upgrade all the packages as follows.
![]()
As you can see, the packages (linux-generic, linux-headers-generic and linux-image-generic) which I have marked as hold are not going to be upgraded with the rest of the packages.
Unlocking Packages:
If later you decide to upgrade the packages which you have marked as hold, all you have to do is unhold them.
You can unhold the linux-generic package as follows:
![]()
The package linux-generic should not be on hold anymore.

As you can see, the package linux-generic is not on the hold list anymore.
The same way, you can unhold the packages linux-headers-generic and linux-image-generic as follows:

Now, if you upgrade all the packages, the packages linux-generic, linux-headers-generic, and linux-image-generic should also be upgraded.
Removing Unnecessary Packages:
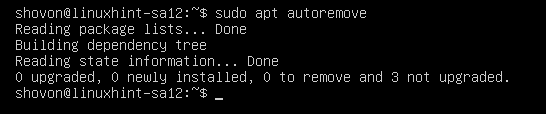
Once the upgrade is complete, you can remove all the unnecessary packages with the following command:
![]()
In my case, no unnecessary packages are available.
If you have any unnecessary packages, they will be displayed and you will be asked to removed them. Just press Y and then press <Enter> to remove them.
Cleaning Up Caches:
Once you have upgraded your computer, the newer version of packages will be cached in the /var/cache/apt/archives/ directory of your computer. You can remove them and free up disk spaces.
To remove them, run the following command:
![]()
The cached packages should be removed.

So, that’s how you upgrade Ubuntu 20.04 LTS from the command line. Thanks for reading this article.