The git users need to work with different types of files in a local repository. The file adds to the repository by using the `git add` command, and this is called staging of the file to the local repository. The user can confirm the file addition task by using the `git commit` command. But suppose the user accidentally added any file and did not want to keep the file in the repository after adding. In that case, he/she can remove the file from the stage area by using the `git reset` command or removing the file. The staging index is located at .git/index. If the user modifies the content of any added file, then the user has to re-add the file again to keep the changes or restore the file in the previous stage to undo the changes. The different ways to unstage the file of a local git repository have been explained in this tutorial.
Prerequisites:
Install GitHub Desktop.
GitHub Desktop helps the git user to perform the git-related tasks graphically. You can easily download the latest installer of this application for Ubuntu from github.com. You have to install and configure this application after download to use it. You can also check the tutorial for installing GitHub Desktop on Ubuntu to know the installation process properly.
Create a GitHub account
You will require to create a GitHub account to check the output of the commands used here in the remote server.
Create a local and remote repository
You have to create a local repository and publish the repository in the remote server to test the commands used in this tutorial. Go to the local repository folder to check the commands used in this tutorial.
Unstage file using git reset:
The way to unstage any repository file using the `git reset` command is shown in this part of the tutorial. The user can unstage all files or the particular file or the committed file using this command.
Unstage all files
Run the following command to check the current status of the repository.
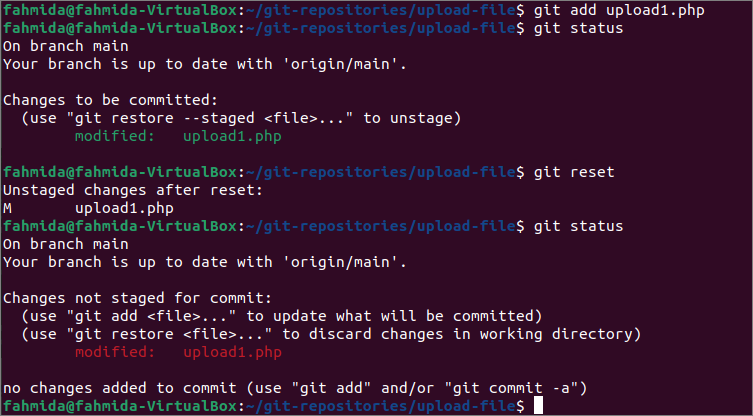
The following output has shown that the upload1.php file is modified. The modified file can be re-added, or the old file can be restored.

Run the following commands to add the modified upload1.php file in the repository, check the status, unstage all staged files, and check the status again.
$ git status
$ git reset
$ git status
The following output shows that the modified file has been stored in the stage area of the git after executing the `git add` command. The file is unstaged again after executing the `git reset command.
Unstage a particular file
The `git reset` command can be used to unstage a particular file by mentioning the file name with this command. Run the following command to check the current status of the repository.
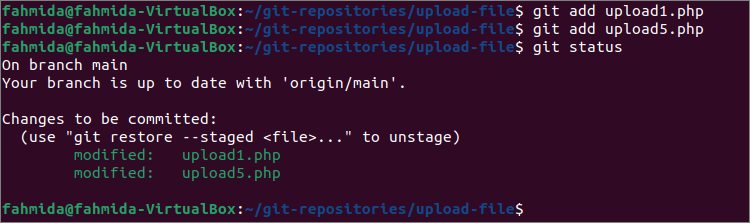
The following output shows that two files have been modified in the current repository. These are upload1.php and upload5.php.

Run the following commands to add the modified files and check the status again.
$ git add upload5.php
$ git status
The following output shows that two modified files have been stored in the stage area of the repository now.
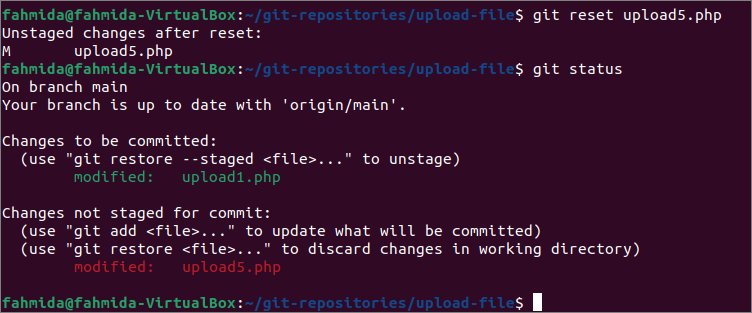
Run the following commands to unstage the upload5.php file from the repository and check the status of the repository again.
$ git status
The following output shows that upload5.php has unstaged and upload1.php has been stored in the stage area.
Unstage committed file
In the previous part of this tutorial, the `git reset` command has used to unstage the uncommitted files of the repository. The way to unstage the committed file has shown in this part of the tutorial.
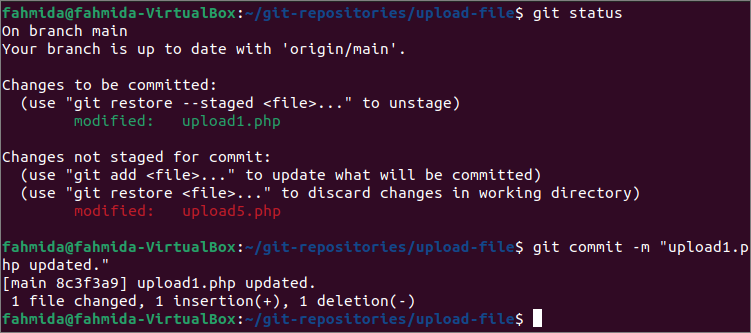
Run the following command to check the status of the repository and commit the staged file with the commit message.
$ git commit -m "upload1.php updated."
The `git status` output has shown that the upload1.php file is stored in the stage area, and upload5.php is not staged. Next, the upload1.php file has been updated by using the `git commit` command.
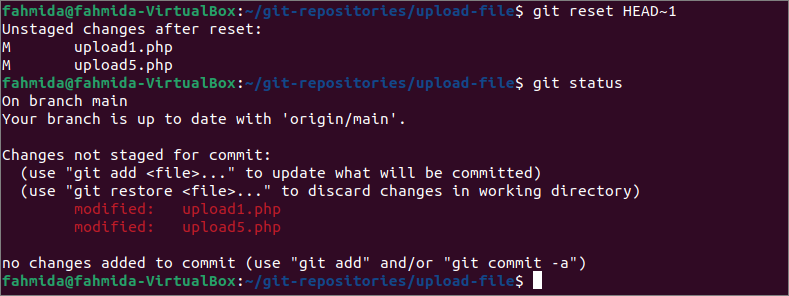
Now, run the following command to unstage the last committed task and check the status of the repository again.
$ git status
The following output shows that the upload1.php file committed before is unstaged after executing the `git reset command.
Unstage file using `rm` command:
Using the `git rm` command is another way to unstage the file of the repository. Run the following command to add the modified file named upload1.php in the repository and check the current status of the repository.
$ git status
The following output shows that the upload1.php file has been stored in the repository stage area and can be committed now or restored in the previous stage.

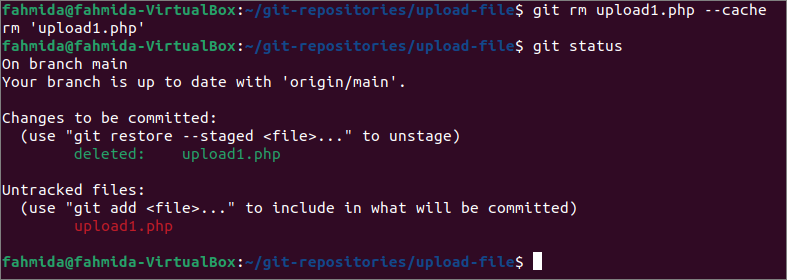
The `git rm` command is used to remove any file permanently from the repository. But if the user wants to unstage any file without removing the file from the repository using the `git rm` command, then the –cache option will be required to use with the `git rm` command. Run the following commands to unstage the upload1.php file by keeping the file in the repository and checking the repository’s status.
$ git status
The following output shows that upload1.php has unstaged, but the file is not removed from the repository.
Conclusion:
Two different ways to unstage files of the repository have shown in this tutorial by using a local demo repository. The `git reset` and `git rm` commands have been used to unstage the staged files to help the git user apply the unstage command in their repository.