The command-Line interface allows one to execute complex processes related to file navigation, installation, and management by typing a few statements in its terminal. No other operating system does a better job at showing this other than Linux distributions.
Although the command terminal is already versatile on its own, you can add to the work efficiency by using a terminal multiplexer.
One of the most common terminal multiplexers out there is tmux. tmux comes with a lot of features that aid in managing multiple terminal sessions in a single instance. It also offers a lot of customizability to ensure that your work sessions include styles and shortcuts to your liking.
tmux also allows you to remotely execute commands and scripts in a different window/pane with the help of send keys. This guide will help you learn how you can utilize tmux send keys. We will cover the basics of the send keys, their syntax, and how to use them.
Send keys refers to a series of keystrokes that serve as an automated instruction to one of the terminal panes in the tmux window. By using send keys, you can automate certain processes in tmux panes.
Send keys work by simulating keystrokes in a terminal. They translate typed instructions into virtual keystrokes that can be used to execute commands.
The syntax for keystrokes in send keys is similar to the one used for configuring key binds. A detailed list of these keys is available in the tmux documentation.
The Send Keys Command
Send-keys is a subcommand for tmux. The syntax for send keys is as follows:
For example,
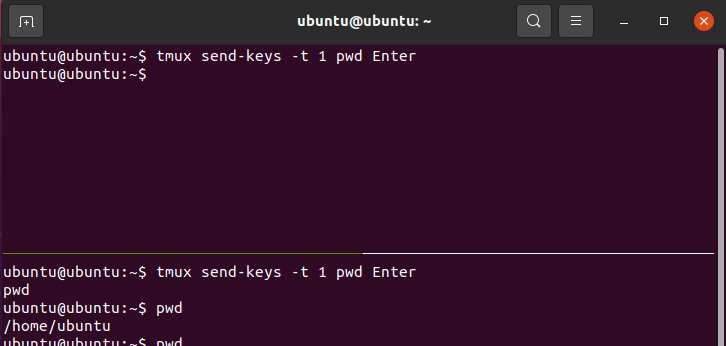
This will type and execute the $pwd command in pane 1.
tmux understands certain keystrokes like space and enter via certain reserved words. These reserved words can be viewed here.
To represent more than one word as certain characters, it is necessary to mark the words with double quotes as follows:
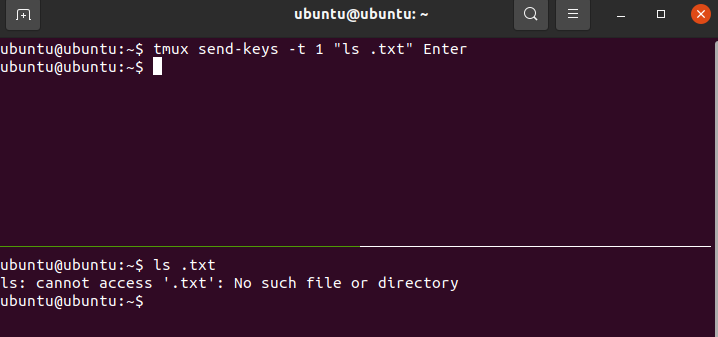
By not using double quotation marks, the following will be interpreted as “ ls.txt” in terminal pane 1.
Specifying Target Panes for Send Keys
Send keys can also be specified to certain target panes. These panes can be specified in a variety of ways, either by their number or their relative position on the tmux window. You can also use send keys to automatically execute commands on panes that are present in a different window altogether.
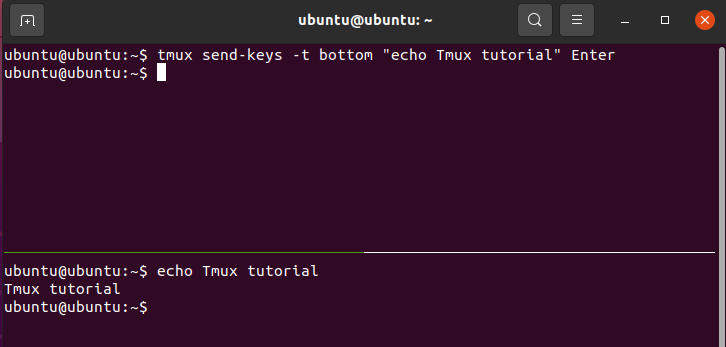
Let’s take a look at some useful commands:
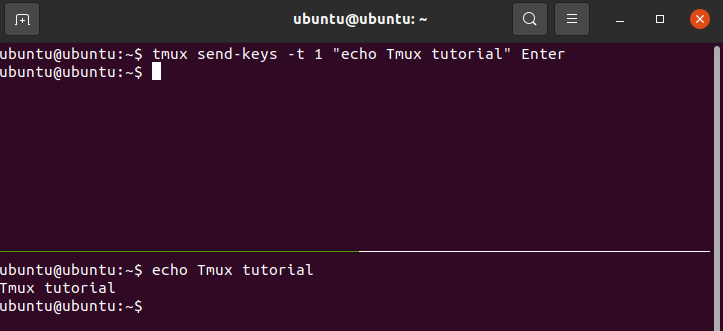
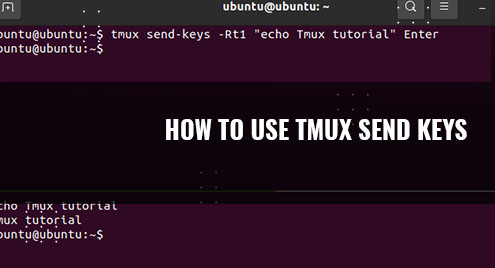
This will echo “tmux tutorial” in the pane with index 1.
Another way of specifying a pane is by highlighting its relative position in the tmux window.
It is also possible to specifically target the last active tmux pane by typing the following command:
For example,
Additionally, you can also use send keys to send instructions to a different tmux window.
For example,
By now, you should have an idea of how to implement send keys for different tmux panes and windows.
tmux Options for Send Keys
Link any other command, send keys also has its fair share of options. Knowing how to use and implement these options has its fair share of advantages.
This section of the guide will go over the available options for tmux send keys.
The first option that we’re going to cover is the -l option. This option is used to disable any reserved words for keystrokes. By using -l, you can send certain words as individual characters rather than their keyboard counterparts.
For example,

This will output tmux tutorialEnter rather than tmux tutorial
The next option that we’re going to discuss is “-r”. This option is responsible for resetting the specified terminal pane/window before executing the keystrokes.
For example,
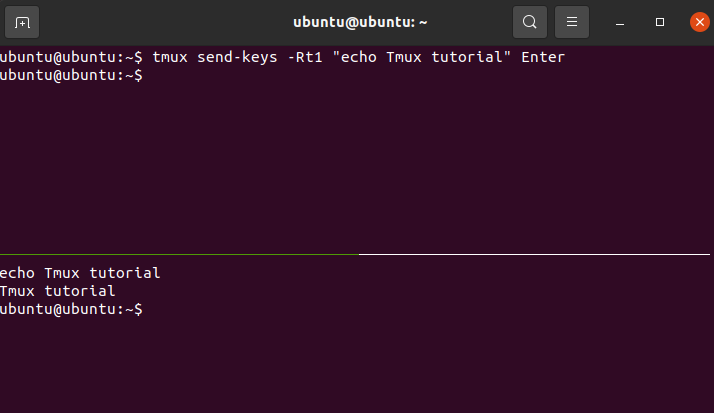
This command will reset the terminal screen before displaying the tmux tutorial as output.
Another useful option is -M. This option is specific for mouse-related keystrokes.
With this, we’ve successfully covered all useful options for tmux send keys.
Conclusion
This was a guide on how to use the send-keys command in tmux. We went over the basics of send keys, the command syntax along with ways to use it. Lastly, we covered some necessary options that can make working with send keys easier.