When developers work on team projects, they manage several local branches in their repositories. When these branches grow, they may need to work on multiple tasks parallel by switching from one branch to another all the time. For this corresponding purpose, the “$ git switch” and “$ git checkout” commands are used.
This blog will discuss:
- How to Switch Back to “master” Using “git switch” Command on Git?
- How to Switch Back to “master” Using “git checkout” Command on Git?
How to Switch Back to “master” Using “git switch” Command on Git?
To switch back to the “master” branch from another branch, the “git switch” command can be used. Follow the below-listed steps to do so.
Step 1: Switch to Root Directory
Navigate to the root directory using the “cd” command:

Step 2: List Git Local Branches
Then, execute the “git branch” command to list all the Git local branches:

Step 3: Switch to Master Branch
Finally, switch to the “master” branch from another local branch through the below command:
It can be observed that the branch has been switched successfully:

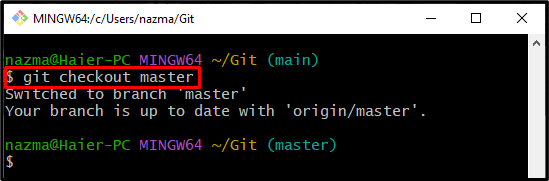
How to Switch Back to “master” Using “git checkout” Command on Git?
Another way to switch from any local branch to a “master” branch is the “git checkout” command, as follows:
That was all about switching back from another branch to a “master” branch.
Conclusion
To switch back to the “master” branch with Git, first move to the Git root directory and check the list of the local branch. Then, execute the “git switch” command. You can also use the “git checkout” command to switch to the “master” branch. This blog demonstrated the method of switching from another branch to a “master” branch.