Just like many other C++ functions, the std::move() function is unique in its functionality. As the name suggests, it has been utilized to move the value of one variable to another while deleting the value of the first variable. It can be used with or without the push_back() function of the vector library. So, let’s start the article to see if it’s working. Please create a new C++ file and open it.
![]()
Example 01:
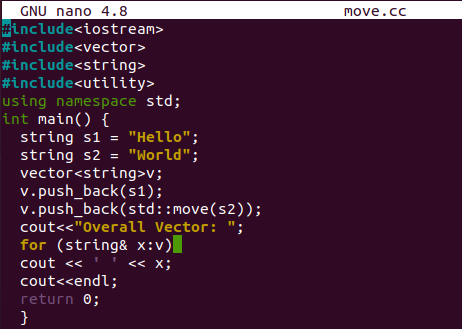
Let’s start with the first example. The main header files for this code have been added, i.e., iostream, vector, string, and utility. We need to add the standard namespace “std.” So, two string-type variables, s1 and s2, are initialized within the main() function. Here comes the vector type iterator “v” of a string type. The iterator “v” object is used to apply the push_back() function on s1. This means that the variable s1 value has been pushed to the vector’s last location. As the vector is empty, it will be inserted first. Here comes the “std::move()” to let us not create another vector object to add value to it. So, the push_back() function uses the “std::move()” function in it to move the s2 string to a vector “v” at its last location. The cout statement is here to let us know about the resultant vector. The “for” loop is utilized to get the values from the vector as a list and display them on the terminal via the “cout” clause. The code ends here. Save it and close the file to move forward.
#include<iostream>
#include<vector>
#include<string>
using namespace std;
int main() {
string s1 = "Hello";
string s2 = "World";
vector<string>v;
v.push_back(s1);
v.push_back(std::move(s2));
cout << "Overall Vector:";
for (string& x:v)
cout << ' ' << x << '\n';
return 0;
}
The code must be compiled before its execution to resolve any error. Therefore, the g++ compiler has been utilized so far. The “./a.out” everlasting instruction is here to execute our C++ code. You can see that the result shows the vector of two strings.

Example 02:
Let’s have a look at another example of using std::move() in C++ in the simplest way possible. The code is started with the same header libraries, i.e., iostream, vector, string, and utility. After that, the standard “std” namespace is necessary to avoid using the “std” keyword again and again in the code. The main() function is started with the initialization of a string variable “s” with a string value. The vector “vec” of string type is declared as empty. As there is only 1 string, the resultant vector will be constructed with this single variable. So, the push_back() function is called using the vector object “vec.” This function copies the string
“s” to be placed on the last place of a vector “vec.” It doesn’t delete the value of the “s” variable. The cout statement displays the value of string “s” on the shell after using the push_back() function. Again the same value is moved to the last location of a vector utilizing the “move” function within the “push_back()” method. The cout statement will show the value of “s” after using the “move” method. In the last, the cout clause is utilized to show the resultant vector “vec” values on the shell.
#include<vector>
#include<string>
#include<utility>
using namespace std;
int main() {
string s = "Linux";
vector<string>vec;
vec.push_back(s);
cout << "After Copy String: " << s << endl;
vec.push_back(move(s));
cout << "After Move String: " << s << endl;
cout<<"Vector Elements: {"<<vec[0]<<", "<<vec[1]<<"}"<<endl;
return 0; }

The code has been executed. Firstly, it shows the value of “s” after copying it to the vector “vec.” After using a move(), the “s” variable got empty. In the last, the vector value has been displayed.

Example 03:
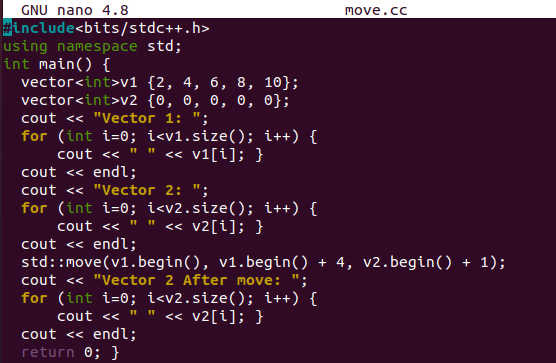
Let’s have a last but not the least example of move(). A single library and standard namespace are included. The main() function is started with the initialization of two integer type vectors, v1 and v2, having some range. The first cout statement shows that we will display the value of the first vector v1. The “for” loop is here to iterate the values of first vector v1 from its starting position to its end by using the “size” function in it. On every iteration, it displays each value from the vector. The same has been done for vector v2 to display its integer values through the “for” loop.
The std::move() function is utilizing the begin() function in it. The first parameter, v1.begin() shows the start value from vector v1 to be placed in the vector v2. The second parameter, “v1.begin() + 4,” shows the last location of v1, which we can add up in the vector v2. The third parameter, “v2.begin() + 1,” shows the starting point of the vector v2 where we have to add or replace the values. The last “for” loop is here to iterate the newly updated vector v2 and display it on the shell.
using namespace std;
int main(){
vector<int>v1 {2, 4, 6, 8, 10};
vector<int>v2 {0, 0, 0, 0, 0};
cout <<"Vector 1: ";
for (int i=0; i<v1.size(); i++) {
cout << " " << v1[i]; }
cout << endl;
cout <<"Vector 2: ";
for (int i=0; i<v2.size(); i++) {
cout << " " << v2[i]; }
cout << endl;
std::move(v1.begin(), v1.begin() + 4, v2.begin() + 1);
cout <<"Vector 2 After move: ";
for (int i=0; i<v2.size(); i++) {
cout << " " << v2[i]; }
cout << endl;
return 0; }
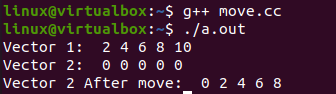
On execution, both vectors are displayed separately first. After that, the updated vector v2 shows the last 4 values updated.
Conclusion:
This article explains examples of the std::move() function in C++. We have used the push_back() function to elaborate more clearly in our codes. We have covered the concept of vectors in our codes to utilize the move function.