Such changes may result in system disconnection. Therefore, it is advised that the static IP addresses be assigned to the computer so that the IP addresses remain unchanged even after the lease duration ends. You may learn how to set up a static IP address in Ubuntu by reading this guide.
Setting a Static IP on Ubuntu
Whether it’s a wired or wireless connection, everything on your home network has an IP address. Internet Protocol is referred to as IP. A string of four integers, each separated by three dots, makes up an IP address. Each individual IP address is exclusive to that network.
IP addresses serve as digitized labels. Your router uses these labels to transmit the data to the connected devices. Your router typically assigns the IP addresses. It is aware of the available and occupied IP addresses. The router assigns one of the available IP addresses to a new device when it joins the network and requests an IP address. This is known as DHCP which is short for dynamic host configuration protocol.
A device may be assigned with a new IP address or get its old IP address again when it is rebooted or turned on and off. This is a typical behavior for DHCP, and it has no impact on your network’s normal functioning or operation. However, if a server or other computer’s IP address must be reachable in order to function, you may encounter the difficulties if the computer is powered off or restarted frequently.
Setting a static IP to a computer means pinning a specific IP address to it. As the name implies, a static IP address isn’t dynamic and doesn’t change even when the computer is powered off.
Method 1: Configuring the Static IP on an Ubuntu Server Using CLI
The Ubuntu operating system employs the predictable network interface names to denote the network interfaces. In order to configure an interface with a static IP address, we must first determine the interface’s name. We use “ip_link” for this.
This lists all the available network interfaces, including “enp0s3”, which we’ll configure.

Netplan is Ubuntu’s default network management tool, and its files are written in YAML with a “.yaml” extension. The configuration of a network interface using Netplan requires the creation of a YAML description file. Netplan then generates the required configuration files for your render tool.
Now, we open the YAML configuration file to assign an IP address.
Output :

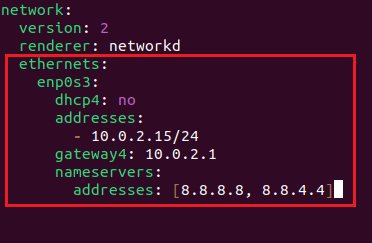
The configuration file is then opened, and the following data needs to be added:

Here are some points that you need to comprehend:
- Each Netplan YAML file is supposed to begin with “network”.
- A network must have at least two components.
- The first component is the network configuration format’s version.
- The second component is the type of device which might be either a bridge, a VLAN, or an Ethernet.
- Renders: Use the default NetworkManager or networkd as the back end (if Ubuntu OS is running in server mode).
You can define a variety of interfaces here under “ethernets.” We define “enp0s3” as a device that uses “dhcp4” to obtain an IP address. We alter the file in order to set “enp0s3” as a static IP address:
- The DHCP server “dhcp4” should be set to no.
- Specify a static IP address with IPv4 or IPv6 addresses.
- Specify the gateway.
- Set the nameserver’s IP address under nameservers.
To apply the modifications, save the file and then run this command.
![]()
Once everything is finished, check the modifications using the following:
Output:
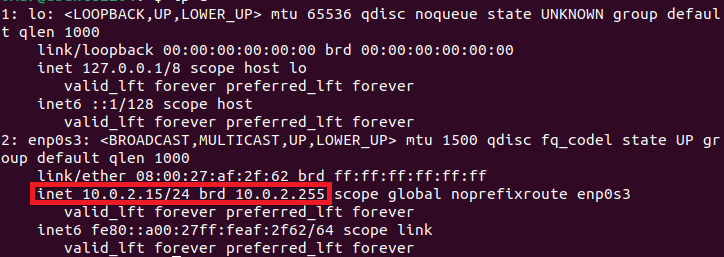
You now successfully set up your Ubuntu server with a static IP address.
Method 2: Setting a Static IP Address in the GUI for the Ubuntu Wired Connection
Changing the IP address on the wired connection in Ubuntu is identical to doing it on a Wi-Fi connection.
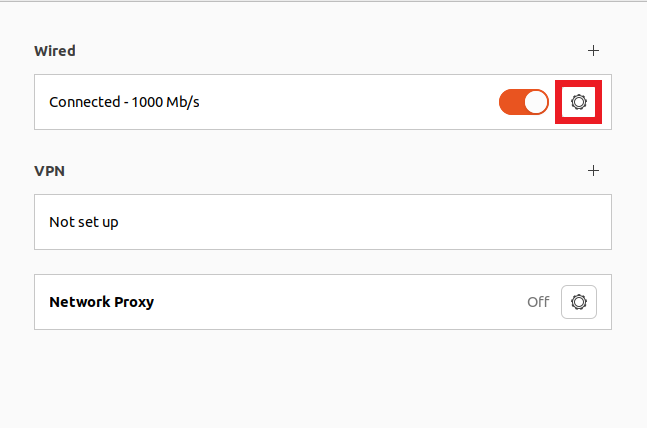
Step 1: Go to the top-right corner, click the network icon, expand the “Wired Connected” option, and then select the “Wired Settings”.
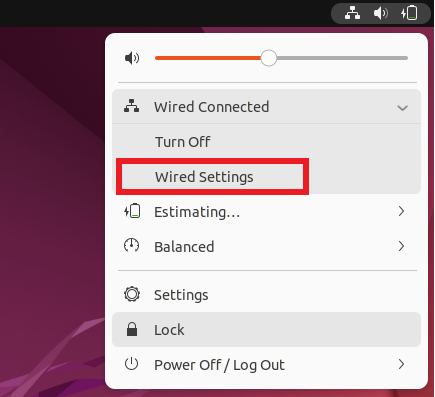
Now, the window to configure the network appears.
Step 2: Click the gear/settings icon under the wired section. The network setup is then displayed.
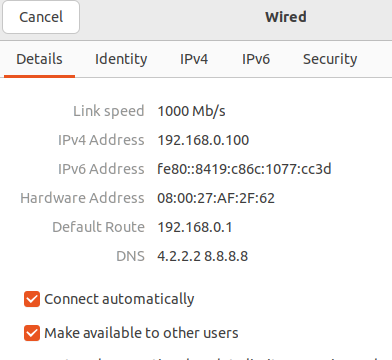
Step 3: You can view the current network setup under the “Details” tab. Click on the “IPv4” tab since we need to alter our IP.
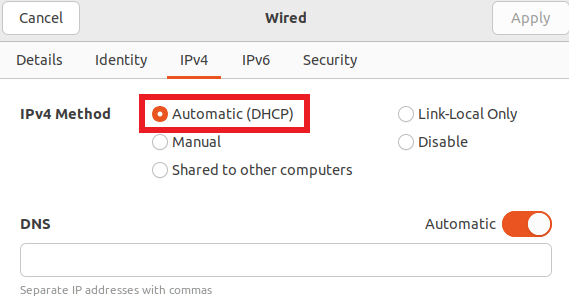
You can see that the automatic (DHCP) option is checked.
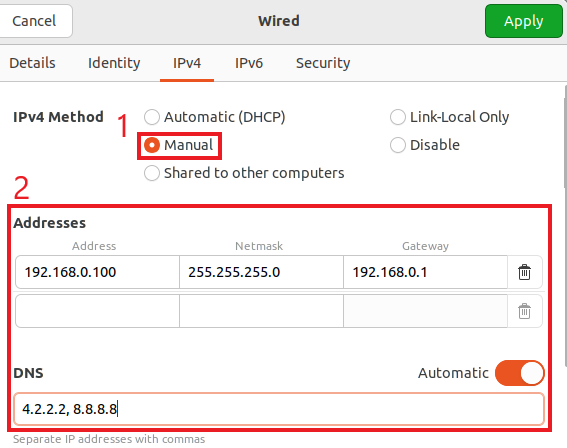
Step 4: Select the manual option, alter the IP address to the appropriate configuration, and click on “Apply”.
You will return to the network setup options after clicking on “Apply”. Toggle the wired connection on and off by clicking the switch. Then, click once again on the settings/gear icon.
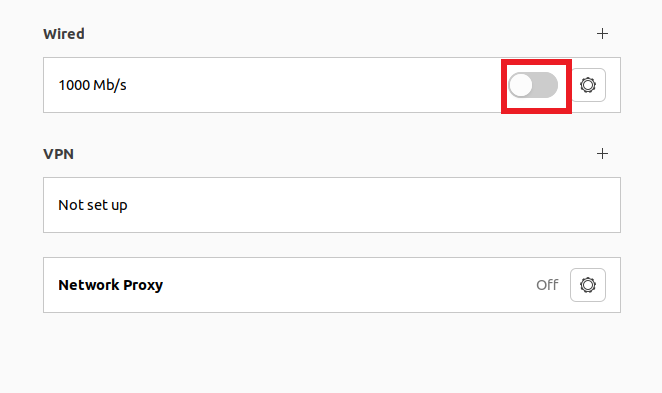
Step 5: The updated network configurations should be visible immediately.
One advantage of setting a static IP is that it prevents your computer’s IP from changing whenever you reboot it.
FAQ
Q1: Why set a static IP address for your computer?
These might be the reasons:
- To facilitate the network access to your pc from other devices
- To troubleshoot the network problems
- To access the particular services or websites that require an IP address that is fixed
Q2: How do I use the command line to set a static IP address for my Ubuntu computer?
A: To specify a static IP address for your Ubuntu computer using the command line, follow these steps:
- Open the Ubuntu terminal.
- Edit the Netplan configuration file:
sudo nano /etc/netplan/01-netcfg.yaml
- Add the following lines to the network interface that you’re trying to configure:
addresses:
- [IP address]
gateway4: [gateway IP address]
nameservers:
- [IP address for DNS servers]
- Save the “yaml” file and exit the editor.
- Apply the changes:
Conclusion
It is useful to assign the static IP addresses because they won’t change even after the lease has ended. There are several methods to accomplish this. This post demonstrated how to assign the static IP addresses using both the CLI and GUI methods. We learned that using the GUI is the simplest method because it requires little technical expertise and only a few easy steps. Following this guide, you can now set your system with a static IP address.