The socket connects programming in C is defined as the two nodes on a network that can connect and interact with one another. The other socket (node) reaches out to the first socket to establish a connection while the first socket listens on a certain port at an IP. A socket connection serves as a communication channel between two parties for sending messages. We are going to write this guide to significantly improve your understanding of the socket connection using the C programming paradigm. We will send messages between the server and the client by using the C programming concept in this guide.
Example:
The examples presented in this guide are conducted on Ubuntu 20.04. Thus, to do these examples with Ubuntu 20.04, the GCC compiler must be installed. After the GCC is installed, some C codes are written to demonstrate the use of the “socket connect”. In this example, we are going to create two different code files, one is the client-side code and the other is the server-side code. We will connect both files and send messages between them.
Server-Side Code
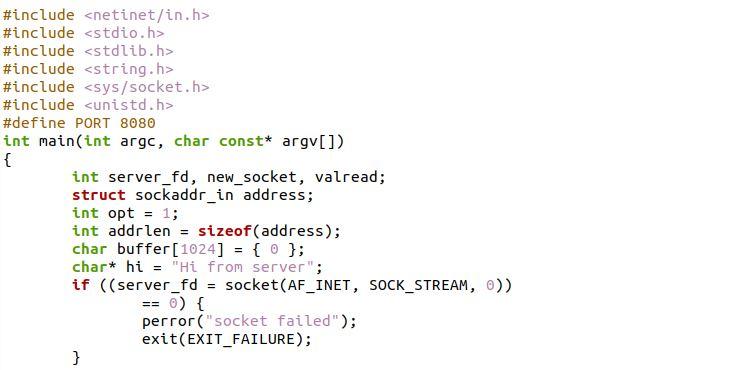
We utilize the text editor that comes with Ubuntu 20.04. First, we add the different header files as shown in the screenshot. These header files are essential for this socket-connect code. After these header files, we define the port “8080”. After this, we use the “main()” function and have the different local variables inside this “main()” function. We ceate a “buffer []” of size “1024” below these variables. The buffer is used here to send and receive the data.
Then, we create the socket inside the “if” statement. In this socket, we give the IP address as “AF_INET”. The connection type is “SOCK_STREAM” which is passed here as the second parameter and pass the “0” as the third parameter. If the given condition is satisfied, the statement below this “if” statement is executed where we put the “perror” statement which prints the error on the terminal. Then, we attach this socket to port “8080”.
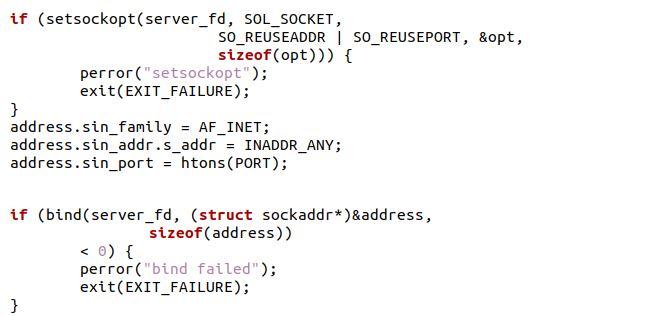
We use the “setsocketopt”. This facilitates the changing of the parameters for the socket that the file descriptor sockfd refers to. Although fully optional, this promotes the address and port reuse. Errors like “address already in use” are avoided. After this, we specify the address for the socket. It is defined in the <netinet/in.h> header file. For the “address.sin_port”, we use the “htons” which is used to convert the port number into a host byte order.
Then, we have the “bind()” function inside the “if” statement. This “bind()” function is used to bind a socket to an address. It contains three parameters. After this, we create a “valread” variable and put the “read()” fucntion. Instead of the initial file descriptor supplied by socket, the read call utilizes the new file descriptor provided by the “accept()” function. We have the “printf” statement which is used to display the data. Then, we use the “send()” function. This function is used to send the data on the sockets.
Then, we again have the “printf” statement and the “close()” function. This is used to shut down the socket and free up all the resources that are allocated to the socket. The “shut down()” function is also here to shut down the connection of the socket. In the end, we have a “return 0” statement.

Client-Side Code
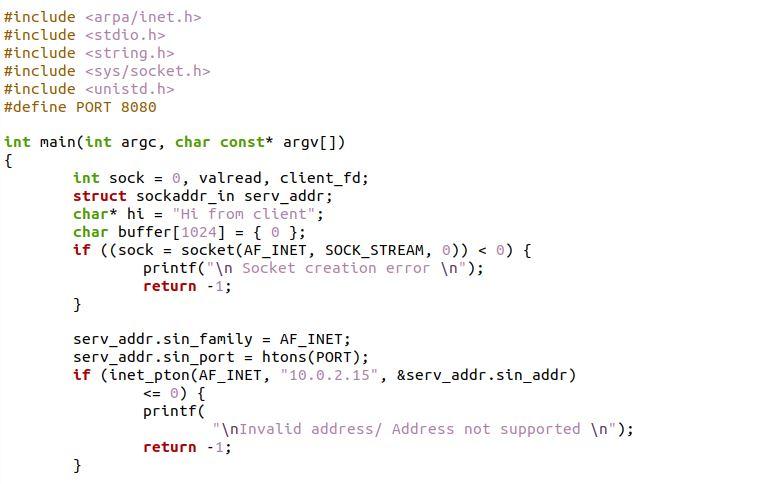
This code is similar to the previous server code. We insert the different header files which are necessary for this code. Then, we declare the “main” function. Within this “main()” function, we have various local variables. We establish a “buffer []” of size “1024” after these variables. The data transmission and reception in this case employ the buffer. We create the socket within the “if” statement. The IP address for this socket is “AF INET”. The connection type for this socket is “SOCK STREAM” which is supplied as the second parameter and “0” as the third parameter.
After this, we specify the addresses after the creation of the socket. Then, we use this address inside the “if” statement and have the “printf” statement here. The first argument we have is the “socket file descriptor”, the second argument is the host’s address, and the third argument is the address size. The “send()” function is then used. The data sent through the sockets are sent using this function. The “printf” command and “close()” function are then present once more. This is done to close the socket and release all the resources that are assigned to it.

Output:
As we are expected to run two independent codes, we must launch two separate terminals to accomplish this goal. The client-side code executes on one terminal while the server-side code runs on the other terminal. In the first terminal, we enter the following command to compile our server-side code:
By running the following command in the second terminal, we compile the client-side code in the same way:
We execute both of the codes one at a time when they are compiled. However, since the server-side code is meant to monitor the connection requests, we must execute it first. The following command can be used to execute the server-side code:
After this, the following command can be used to execute the client-side code:
After using both commands on both terminals simultaneously, we get this output which is shown in the following:

Conclusion
We presented this guide to help you understand the “socket connect” in C programming. We explained this in detail and provided examples as the output. You will be able to effectively send and receive the data between a client and server using the sockets after going through the example provided to you in this guide. This example only serves as a simple illustration on how to connect the sockets with the C programming and how the data is sent.


