The names of logical volumes can be meaningful. On a running system, volumes can be enlarged dynamically as storage space vary, and they can be readily transferred between physical devices inside the pool or exported. One of the advantages of LVM systems is the ability to efficiently and rapidly scale storage capacity. Of yet, sysadmins frequently need to scale up (increase capacity). It’s also worth noting that LVM can be used to reduce storage capacity. This means you can reduce storage capacity if it is over-allocated (you configured considerably more storage than required). In this guide, we will go over the process to shrink LVM volume in Ubuntu 20.04 system.
Method to shrink LVM volume in Ubuntu 20.04 system
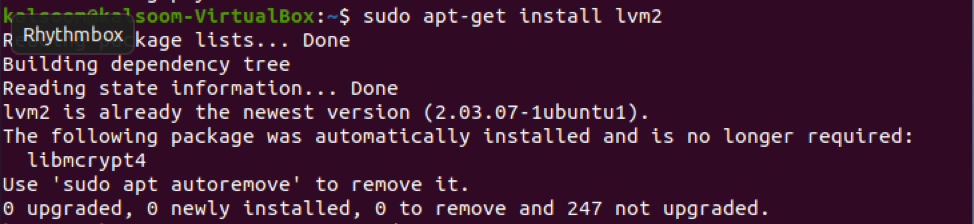
As the LVM utility is not included on the Live CD, we should first install it by executing the cited command in the terminal of the Ubuntu 20.04 Linux system.
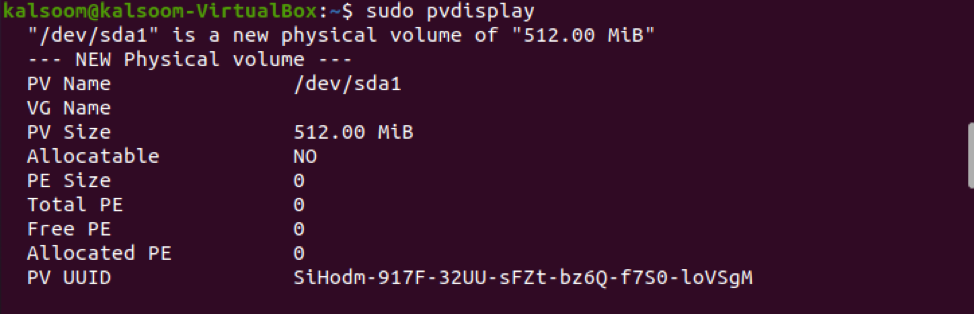
That’s always a good idea to check what physical volumes are already set up on your system. Utilize the pvs command to achieve this task.

To check out the complete information of physical volume, execute the appended command.
Forming a New Volume Group in Ubuntu 20.04 Linux system from Physical Volumes
Utilize the vgcreate instruction to establish a new volume group from LVM physical volumes. Execute the below-mentioned command to establish a new volume group in Ubuntu 20.04 Linux system.

We have created a volume group named “LVMgTEST.” You can create any other as per your work requirements. The vgscan instruction can be utilized to search for currently accessible volume groups on the system. If necessary, it additionally rebuilds the cache file. When transferring a volume group into a new system, this command is useful. To execute it as :

Creating a Logical Volume in Ubuntu 20.04 Linux system
Utilize the lvcreate command to build a logical volume from the volume group storage pool. The -L option specifies the logical volume’s size, the -n option specifies a name, and the -v option specifies the volume group from which space will be allocated.
To make a 20MB logical volume called test from the LVMgTEST volume group, for example, type the below-appended command in the terminal:

Presenting Information related to Logical Volumes
LVM has a collection of tools for displaying information about logical volumes. The lvscan option, as the other LVM elements, scans the system and provides minimum information on the logical volumes. Execute the affixed command as:

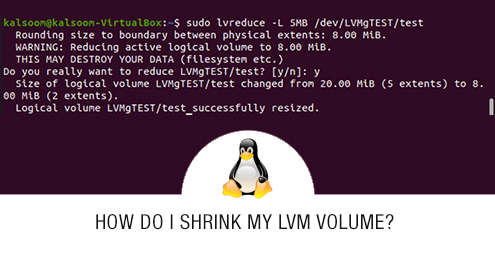
The lvreduce command can be used to reduce the size of a logical volume. Reduce this to the size of the volume that you desire, as indicated by the -L flag. So run the cited below command in the shell
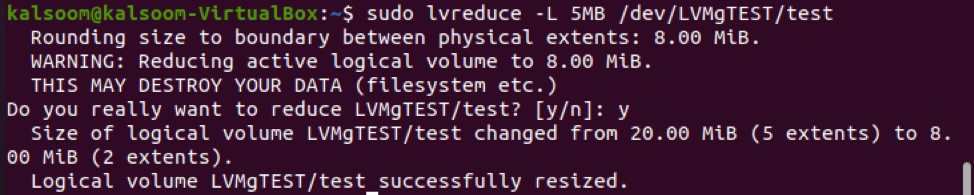
When you run the lvreduce command, you will get a warning about the size you’ve chosen to reduce to. Use this as a chance to double-check that you’re lowering the logical volume to a size that isn’t smaller than the file system size. Enter ‘y’ and hit enter once you’ve confirmed it’s okay to go forward.
Conclusion
In this tutorial, we have explained the concept of physical and logical volumes in the Ubuntu 20.04 Linux system. Also, we have created logical volume groups as well. The process to shrink LVM volume in Ubuntu 20.04 system is also elaborated. I am hopeful you will easily understand this guide and implement it conveniently.