ZFS volumes are block storage devices that work like any other storage device (HDD/SSD). You can create partition tables, create new partitions, format these partitions, create filesystems, and mount them on your computer.
You can also share ZFS volumes via the iSCSI protocol and access them from remote computers.
In this article, I am going to show you how to share ZFS volumes via iSCSI and access them from remote computers. I will be using the Ubuntu 20.04 LTS operating system for the demonstration. However, the steps shown in this article should also work on other Linux distributions with some adjustments.
Let’s get started.
Table of Contents:
- Network Diagram
- Installing tgt on the iSCSI Server
- Installing open-iscsi on the iSCSI Client
- Creating a ZFS Pool
- Creating ZFS Volumes
- Creating iSCSI Targets
- Adding ZFS Volumes to the iSCSI Targets
- Configuring iSCSI Authentication (Optional)
- Generating iSCSI Server Configuration
- Accessing Shared ZFS Volumes via iSCSI
- Automatically Mounting Shared ZFS Volumes via iSCSI
- Conclusion
- References
Network Diagram:
In this article, I will set up two Ubuntu 20.04 LTS computers: iscsi-server and iscsi-client. I will install ZFS and the iSCSI server software on the iscsi-server computer and configure it to share ZFS volumes via iSCSI.
I will install the iSCSI client software on the iscsi-client computer and configure it to access the ZFS volumes exported from the iscsi-server computer via iSCSI.
The whole setup is visualized in the figure below:

Installing tgt on the iSCSI Server:
In this section, I am going to show you how to install the iSCSI server package tgt on the iscsi-server computer.
First, update the APT package repository cache as follows:
Then, install the tgt package on the iscsi-server computer with the following command:

If you don’t have ZFS installed on the iscsi-server computer already, you may install it with the following command:

Installing open-iscsi on the iSCSI Client:
In this section, I am going to show you how to install the iSCSI client package open-iscsi on the iscsi-client computer.
First, update the APT package repository cache with the following command:

Then, install the open-iscsi package on the iscsi-client computer with the following command:

Creating a ZFS Pool:
For the demonstration, I will create a ZFS pool, pool1, on the iscsi-server computer using the vdb and vdc storage devices:
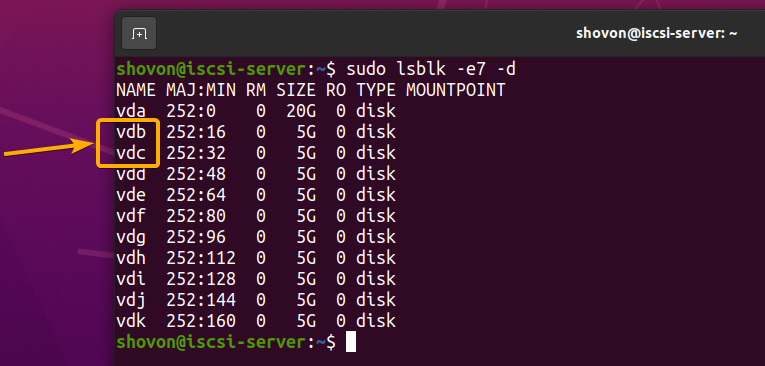
Create a ZFS pool, pool1, using the vdb and vdc storage devices in mirror configuration as follows:

A new ZFS pool, pool1, should be created on the iscsi-server computer.

Creating ZFS Volumes:
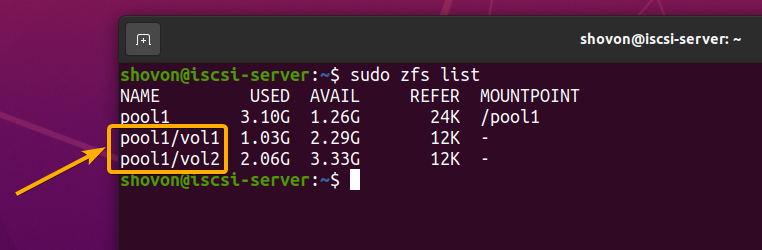
In this section, I am going to show you how to create ZFS volumes vol1 and vol2 on the ZFS pool, pool1, so that you can export them via iSCSI.
To create a ZFS volume vol1 of size 1 GB on the ZFS pool, pool1, run the following command:

To create a ZFS volume vol2 of size 2 GB on the ZFS pool, pool1, run the following command:

ZFS volumes vol1 and vol2 should be created in the ZFS pool, pool1.
Creating iSCSI Targets:
An iSCSI target is like a named container. You can put one or more ZFS volumes in there. When you access a target from other computers, all the ZFS volumes that you have placed in that container will be mounted.
iSCSI target names have a standard format:
Here:
<yyyy> – The year in 4-digit format. i.e. 2021, 2018
<mm> – The numeric month in 2-digit format. Should be in the range 01-12. i.e. 01 (for January), 08 (for August), 12 (December)
<fqdn-reverse-format> – The fully qualified domain name in reverse format. i.e. iscsi.linuxhint.com should be written as com.linuxhint.iscsi.
<unique-identifier> – It can be anything unique in your setup. For small home and office setup, you may use the ZFS pool name and volume name (i.e., pool1.vol1, pool1.vol2) or the department/branch name (i.e., engineering.pc1, account.pc2, engineering.us-1, account.uk-2) of the clients that will use these shared volumes. That should be unique enough. In a large company, you may use a unique UUID for each target.
In this section, I am going to show you how to create two iSCSI targets: iqn.2021-08.com.linuxhint.iscsi:pool1.vol1 and iqn.2021-08.com.linuxhint.iscsi:pool1.vol2. In the next section, I will show you how to add ZFS volumes to these targets.
To create an iSCSI target iqn.2021-08.com.linuxhint.iscsi:pool1.vol1 and set an ID of 1 for the target, run the following command:

In the same way, run the following command to create an iSCSI target iqn.2021-08.com.linuxhint.iscsi:pool1.vol2 and set an ID of 2 for the target:

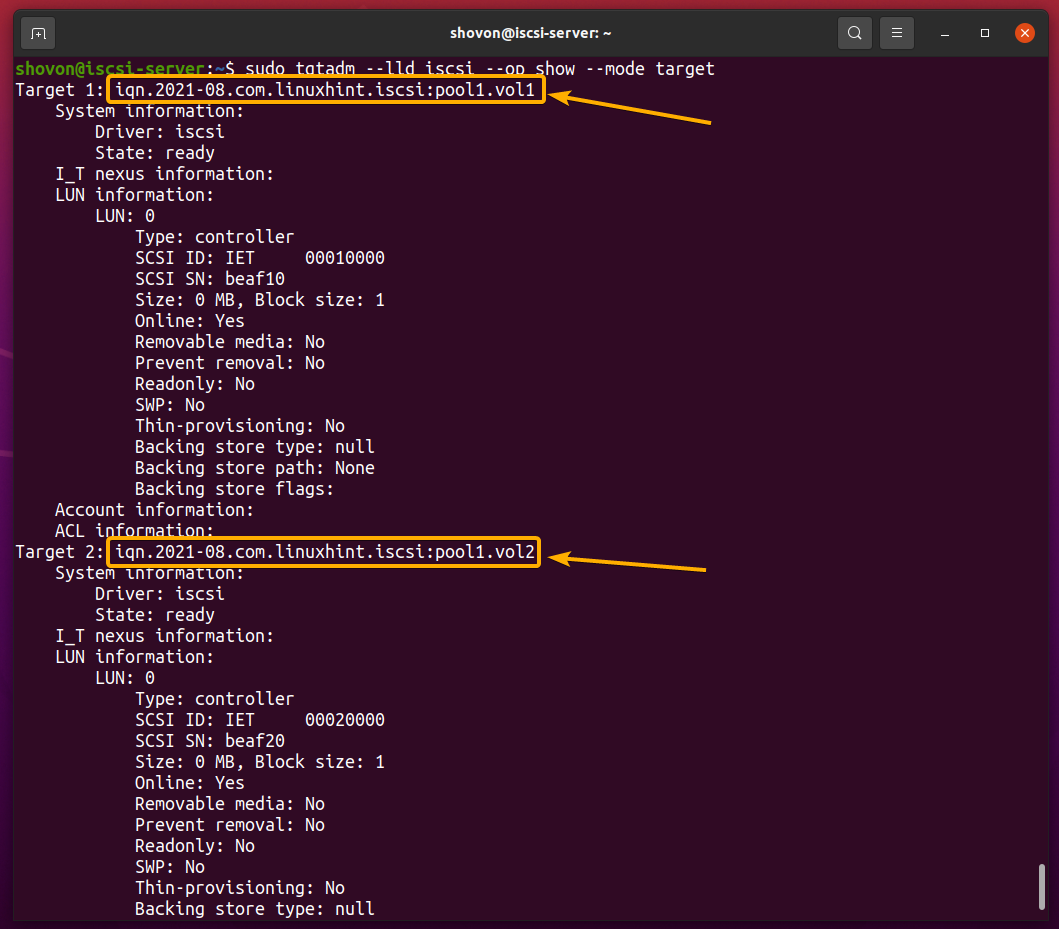
To list all the targets that you have created, run the following command:

The targets that you have created should be listed, as you can see in the screenshot below:
Adding ZFS Volumes to the iSCSI Targets:
The ZFS volumes that you will add to a target are called LUNs (Logical Units).
As previously mentioned, you can add one or more ZFS volumes in an iSCSI target. But, if you do, when you access the target from other computers, all the ZFS volumes that you have added to that target will be mounted. So, if you want to allow access to only one ZFS volume per iSCSI target, add only one ZFS volume to one iSCSI target.
In this section, I demonstrate how to add the ZFS volumes vol1 and vol2 to the targets iqn.2021-08.com.linuxhint.iscsi:pool1.vol1 and iqn.2021-08.com.linuxhint.iscsi:pool1.vol2, respectively.
Each of the LUNs in an iSCSI target has an ID starting from 0. So, the first LUN is called LUN 0. Then, the second LUN is called LUN 1, while the third LUN is called LUN 2, and so on.
By default, LUN 0 of each iSCSI target will be occupied by an iSCSI controller, as shown in the screenshot below. So, you will have to use LUN 1, LUN 2, and so on to add your ZFS volumes to the iSCSI targets.

To add the ZFS volume vol1 from the ZFS pool pool1 as LUN 1 to the target ID 1 (iqn.2021-08.com.linuxhint.iscsi:pool1.vol1), run the following command:

To add the ZFS volume vol2 from the ZFS pool, pool1, as LUN 1 to the target ID 2 (iqn.2021-08.com.linuxhint.iscsi:pool1.vol2), run the following command:

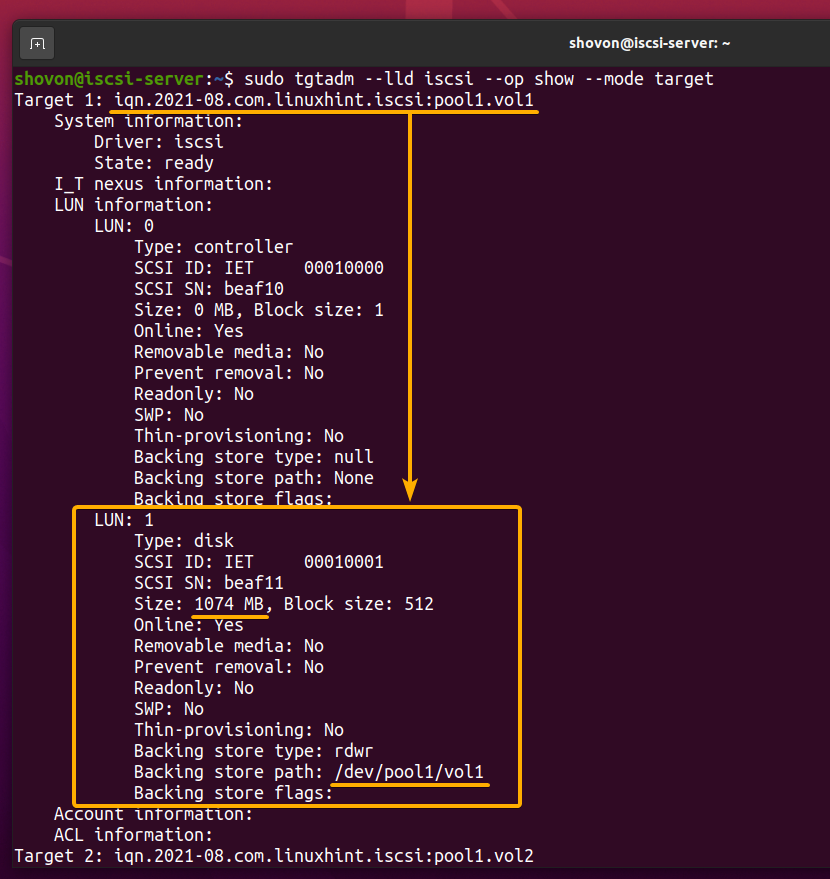
The ZFS volume vol1 should be added to the iSCSI target iqn.2021-08.com.linuxhint.iscsi:pool1.vol1 as LUN 1, as marked in the screenshot below:
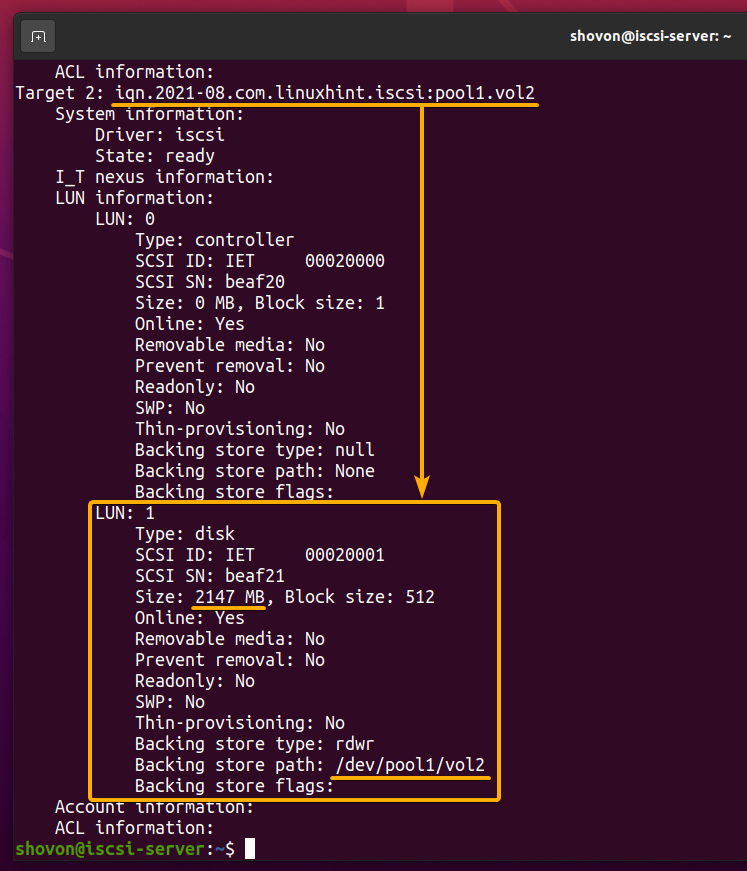
The ZFS volume vol2 should be added to the iSCSI target iqn.2021-08.com.linuxhint.iscsi:pool1.vol2 as LUN 1, as marked in the screenshot below:
Configuring iSCSI Authentication (Optional):
In this section, I am going to show you how to enable basic username and password authentication for the iSCSI targets iqn.2021-08.com.linuxhint.iscsi:pool1.vol1 and iqn.2021-08.com.linuxhint.iscsi:pool1.vol2.
You can happily skip this section if you don’t want to enable authentication for your iSCSI targets.
First, create a new iSCSI user linuxhint1 with a dummy password 123456 (you will have to change it later) with the following command:

In the same way, create another iSCSI user linuxhint2 with a dummy password 456789 (you will have to change it later) with the following command:

iSCSI users linuxhint1 and linuxhint2 should be created, as you can see in the screenshot below:

To allow only the linuxhint1 user access to the iSCSI target ID 1 (iqn.2021-08.com.linuxhint.iscsi:pool1.vol1) from remote iSCSI clients, run the following command:

In the same way, to allow the linuxhint2 user access to the iSCSI target ID 2 (iqn.2021-08.com.linuxhint.iscsi:pool1.vol2) from remote iSCSI clients, run the following command:

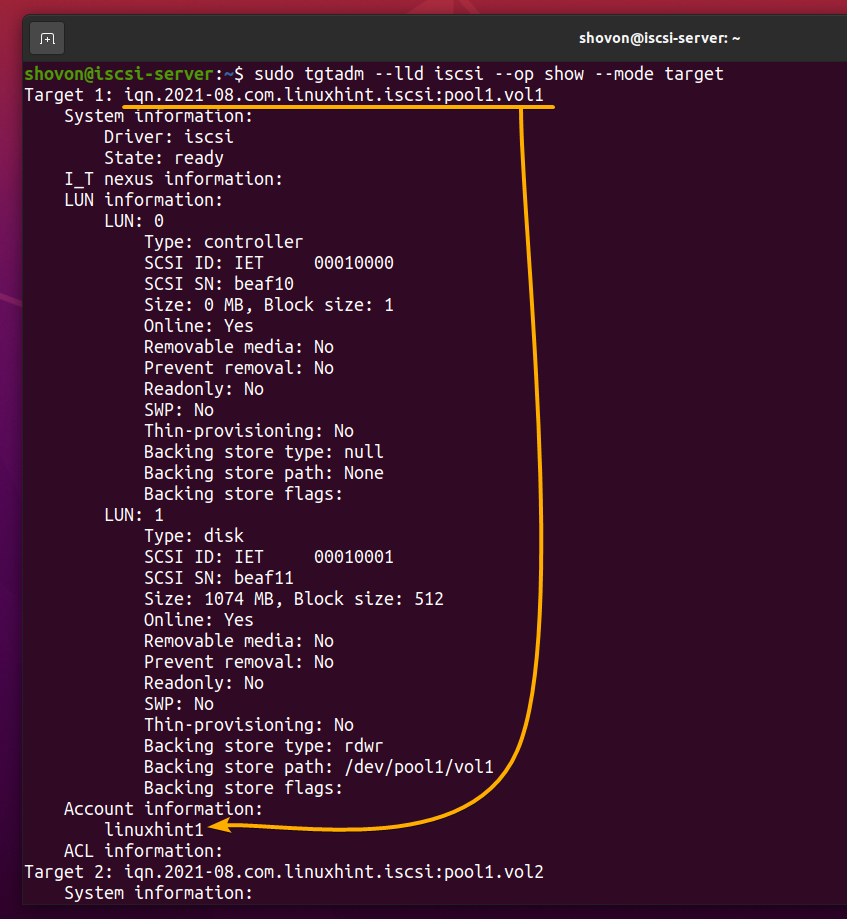
The linuxhint1 user account should be added to iSCSI target iqn.2021-08.com.linuxhint.iscsi:pool1.vol1, as you can see in the screenshot below:
The linuxhint2 user account should also be added to iSCSI target iqn.2021-08.com.linuxhint.iscsi:pool1.vol2, as you can see in the screenshot below:

Generating iSCSI Server Configuration:
In this section, I am going to show you how to generate a configuration file for the iSCSI server so that the changes you have made will be persistent and survive system reboots.
First, allow access to the iSCSI target ID 1 (iqn.2021-08.com.linuxhint.iscsi:pool1.vol1) from any iSCSI client as follows:

In the same way, allow access to the iSCSI target ID 2 (iqn.2021-08.com.linuxhint.iscsi:pool1.vol2) from any iSCSI client as follows:

Now, dump the current iSCSI server configuration to the iSCSI server configuration file /etc/tgt/targets.conf as follows:

The current iSCSI server configuration should be saved to the /etc/tgt/targets.conf file.
The user password will not be saved. So, you will have to replace PLEASE_CORRECT_THE_PASSWORD string with the user password in the /etc/tgt/targets.conf file.

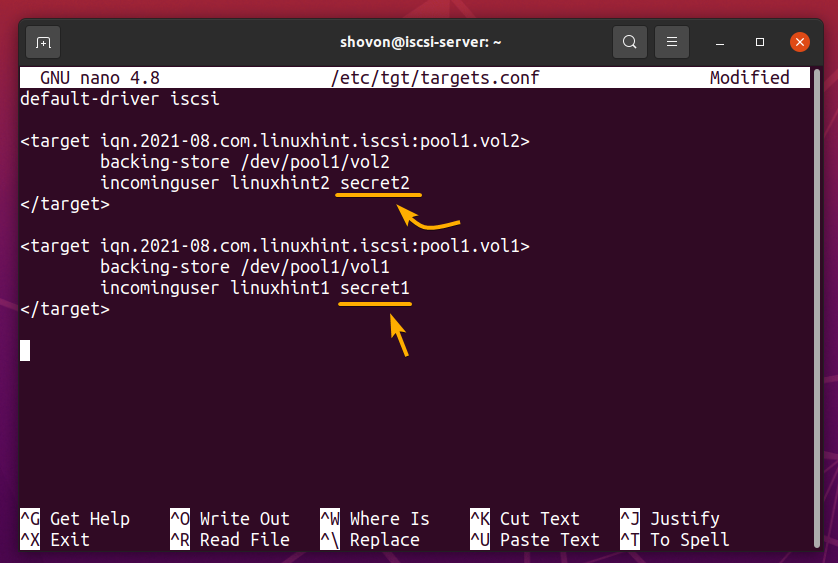
Open the iSCSI server configuration file /etc/tgt/targets.conf with the nano text editor as follows:

Replace the strings PLEASE_CORRECT_THE_PASSWORD with the respective user password here:

For the linuxhint1 user, I will set the password secret1, and for the linuxhint2 user, I will set the password secret2 as marked in the screenshot below.
Once you are done, press <Ctrl> + X followed by Y and <Enter> to save the /etc/tgt/targets.conf file:
For the changes to take effect, reboot the iscsi-server computer:
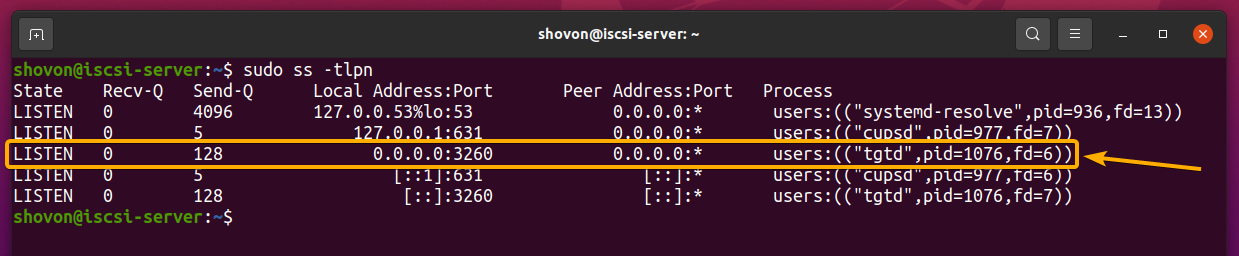
Once the iscsi-server computer boots, the iSCSI server should be running on port 3260, as displayed in the screenshot below:
Accessing Shared ZFS Volumes via iSCSI:
Once you have set the iSCSI server on the iscsi-server computer, you can access the ZFS volumes vol1 and vol2 via iSCSI on the iscsi-client computer.
To access the iSCSI targets from the iscsi-server computer, you need to know the IP address of the iscsi-server computer. In my case, the IP address of my iscsi-server computer is 192.168.122.98. It will be different for you. So, ensure to replace it with yours from now on.

To discover all the iSCSI targets from the iscsi-server (IP address 192.168.122.98), run the following command:

As you can see, the iSCSI targets iqn.2021-08.com.linuxhint.iscsi:pool1.vol1 and iqn.2021-08.com.linuxhint.iscsi:pool1.vol2 are listed.

If you have not set up authentication, you should be able to access the iSCSI target iqn.2021-08.com.linuxhint.iscsi:pool1.vol1 with the following command:

In the same way, you can access the iSCSI target iqn.2021-08.com.linuxhint.iscsi:pool1.vol2 with the following command:

If you have enabled authentication for the iSCSI targets iqn.2021-08.com.linuxhint.iscsi:pool1.vol1 and iqn.2021-08.com.linuxhint.iscsi:pool1.vol2, you should receive an authorization failure message as marked in the screenshot below.

To successfully log in to the authentication-enabled iSCSI targets, set the authentication method, username, and password for each authentication-enabled iSCSI target.
You can set the authentication method of the iSCSI target iqn.2021-08.com.linuxhint.iscsi:pool1.vol1 to CHAP with the following command:

You can set the login username of the iSCSI target iqn.2021-08.com.linuxhint.iscsi:pool1.vol1 to linuxhint1 with the following command:

You can set the login password of the iSCSI target iqn.2021-08.com.linuxhint.iscsi:pool1.vol1 to secret1 with the following command:

Once you are done setting up the authentication method, login username, and password for the iSCSI target iqn.2021-08.com.linuxhint.iscsi:pool1.vol1, you should be able to successfully log in to the iSCSI target iqn.2021-08.com.linuxhint.iscsi:pool1.vol1:

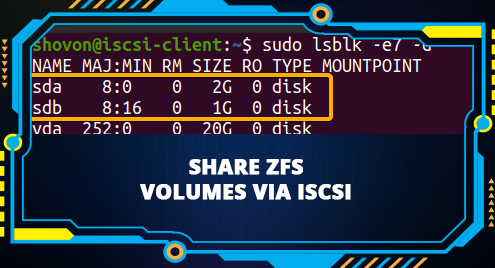
Once you have successfully logged in to the iSCSI target iqn.2021-08.com.linuxhint.iscsi:pool1.vol1, a new SCSI disk sda should be attached to the iscsi-client computer. Note, it may be different in your case:
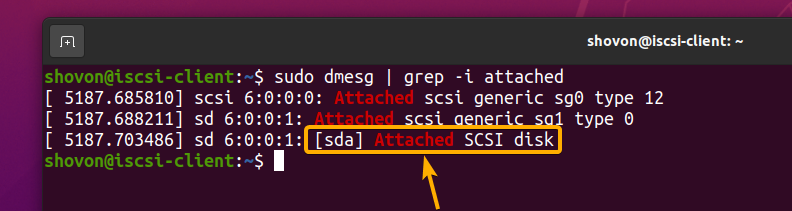
As you can see, a new storage device sda of size 1 GB is added to the iscsi-client computer. It is the ZFS volume vol1 that you have shared via iSCSI:

In the same way, set the authentication method of the iSCSI target iqn.2021-08.com.linuxhint.iscsi:pool1.vol2 to CHAP with the following command:

Set the login username of the iSCSI target iqn.2021-08.com.linuxhint.iscsi:pool1.vol2 to linuxhint2 with the following command:

Set the login password of the iSCSI target iqn.2021-08.com.linuxhint.iscsi:pool1.vol2 to secret2 with the following command:

Log in to the iSCSI target iqn.2021-08.com.linuxhint.iscsi:pool1.vol2 with the following command:

You should be able to successfully log in to the iSCSI target iqn.2021-08.com.linuxhint.iscsi:pool1.vol2:

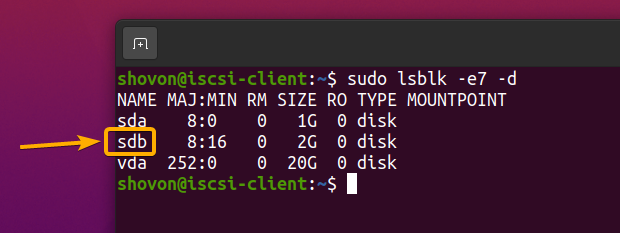
Once you have successfully logged in to the iSCSI target iqn.2021-08.com.linuxhint.iscsi:pool1.vol2, a new SCSI disk sdb should be attached to the iscsi-client computer. Note, it may be different in your case.

As you can see, a new storage device sdb of size 2 GB is added to the iscsi-client computer. It is the ZFS volume vol2 that you have shared via iSCSI:
Automatically Mounting Shared ZFS Volumes via iSCSI:
To automatically log in to an iSCSI target, you will have to set the node.startup property of the iSCSI target to automatic.

To set the node.startup property of the iSCSI target iqn.2021-08.com.linuxhint.iscsi:pool1.vol1 to automatic, run the following command:
To set the node.startup property of the iSCSI target iqn.2021-08.com.linuxhint.iscsi:pool1.vol2 to automatic, run the following command:

Finally, enable the open-iscsi systemd service so that it starts automatically at boot time with the following command:

For the changes to take effect, restart the iscsi-client computer with the following command:
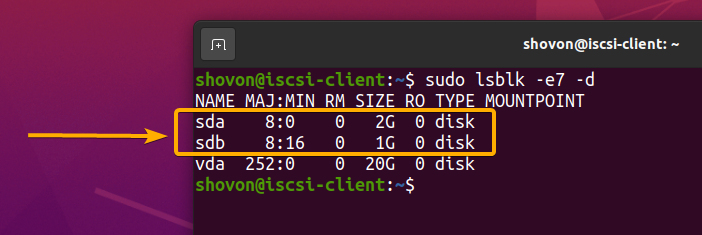
Once the iscsi-client computer boots, you should see the sda and sdb storage devices on the iscsi-client computer as marked in the screenshot below:
Conclusion:
In this article, I have shown you how to create ZFS volumes and share them via iSCSI. Also, I have shown you how to set up authentication for iSCSI targets. I have shown you how to log in to the iSCSI targets remotely and access the shared ZFS volumes.
References:
[1] Ubuntu Manpage: tgtadm – Linux SCSI Target Administration Utility
[2] Ubuntu Manpage: tgt-admin – Linux SCSI Target Configuration Tool
[3] Ubuntu Manpage: iscsiadm – open-iscsi administration utility