You can share your ZFS pools and filesystems using the NFS (Network File System) file-sharing protocol and access them from remote computers very easily.
In this article, I am going to show you how to share ZFS pools and filesystems using the NFS file sharing service and access them from remote computers. So, let’s get started.
Table of Contents
- Network Diagram
- Installing NFS Server
- Installing NFS Client
- Creating ZFS Pools and Filesystems
- Sharing ZFS Pools with NFS
- Sharing ZFS Filesystems with NFS
- Mounting NFS Shared ZFS Pools and Filesystems
- Automatically Mounting NFS Shared ZFS Pools and Filesystems
- Allow Writes to the NFS Shared ZFS Pools and Filesystems
- Unsharing ZFS Pools and Filesystems
- Conclusion
- References
Network Diagram
In this article, I will configure an Ubuntu 20.04 LTS computer (Hostname: linuxhint, IP: 192.168.122.98) as an NFS server and configure an Ubuntu 20.04 LTS computer (Hostname: nfs-client, IP: 192.168.122.203) as an NFS client. Both of these computers are in the subnet 192.168.122.0/24. I will configure the NFS server in a way that only computers/servers in this subnet will be able to access the NFS server.
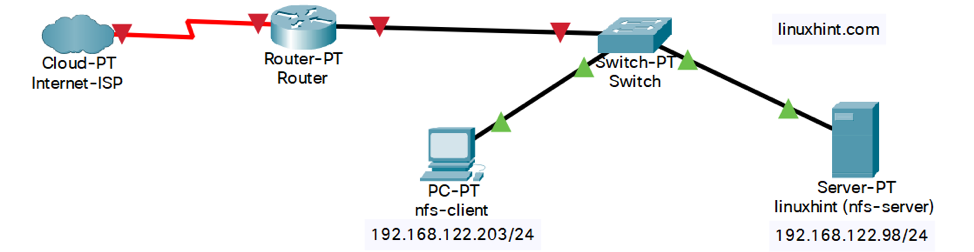
Figure 1: NFS server and client connected to the network subnet 192.168.122.0/24
Installing NFS Server
You must have the NFS server package installed on the computer from where you want to share your ZFS pools/filesystems via NFS.
If you’re using Debian 10 or Ubuntu 20.04 LTS, you can install the NFS server package on your computer as follows:

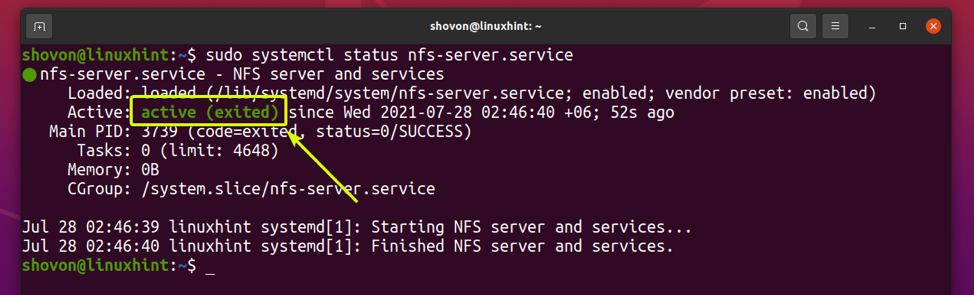
Once the NFS server package is installed, the nfs-server systemd service should be active.
If you’re using CentOS 8/RHEL 8, read the article How to Configure NFS Server on CentOS 8 for assistance on installing NFS server on your computer.
Installing NFS Client
You must have the NFS client package installed on the computer from where you will be accessing your ZFS pools/filesystems via NFS.
If you’re using Debian 10 or Ubuntu 20.04 LTS, you can run the following command to install the NFS client package on your computer:

Creating ZFS Pools and Filesystems
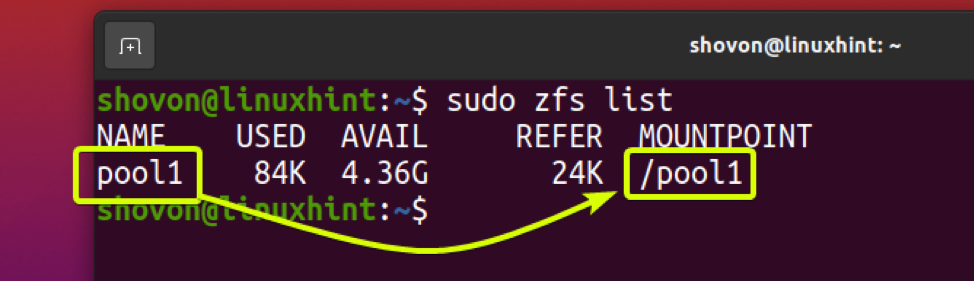
In this section, I am going to create a ZFS pool pool1 using the storage devices vdb and vdc in mirror configuration.

To create a new ZFS pool pool1 using the storage devices vdb and vdc in mirror configuration, run the following command:

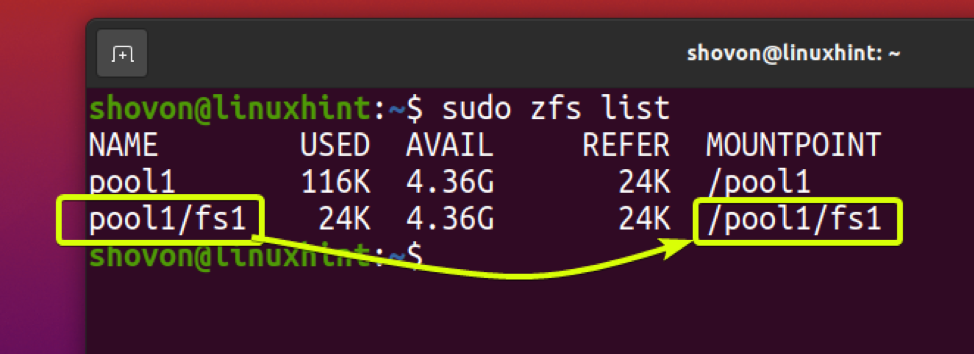
A new ZFS pool pool1 should be created and the ZFS pool pool1 should be automatically mounted in the /pool1 directory.
Create a ZFS filesystem fs1 in the ZFS pool pool1 as follows:

A new ZFS filesystem fs1 should be created and automatically mounted in the /pool1/fs1 directory.
Sharing ZFS Pools with NFS
To share the ZFS pool pool1 via NFS, you have to set the sharenfs property of your ZFS pool accordingly.
To allow everyone on the network read/write access to the ZFS pool pool1, you can set the sharenfs property of the ZFS pool pool1 as follows:

Or,

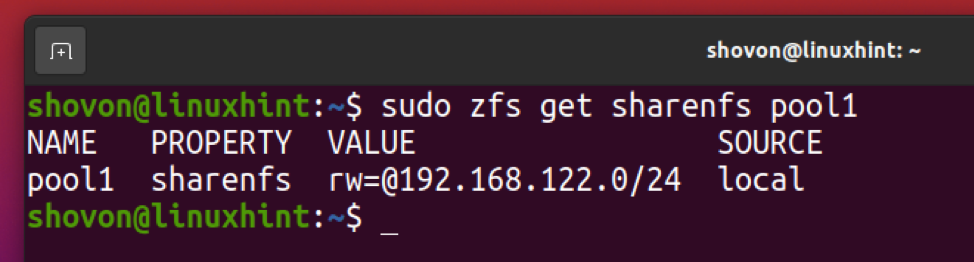
To allow every computer/server on the network subnet 192.168.122.0/24 read/write access to the ZFS pool pool1 only, you can set the sharenfs property of the ZFS pool pool1 as follows:

To allow only the computer with the IP address 192.168.122.203 read/write access to the ZFS pool pool1, you can set the sharenfs property of the ZFS pool pool1 as follows:

You can use the colon (:) symbol to allow access to the ZFS pool pool1 from multiple network subnets or IP addresses as well.
For example, to allow the network subnets 192.168.122.0/24 and 192.168.132.0/24 read/write access to the ZFS pool pool1, you can set the sharenfs property of the ZFS pool pool1 as follows:
In the same way, to allow only the computers with the IP addresses 192.168.122.203 and 192.168.122.233 read/write access to the ZFS pool pool1, you can set the sharenfs property of the ZFS pool pool1 as follows:
You can verify whether the sharenfs property is correctly set on the ZFS pool pool1 as follows:
Sharing ZFS Filesystems with NFS
To share the ZFS filesystem fs1 via NFS, you have to set the sharenfs property of the ZFS filesystem accordingly.
To allow everyone on the network read/write access to the ZFS filesystem fs1, you can set the sharenfs property of the ZFS filesystem fs1 as follows:

Or,

To allow every computer/server on the network subnet 192.168.122.0/24 read/write access to the ZFS filesystem pool1/fs1, you can set the sharenfs property of the ZFS filesystem pool1/fs1 as follows:

To allow only the computer with the IP address 192.168.122.203 read/write access to the ZFS filesystem pool1/fs1, you can set the sharenfs property of the ZFS filesystem pool1/fs1 as follows:

You can use the colon (:) symbol to allow access to the ZFS filesystem fs1 from multiple network subnets or IP addresses as well.
For example, to allow the network subnets 192.168.122.0/24 and 192.168.132.0/24 read/write access to the ZFS filesystem pool1/fs1, you can set the sharenfs property of the ZFS filesystem pool1/fs1 as follows:

In the same way, to allow only the computers with the IP addresses 192.168.122.203 and 192.168.122.233 read/write access to the ZFS filesystem pool1/fs1, you can set the sharenfs property of the ZFS filesystem pool1/fs1 as follows:
You can verify whether the sharenfs property is correctly set on the ZFS filesystem pool1/fs1 as follows:

Mounting NFS Shared ZFS Pools and Filesystems
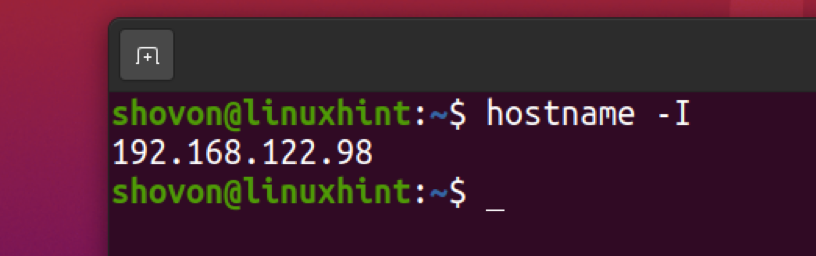
To mount the ZFS pools and filesystems that you’ve shared via NFS on your computer (NFS client), you need to know the IP address of your NFS server.
You can run the `hostname -I` command on your NFS server to find the IP address of your NFS server. In my case, the IP address is 192.168.122.98.
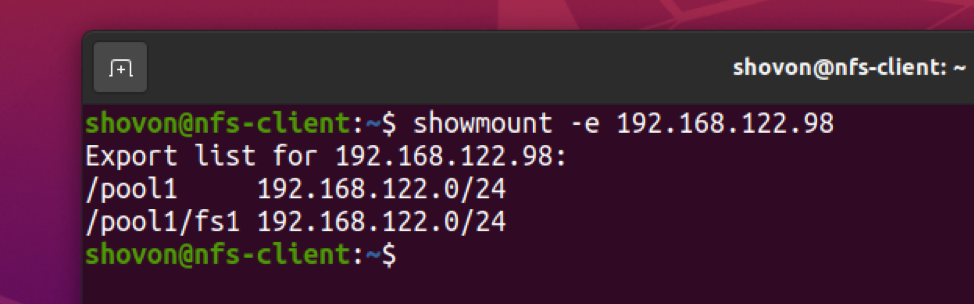
Once you know the IP address of the NFS server, you can list all the available NFS shares from your computer as follows:

As you can see, the ZFS pool pool1 and the ZFS filesystem fs1 are listed as NFS shares /pool1 and /pool1/fs1 respectively.
Create a directory /mnt/pool1 for mounting the NFS share /pool1 (ZFS pool pool1) as follows:

You can mount the NFS share /pool1 (ZFS pool pool1) from the NFS server 192.168.122.98 on the /mnt/pool1 directory of your computer (NFS client) as follows:

The NFS share /pool1 should be mounted on the /mnt/pool1 directory of your computer (NFS client).

In the same way, create a new directory /mnt/fs1 for mounting the NFS share /pool1/fs1 (ZFS filesystem fs1) as follows:
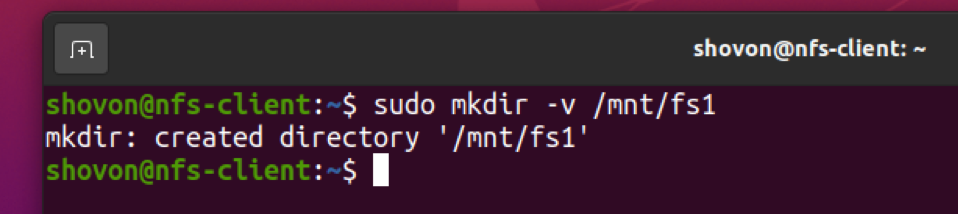
Mount the NFS share /pool1/fs1 (ZFS filesystem fs1) from the NFS server 192.168.122.98 on the /mnt/fs1 directory of your computer (NFS client) as follows:

The NFS share /pool1/fs1 (ZFS filesystem fs1) should be mounted on the /mnt/fs1 directory of your computer (NFS client).

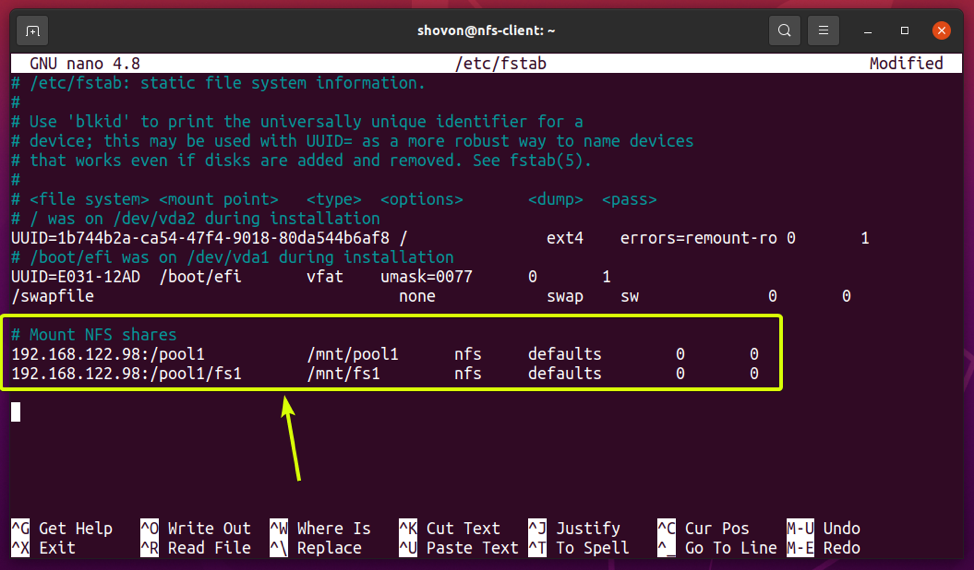
Automatically Mounting NFS Shared ZFS Pools and Filesystems
You can mount the NFS shares /pool1 (ZFS pool pool1) and /pool1/fs1 (ZFS filesystem fs1) on your computer (NFS client) automatically at boot time.
To do that, open the /etc/fstab file with the nano text editor as follows:

Add the following lines at the end of the /etc/fstab file.
192.168.122.98:/pool1 /mnt/pool1 nfs defaults 0 0
192.168.122.98:/pool1/fs1 /mnt/fs1 nfs defaults 0 0
Once you’re done, press <Ctrl> + X followed by Y and <Enter> to save the /etc/fstab file.
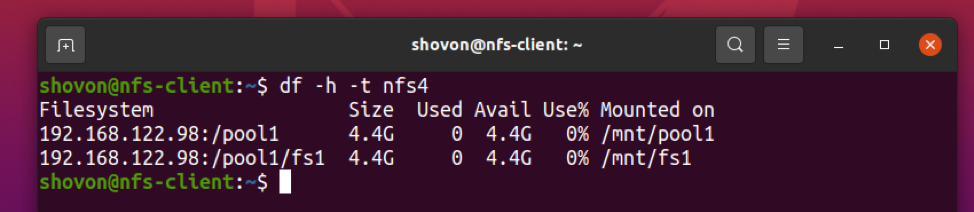
For the changes to take effect, restart your computer (NFS client) as follows:

The next time your computer (NFS client) boots, the NFS shares /pool1 (ZFS pool pool1)and /pool1/fs1 (ZFS filesystem fs1) should be mounted in the /mnt/pool1 and /mnt/fs1 directories respectively.
Allow Writes to the NFS Shared ZFS Pools and Filesystems
If you try to write to the NFS shares /pool1 (ZFS pool pool1) or /pool1/fs1 (ZFS filesystem fs1) from your computer (NFS client) right now, you will get the Permission denied message as shown in the screenshot below.

To solve this problem, you can do one of the following:
- Set 0777 permission on the /pool1 (ZFS pool pool1) and /pool1/fs1 (ZFS filesystem fs1) directory of the NFS server so that everyone can write to the ZFS pool pool1 and filesystem fs1. This method has big security risks. So, I don’t recommend it unless you’re using it for testing purposes.
- Create a group nfs-users (let’s say) on the NFS server and on the NFS client computers from which you want to write to your NFS shares. Then, change the group of the /pool1 (ZFS pool pool1) and /pool1/fs1 (ZFS filesystem fs1) directories of the NFS server to nfs-users. Also, set group write permissions (0775) for the directories /pool1 (ZFS pool pool1) and /pool1/fs1 (ZFS filesystem fs1) directories of the NFS server. This way, you can create new users on the NFS client computers, set nfs-users as their primary group, and they should be able to write to the NFS shares without any problems.
NOTE: NFS maps the UID (User ID) and GID (Group ID) of the NFS client computers with the UID and GID of the NFS server. So, if a user/group can write to an NFS share on the NFS server, then the same user/group with the same UID/GID should also be able to write to that NFS share from the NFS client computer.
In this section, I am going to show you how to set up the necessary users and groups on the NFS server and client computers to be able to write to the NFS shares.
On the NFS server, create a new group nfs-users and set the GID (Group ID) of the nfs-users group to 2000 as follows:

On the NFS client computers, create a new group nfs-users and set the GID (Group ID) of the nfs-users group to 2000 as well.

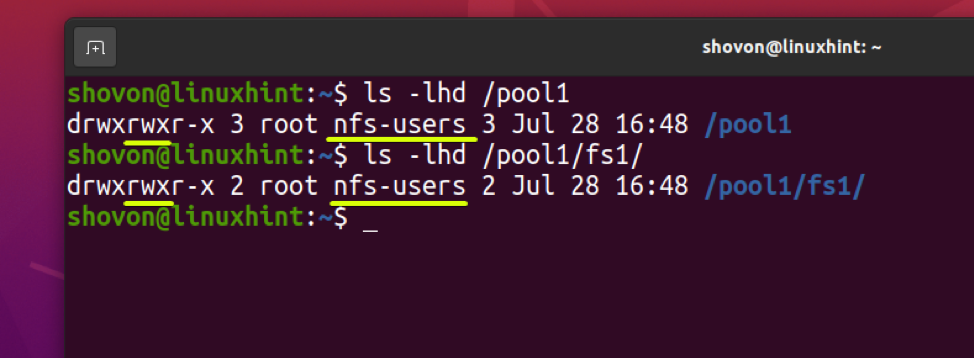
On the NFS server, change the group of the /pool1 (ZFS pool pool1) and /pool1/fs1 (ZFS filesystem fs1) directories to nfs-users as follows:

Allow group read and write permissions for the /pool1 (ZFS pool pool1) and /pool1/fs1 (ZFS filesystem fs1) directories as follows:

The group of the /pool1 (ZFS pool pool1) and /pool1/fs1 (ZFS filesystem fs1) directories should be changed to nfs-users and group read/write permissions should be set as well.
$ ls -lhd /pool1/fs1
For the changes to take effect, reboot the NFS server as follows:

Now, you have to create the necessary user accounts on your NFS client computers to be able to write to the NFS shares.
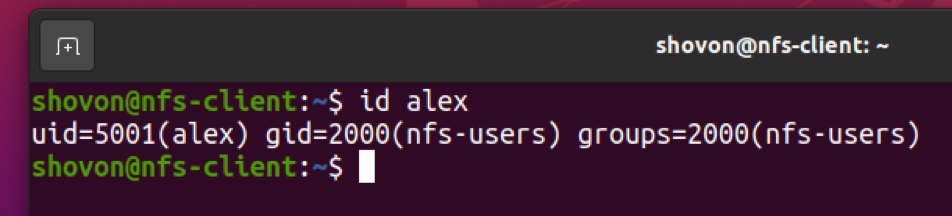
Create a new user alex (let’s say) with the UID 5001 (so that they don’t interfere with the users already available in the NFS server) and set the primary group of the user to nfs-users as follows:

A new user alex with the UID 5001 and primary group nfs-users (GID 2000) should be created on the NFS client computer.
Now, restart the NFS client computer for the changes to take effect.

Once the NFS client computer boots, the NFS shares /pool1 (ZFS pool pool1) and /pool1/fs1 (ZFS filesystem fs1) should be mounted.

The NFS shares /pool1 (ZFS pool pool1) and /pool1/fs1 (ZFS filesystem fs1) should also have the correct directory permissions.
$ ls -lhd /mnt/fs1

Now, log in as the user alex on the NFS client computer as follows:

The user alex should be able to create files on the NFS share /pool1 (ZFS pool pool1) and access them as you can see in the screenshot below.
$ ls -lh /mnt/pool1
$ cat /mnt/pool1/hello.txt
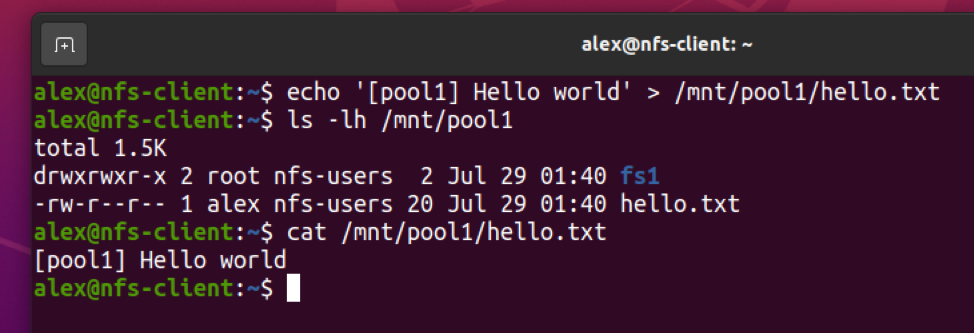
The user alex should also be able to create files on the NFS share /pool1/fs1 (ZFS filesystem fs1) and access them as you can see in the screenshot below.
$ ls -lh /mnt/fs1
$ cat /mnt/fs1/hello.txt

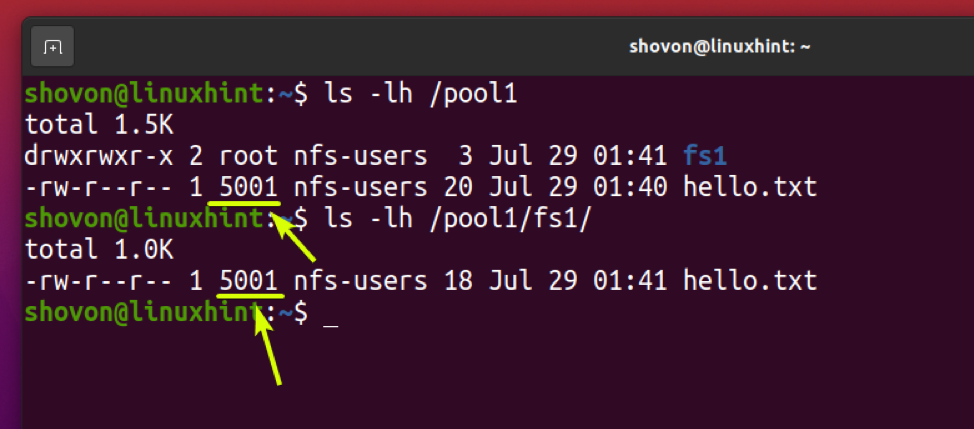
On the NFS server, the UID (User ID) of the files that the user alex created from the NFS client computer should be 5001 and the group should be nfs-users as you can see in the screenshot below.
$ ls -lh /pool1/fs1
If you want to resolve the UIDs to usernames on your NFS server, you must create the same user with the same UID (as you have created on the NFS client computer) on the NFS server.
For a small number of users, you can run the same useradd command on both the NFS server and client computers to solve this problem. If you have to manage a large number of users, then it will be a lot of work to do this manually. Instead, you should use NIS (Network Information Server) or LDAP (Lightweight Directory Access Protocol) to automatically sync the users between your NFS server and NFS client computers.
For assistance on configuring NIS on your NFS server and client computers, check out the following articles:
For assistance on configuring LDAP on your NFS server and client computers, check out the following articles:
Unsharing ZFS Pools and Filesystems
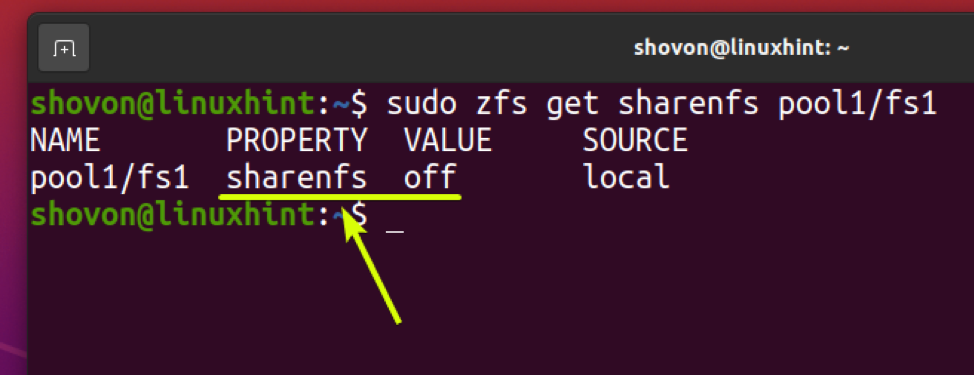
If you want to stop sharing the ZFS pool pool1 you will have to set the sharenfs property of the ZFS pool pool1 to off as follows:

NFS sharing should be disabled for the ZFS pool pool1 as you can see in the screenshot below.

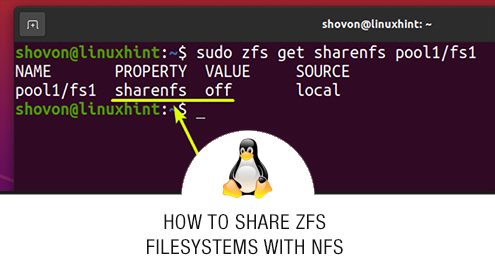
In the same way, you can stop sharing the ZFS filesystem fs1 by setting the sharenfs property of the ZFS filesystem fs1 to off as follows:

NFS sharing should be disabled for the ZFS filesystem fs1 as you can see in the screenshot below.
Conclusion
In this article, I have shown you how to share ZFS pools and filesystems and access them remotely using the NFS file-sharing protocol. I have also shown you how to automatically mount ZFS pools/filesystems that you’ve shared with NFS on NFS client computers at boot time. I have shown you how to manage access permissions for the NFS shares and allow write access to the NFS shares from the NFS client computers as well.
References
[1] Ubuntu Manpage: zfs – configures ZFS file systems
[2] Sharing and Unsharing ZFS File Systems – Oracle Solaris Administration: ZFS File Systems
[3] Synopsis – man pages section 1M: System Administration Commands
[4] nfssec Manpage section 5 – Oracle Solaris Documentation
[5] centos – NFS default to 777 – Server Fault
[6] Chapter 4. Exporting NFS shares Red Hat Enterprise Linux 8 | Red Hat Customer Portal