What Is “Core Dump” in Linux?
When a process unexpectedly exits, it frequently leaves behind a “core dump” in your system. There is a relevant message that is included with this. A core serves as a debugging tool and is an image of memory that also includes the debugging information. If you’re a user who doesn’t want to debug a program, you may just delete the core:
You can also leave it untouched, as the old core is overwritten if a new one is ever dumped. You may also deactivate the core dumping with the following command:
We can generate the core dumps on demand (for example, via a debugger) or they can be produced automatically upon termination. The kernel initiates core dumps as a consequence of a program’s abrupt exit. These may be sent to some other program (such as systemd-coredump) for additional operations.
As is usually the case, there is a trade-off between collecting the data for better stability and troubleshooting and the risk of revealing the sensitive information from debug data.
What Will We Cover?
In this article, we will see how to set the location of core dumps on Ubuntu 20.04 OS. Let’s get started now.
Generating a Core Dump
Let’s first see how we can generate a core dump. For this, we use the Linux kill command. First, find the PID of a process and then send a kill signal. For example, let’s start the sleep process and then kill it with its PID:
$ kill -s SIGTRAP $(pgrep sleep)

Now that you learned how to generate a core dump, you can use it in the following subsequent sections.
Where Do They Go?
The core dump file is named core.pid by default and is created in the working directory of the application. Here, pid is the process id.
With the ulimit tool, you can get or change the system resource limits for the current shell and any shells that come after it. To verify or configure the core file size limit, use the following command:
In order to avoid delimiting or truncating the core file, make sure that the limit is globally set to “unlimited” [1]. This can be done in /etc/security/limits.conf by adding the following line:
* - core unlimited
Now, simply log out and log back in for the limits to be applied to your session.
Customizing the Location of the Core Dump
The “sysctl kernel.core_pattern” command or the “/proc/sys/kernel/core_pattern” is normally used to set the location where the core dumps go.
Enter the following command to see the settings for the current core pattern:
Usually, you will find the default value listed as “core” here.
Using “/proc/sys/kernel/core_pattern” to Set the Core Dump Location
Let’s temporarily redirect the core dumps to a new location, say /tmp/dumps/core, using the “/proc/sys/kernel/core_pattern” file [2] [3]. Now, follow the following steps:
Step 1. First, make a directory to store the core dumps:
Step 2. Give the required permissions to this directory:
Step 3. Now, temporarily set the core dump path:
Again, globally set the ulimit to unlimited.

Here, we can append some other information to the name of the file as shown in the following:
Each parameter that is used here can be defined as follows:
%p: for process id or pid.
%t: for adding a timestamp
Step 4. Next, we have to change the “/etc/sysctl.conf” file to permanently apply the previous settings. Open this file:
Now, add the following line to this file:
Also, instead of this line, you can add this:
That’s all we need to do. Now, generate a core dump as mentioned in the “Generating a Core Dump” section. After this, we can check if our core file is generated or not:

Using “Sysctl” Command to Set Core Dump Location
As mentioned earlier, we can also use the sysctl command for the same purpose. Let’s change the core dump location and the format of the core file:
Step 1. Create a new directory and give the required permissions:
$ chmod a+rwx /tmp/mydumps
Step 2. Now, just run the following command:

Step 3. Now, again, generate the core dump as we did earlier. After this, check if the core file is generated or not:
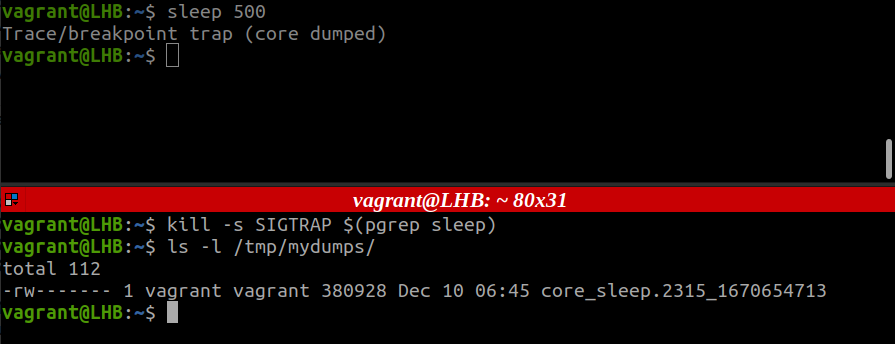
On Ubuntu systems, core dumps are often sent to Apport. For Red Hat-based systems, it might be forwarded to the Automatic Bug Reporting Tool (ABRT). Initially, I was facing a problem in configuring the core dump location, so I had to completely disable Apport on Ubuntu 20.04. Perhaps, this may also be the case with Red Hat and others.
Conclusion
In this article, we have seen how we can customize the location of core dumps on Ubuntu 20.04 OS. Core dumps can help you figure out what’s wrong, but they’re terrible for leaking sensitive data. Core dumps should be disabled whenever they are not required and only enabled when absolutely necessary. In such a situation, confirm that the files are securely stored so that the ordinary users cannot access the data. Furthermore, regardless of your decision, you should always test your configuration to ensure that it operates as intended.
Core dumps and default configurations are handled differently by various operating systems. In recent times, most Linux systems have been adopting systemd, which has brought about some minor rule adjustments. Depending on how your system is configured, you might need to search for core dumps.