The measures of securing the SSH server range from basic to advanced, and as we said earlier, you can pick them up according to the level of security that you need. You can skip any of the prescribed measures if you have sufficient knowledge about the consequences and if you are in a good position to face them. Also, we can never say that a single step will ensure 100% security, or a certain step is better than the other.
It all depends upon which type of security we actually need. Therefore, today we intend to give you a very deep insight into the basic and advanced steps for securing an SSH server in Ubuntu 20.04. Apart from these methods, we will also be sharing with you some additional tips for securing your SSH server as a bonus. So let us get started with today’s interesting discussion.
Method of Securing the SSH Server in Ubuntu 20.04:
All the SSH configurations are stored in its /etc/ssh/sshd_config file. This file is considered very crucial for the normal functioning of your SSH server. Therefore, before making any changes to this file, it is highly recommended that you create a backup of this file by running the following command in your terminal:

If this command is executed successfully, you will not be presented with any output, as shown in the image below:

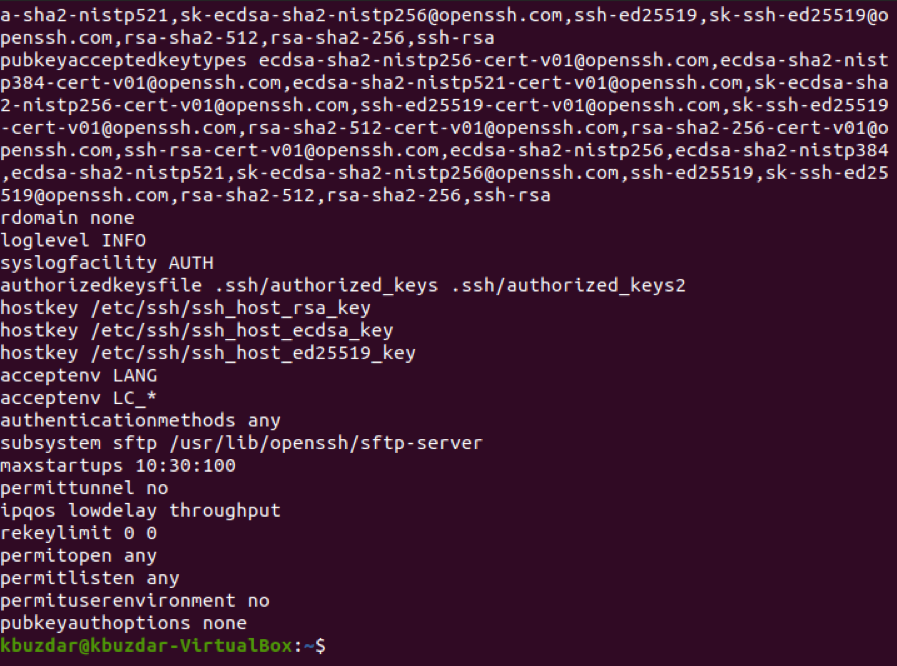
After creating a backup of this file, this step is optional and is performed if you wish to check all the options that are currently enabled in this configuration file. You can check it out by running the following command in your terminal:
![]()
The currently enabled options of the SSH configuration file are shown in the image below. You can scroll down this list to view all the options.
Now you can start securing your SSH server while moving from the basic steps to the advanced steps in Ubuntu 20.04.
Basic Steps for securing the SSH Server in Ubuntu 20.04:
The basic steps for securing an SSH server in Ubuntu 20.04 are as follows:
Step # 1: Opening the SSH Configuration File:
You can open the SSH configuration file by running the command stated below in your terminal:
![]()
The SSH configuration file is shown in the following image:

Step # 2: Disabling Password-Based Authentication:
Instead of using passwords for authentication, SSH keys are considered more secure. Therefore, if you have generated the SSH keys for authentication, then you must disable password-based authentication. For that, you need to locate the “PasswordAuthentication” variable, uncomment it, and set its value to “no,” as highlighted in the image shown below:

Step # 3: Rejecting/ Denying Empty Passwords:
At times, users find it extremely convenient to create empty passwords for the sake of saving themselves from memorizing complex passwords. This practice can prove to be detrimental to the security of your SSH server. Therefore, you need to reject all the authentication attempts with empty passwords. For that, you need to locate the “PermitEmptyPasswords” variable and just uncomment it since its value is already set to “no” by default, as highlighted in the following image:

Step # 4: Forbidding Root Login:
You should strictly forbid root logins for protecting any intruder from gaining root-level access to your server. You can do this by locating the “PermitRootLogin” variable, uncomment it, and set its value to “no,” as highlighted in the image shown below:

Step # 5: Using SSH Protocol 2:
SSH server can operate on two different protocols, i.e., Protocol 1 and Protocol 2. Protocol 2 implements more advanced security features, which is why it is preferred over Protocol 1. However, Protocol 1 is the default protocol of SSH, and it is not explicitly mentioned in the SSH configuration file. Therefore, if you wish to work with Protocol 2 instead of Protocol 1, then you need to explicitly add the line “Protocol 2” to your SSH configuration file as highlighted in the following image:

Step # 6: Setting a Session Timeout:
At times, the users leave their computers unattended for a very long time. Meanwhile, any intruder can come over and gain access to your system while breaching its security. This is where the concept of session timeout comes into play. This feature is used to logout a user if he stays inactive for a long time so that no other user can gain access to his system.
This timeout can be set by locating the “ClientAliveInterval” variable, uncomment it, and assign it any value (in seconds) of your choice. In our case, we have assigned it the value of “300 seconds” or “5 minutes”. It means that if the user stays away from the SSH server for “300 seconds”, then he will automatically be logged out as highlighted in the image shown below:

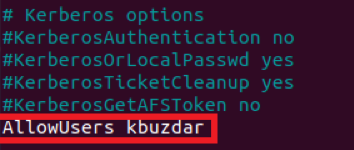
Step # 7: Allowing Specific Users to Access the SSH Server:
The SSH server is not a server whose access is required by every other user. Therefore, its access must be restricted only to those users who actually need it. For allowing specific users to access the SSH server, you need to add a variable named “AllowUsers” to the SSH configuration file and then write the names of all those users whom you want to allow access to the SSH server separated by a space. In our case, we only wanted to allow one user to access the SSH server. That is why we have only added his name as highlighted in the following image:
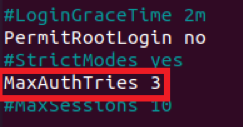
Step # 8: Limiting the Number of Authentication Attempts:
Whenever a user tries to access a server, and he is unable to authenticate himself for the first time, he tries to do it again. The user keeps on making these attempts until and unless he is successfully able to authenticate himself hence gaining access to the SSH server. This is considered a highly insecure practice since a hacker may launch a Brute Force Attack (an attack that repeatedly attempts to guess a password until the right match is found). Resultantly, he will be able to gain access to your SSH server.
That is why it is highly recommended to limit the number of authentication attempts to prevent password guessing attacks. The default value of the authentication attempts to the SSH server is set to “6”. However, you can change it depending upon the level of security that you require. For that, you need to locate the “MaxAuthTries” variables, uncomment it, and set its value to any desired number. We wanted to limit the authentication attempts to “3,” as highlighted in the image shown below:
Step # 9: Running the SSH Server in Test Mode:
By now, we have taken all the basic steps to secure our SSH server on Ubuntu 20.04. However, we still need to make sure that the options we have just configured are working properly. For that, we will first save and close our configuration file. After doing that, we will try to run our SSH server in the test mode. If it runs successfully in the test mode, then it will imply that there are no errors in your configuration file. You can run your SSH server in the test mode by running the following command in your terminal:
![]()
When this command is executed successfully, it will not display any output on the terminal, as shown in the image below. However, if there will be any errors in your configuration file, then running this command will render those errors on the terminal. You will then be supposed to fix those errors. Only then will you be able to proceed further.

Step # 10: Reloading the SSH Server with New Configurations:
Now when the SSH server ran successfully in the test mode, we need to reload it so that it can read the new configuration file, i.e., the changes that we have made to the SSH configuration file in the steps shown above. For reloading the SSH server with new configurations, you need to run the following command in your terminal:
![]()
If your SSH server is restarted successfully, the terminal will not display any output, as shown in the image below:

Advanced Steps for securing the SSH Server in Ubuntu 20.04:
After performing all the basic steps for securing the SSH server in Ubuntu 20.04, you can finally head on to the advanced steps. This is just a step forward to secure your SSH server. However, if you only intend to achieve a moderate level of security, then the steps described above will be sufficient. But if you want to go a little farther, then you can follow the steps explained below:
Step # 1: Opening the ~/.ssh/authorized_keys File:
The basic steps of securing the SSH server are implemented within the SSH configuration file. It means that these policies will hold good for all the users who will try to access the SSH server. It also implies that the basic steps represent a generic method of securing the SSH server. However, if we try to consider the principle of “Defense in Depth,” then we will realize that we need to secure each individual SSH key separately. This can be done by defining explicit security parameters for each individual key. The SSH keys are stored in the ~/.ssh/authorized_keys file, so we will first access this file to modify the security parameters. We will run the following command in the terminal to access the ~/.ssh/authorized_keys file:
Running this command will open the specified file with the nano editor. However, you can use any other text editor of your choice as well to open this file. This file will contain all the SSH keys that you have generated thus far.
![]()
Step # 2: Defining Specific Configurations for Particular Keys:
For achieving an advanced level of security, the following five options are available:
- no-agent-forwarding
- no-port-forwarding
- no-pty
- no-user-rc
- no-X11-forwarding
These options can be written before any SSH key of your choice to make them available for that particular key. Even more than one option can also be configured for a single SSH key. For example, you want to disable port forwarding for any particular key or, in other words, you want to implement no-port-forwarding for a specific key, then the syntax will be as follows:
Here, instead of the DesiredSSHKey, you will be having an actual SSH key within your ~/.ssh/authorized_keys file. After applying these options for your desired SSH keys, you will need to save the ~/.ssh/authorized_keys file and close it. A good this about this advanced method is that it will not require you to reload your SSH server after making these modifications. Rather these changes will be read by your SSH server automatically.
In this way, you will be able to secure each SSH key in depth by applying the advanced security mechanisms.
Some Additional Tips for securing the SSH Server in Ubuntu 20.04:
Apart from all the basic and advanced steps that we have taken above, there are also some additional tips that can prove to be very good for securing the SSH server in Ubuntu 20.04. These additional tips have been discussed below:
Keep your Data Encrypted:
The data that resides on your SSH server, as well as the one that remains in transit, must be encrypted and that too, with a strong encryption algorithm. This will not only protect the integrity and confidentiality of your data but will also prevent the security of your whole SSH server from being compromised.
Keep Your Software Up to Date:
The software that runs on your SSH server must be up to date. This is done to ensure that no security bugs in your software remain unattended. Rather they should be patched well in time. This will save you from any potential harms in the long run and will also prevent your server from going down or being unavailable due to security issues.
Ensure that SELinux is Enabled:
SELinux is the mechanism that lays the foundation stone of the security within the Linux based systems. It works by implementing the Mandatory Access Control (MAC). It implements this access control model by defining access rules in its security policy. This mechanism is enabled by default. However, the users are permitted to change this setting at any time. It means that they can disable SELinux whenever they want. However, it is strongly recommended that you always keep SELinux enabled so that it can prevent your SSH server from all the potential harms.
Use Strict Password Policies:
If you have protected your SSH server with passwords, then you must create strong password policies. Ideally, the passwords should be more than 8 characters long. They should be changed after a specified time, say, after every 2 months. They should not contain any dictionary words; rather, they should be a combination of alphabets, numbers, and special characters. Similarly, you can define some other extra strict measures for your password policies to ensure that they are strong enough.
Monitor and Maintain the Audit Logs of your SSH Server:
If anything goes wrong with your SSH server, your first helper can be the audit logs. Therefore, you must keep maintaining those logs so that you can trace back the root cause of the problem. Moreover, if you keep monitoring the health and working of your SSH server continuously, then this will also prevent any major issues from occurring in the first place.
Maintain Regular Backups of your Data:
Last but not least, you should always keep a backup of your entire SSH server. Doing this will not only save your data from being corrupted or entirely lost; rather, you can also use this backup server whenever your main server goes down. This will also limit the server downtime and ensure its availability.
Conclusion:
By taking care of all the measures that have been prescribed in this article, you can easily secure or harden your SSH server in Ubuntu 20.04. However, if you are from an Information Security background, then you must be well aware of this fact that there is nothing like 100% security. All we can get is the best effort promise, and that best effort will only be secure until the time it will also be breached. That is why even after taking all these measures, you cannot say that your SSH server is 100% secure; rather, it still may have such vulnerabilities that you could have never even thought of. Such vulnerabilities can only be taken care of if we keep a keen eye on our SSH server and keep updating it whenever it is required.