Lifecycle configuration for different types of objects in S3 can be managed differently. A lifecycle rule can be configured for temporary data that will delete the temporary data after a specific amount of time. Similarly, a lifecycle rule for the application logs can be created to moves the logs to S3 Glacier after a specific time. Multiple lifecycle rules can be created which will track different objects filtered by the prefix and tags. In this blog, we will discuss how we can set up the Amazon S3 lifecycle configuration.
Setting up S3 bucket lifecycle configuration
First, log into the AWS management console and go to the S3 console. Go to the S3 bucket you want to create a lifecycle configuration rule.
From the S3 bucket, go to the Management tab and click on the create lifecycle rule button to create a life cycle rule.
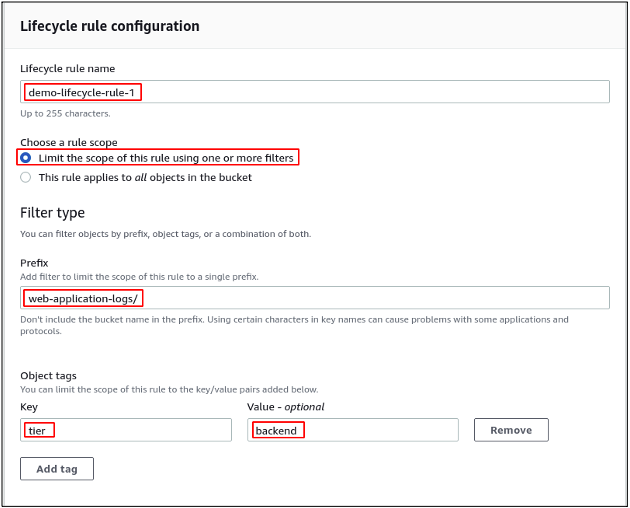
A new lifecycle rule configuration window will open, asking for rule scope, filter type, and name. The rule scope defines whether the lifecycle rule will apply to all the buckets or some selected objects. For this demo, we will apply the lifecycle rule to selected objects stored in the bucket. Lifecycle rule configuration provides two types of filters to select the object on which the rule will apply. We can apply the lifecycle rule to all the objects with specific prefixes and/or specific tags. For this demo, we will use both filters to configure the lifecycle rule. In the following configuration, the lifecycle rule will apply on all the objects stored in the web-application-logs folder and having a tag (tier: backend).
Setting up lifecycle rule actions
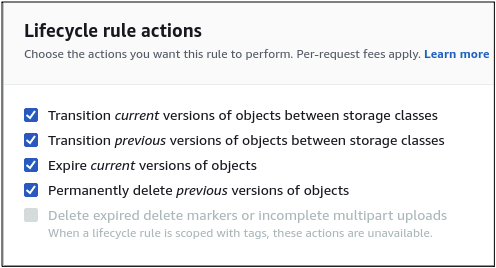
After configuring the lifecycle rule, now it is time to set up rule actions for the selected objects through prefixes and tags in the previous step. There are different types of lifecycle rules actions that are listed below.
- Transition of current versions of the objects
- Transition of previous versions of the objects
- Expire current versions of objects
- Permanently delete previous versions of objects
- Delete expired delete markers or incomplete multipart uploads
In order to manage the complete lifecycle of the current and previous versions of S3 objects, select all the options from the lifecycle rules actions list.
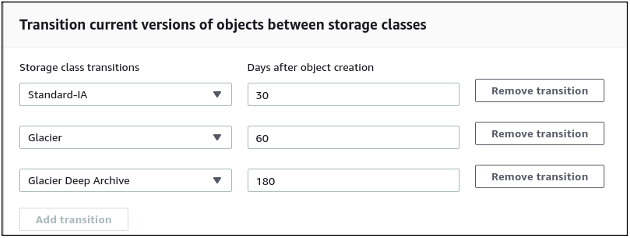
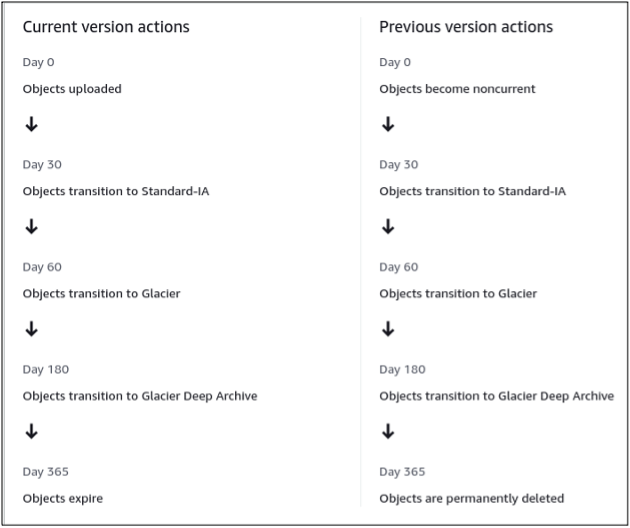
Selecting all the options will enable all the configuration settings of this bucket’s previous and current versions of objects. For the current version transition, I have added the following transition rules listed in the figure. These rules will move the stored objects to the Standard-IA storage class of S3 after 30 days of creation. After 60 days, the object will be moved to the Glacier and Glacier Deep Archive after 180 days of object creation.
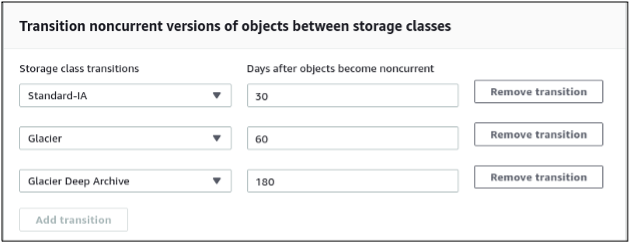
For the previous versions of the objects stored in S3, the same lifecycle transition rules have been created, which will move the previous versions of the objects to the Standard-IA after 30 days of becoming the previous version. The previous versions of the object will be moved to the Glacier and then Glacier Deep Archive after 60 and 180 days, respectively.
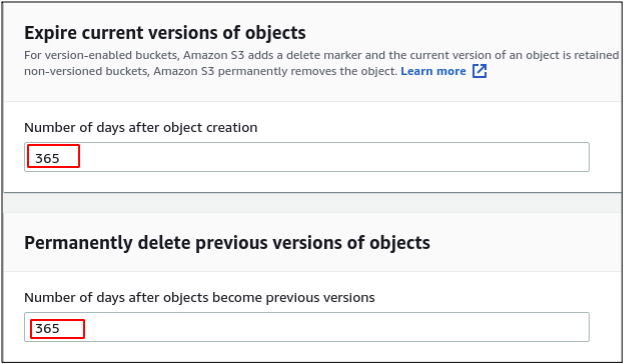
Now the lifecycle rule will ask for the object expiry configuration for current and previous versions of the objects. Enter the number of days after which the S3 objects will be deleted permanently from the S3 bucket. The following configuration will delete the current and previous versions of the S3 objects after 1 year.
Now the lifecycle rule will create a timeline summary of the transition rules configuration showing the lifecycle of the objects.
Review the timeline summary and click on the Create rule button at the end to create the lifecycle rule.
Store test data to S3
The lifecycle rule created above will apply to specific S3 objects (with web-application-logs prefix and tier: backend object tag). In this section, we will upload an object on which this lifecycle rule will apply. First, create a folder of web application logs inside the bucket.
Now upload a file inside this newly created folder. The prefix for all the files uploaded in this folder will be the folder name, i.e., web-application logs.
After uploading the file, add a tag (tier: backend) to the object so the lifecycle rule will use the object. Select the object from the folder and scroll down to the tags section. Add a tag with key=tier and value=backend to the object.
According to the specified transition rules, the lifecycle rule will track this and move it to the other storage classes. All the objects stored in the web-application-logs folder and having a tag (tier: backend) will be tracked by the lifecycle rule configured in this blog.
Conclusion
S3 provides lifecycle configuration to manage the objects into different storage classes automatically to save cost. A lifecycle rule can be configured on all the objects stored in S3 as well as a filter can be used to apply lifecycle configuration to specific objects stored in S3. This guide explains each step to create a lifecycle rule that applies to specific objects and moves the objects into different storage classes to save costs.


