This tutorial explains the route command and how to use it in Linux to administrate connectivity between different networks.
This document lets you connect networks through routing methods (static, default, and dynamic) and command line techniques (IP and route add).
At Linux Hint, we optimize our content for both new and experienced users by going straight to the point with practical examples for experienced users and by explaining each step thoroughly to new users together with the examples. Our tutorial requires us to start with theoretical content before the practical examples. If you are an experienced user with routing understanding and only need to learn practical instructions, just scroll down to the practical section or press here.
All steps described in this tutorial include screenshots, making it easy for every Linux user to understand how they are applied.
Introduction to Routing Tables
Routing tables are networking instructions where we specify how network devices can access a different network. For example, if we have the network 192.168.0.0 and network 10.0.0.0, we can use routing tables to allow both networks’ connectivity. To achieve connectivity, we specify the path (route) packets that must follow through routing tables. For example, our routing table can determine what routers need to be reached to communicate with different networks.
The command you are looking for, route add, is the command to interact with the routing table, the command to add proper routes to reach the destination or multiple destinations. You can add more than one gateway to access different networks depending on the chosen routing method explained below.
It is also essential to know that those network devices allowing connectivity between two networks is called “gateways”. Gateways must have two network cards, each connected to the networks we want to connect between them.
Static vs. Default vs. Dynamic Routing
There are three different methods to implement network routing: static, default, and dynamic. Each has advantages and disadvantages depending on the network topology and knowledge. They are explained below in this article.
The Static Routing
Static routes are the most specific ones. The static route means both networks must configure their network devices (one by one), instructing the full path (route) each device from each network must follow to reach the other network. It is essential to understand that when using a static route, all devices like computers must be configured manually.
Let’s say you have two different networks, each with its router: the network 192.168.1.x and network 10.0.0.1. The 192.168.1.0 (network A) and 10.0.0.1 (network B) want to connect between them.
Suppose a client from network A wants to connect to network B. In that case, he must specify in the routing table the network destination (B) and all the routers (gateways) it needs to pass through to reach network B. If the network B wants to connect to the network A, each network B client must also be configured reciprocally. There are no automatic inverse connections.
This means if we have a network with a router each and an intermediating third router, we need to configure our client PCs, specifying the network interface or network address and netmask the local router needs to use to communicate with the next router (the intermediating router, the third one). Since the intermediating router is not directly connected to the destination network, the client must also add to the routing table the next router the intermediating one must follow until reaching the destination network. The last router does not need to be configured because it is already directly connected to the destination network.
As said previously, routing devices must have two network cards or interfaces to communicate with both networks.
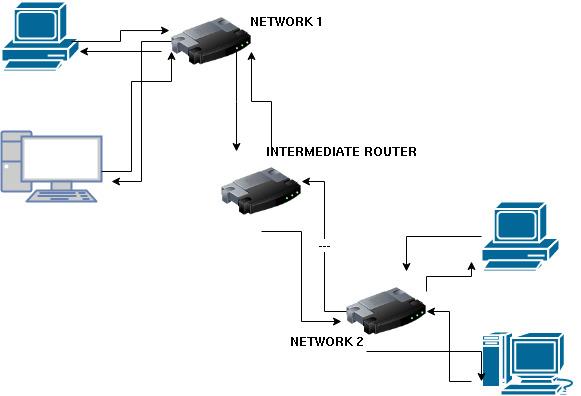
Let’s take the image below as an example. If a computer from the NETWORK 1 wants to connect to a computer from NETWORK 2 using static routing, the computer from the NETWORK 1 must define in the routing table that both exit interfaces, ROUTER 1 and Intermediating router, need to be used to connect to the next router until reaching the final destination.
When using static routing, the computer must also define the outgoing interface to connect to the intermediating router and the interface the intermediating router needs to use to connect to the router belonging to NETWORK 2. However, the NETWORK 2 router does not need to be specified in the routing table because it is already connected directly to the destination.
If a client from the NETWORK 2 wants to connect to NETWORK 1 (Inverse), it also will be required to add the inverse route or path (including its router but without including the NETWORK 1 router, which is already connected to NETWORK 1).
Static routes are the fastest and safest routing method. It is fast because clients provide routing devices the full path, while routers must learn them by themselves in other methods.
And it is safe because sysadmins hold full knowledge of the network topology, and packets go precisely through the defined route (Path).
The most significant disadvantage of static routing is that each client must be configured manually, which is not practical for big networks.
It is called “static” because each client predefines routes.
Default Routing
While static routes require the client to add the full path to the destination, the default route only requires adding to the routing table the second hop after the local router. The second router, without instructions from the network table, sends the packets to the next hop or router, hoping it will resolve the destination or forward the packet to another router that possibly can determine the goal. This process repeats until the destination is resolved unless some routers cannot route the packet to another device. In such a case, the packet is dropped.
The default route does not necessarily replace static or dynamic routing but remains the last resource in case a destination is not defined through static or dynamic routing. Indeed, the default route is also called “the last resource”. Sometimes, you can have only the default gateway, for example, when we connect to the internet. Then, the connection continues as dynamic.
Dynamic Routing
Dynamic routing is when there are no routing tables, and routers exchange or share all their information with other routers. They learn the network topology by sharing information. As said previously, with static routes, the packet is dropped if some router defined in the path is unavailable. Contrary to static routing, the dynamic one in such cases looks for an alternative since it does not have a predefined route.
Practical Introduction to the Route Command
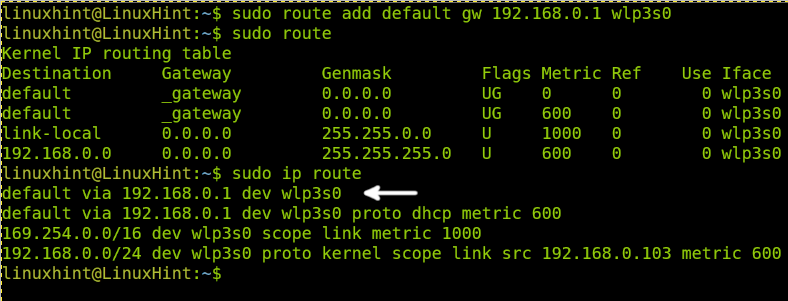
Before adding or removing routing tables, let’s see how you can print existing routes. You can do it by running the IP route or route commands with superuser permissions, as shown below.
Note: To use the sudo route add command, you must install the net-tools package.
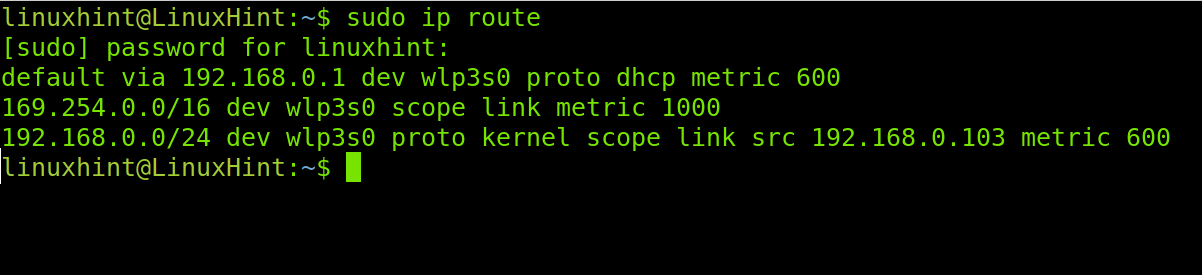
The screenshot above shows that the default gateway is my router with IP address 192.168.0.1, connected through the wlp3s0 device and getting the IP address from DHCP.
The second and third lines are irrelevant. The second is generated in case of an IP assignment problem, and the kernel assigned the third line.
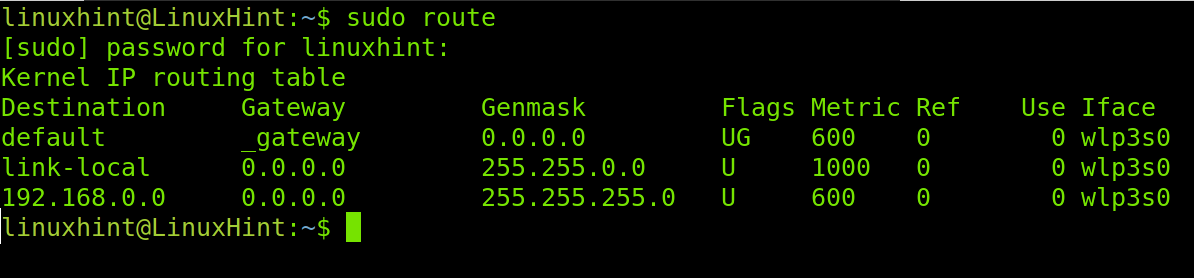
If you have installed the net-tools package on your computer, you can also run the following command to see the existing tables.
The Route Add Command in Linux for Static Routing
Therefore, if my IP address is 192.168.0.103, and I want to connect to the network 192.168.1.0, which is connected through a router (with two interfaces) with the IP address 192.168.3.0, run the command shown in the following figure:

You can do the same using the IP command with the following syntax.
The Route Add Command To Define the Default Gateway in Linux
The syntax is shown below if you want to add a default gateway using the route add command.
If I want to add a default gateway to access the internet and my router has the IP address 192.168.0.1, I would execute the following command:
The same can be done with the IP command shown below:

Making Your Changes Persistent
All changes you make in the routing table will be automatically deleted upon reboot or if the network service restarts.
Run the following command to make routing table changes persistent on Debian or Ubuntu.
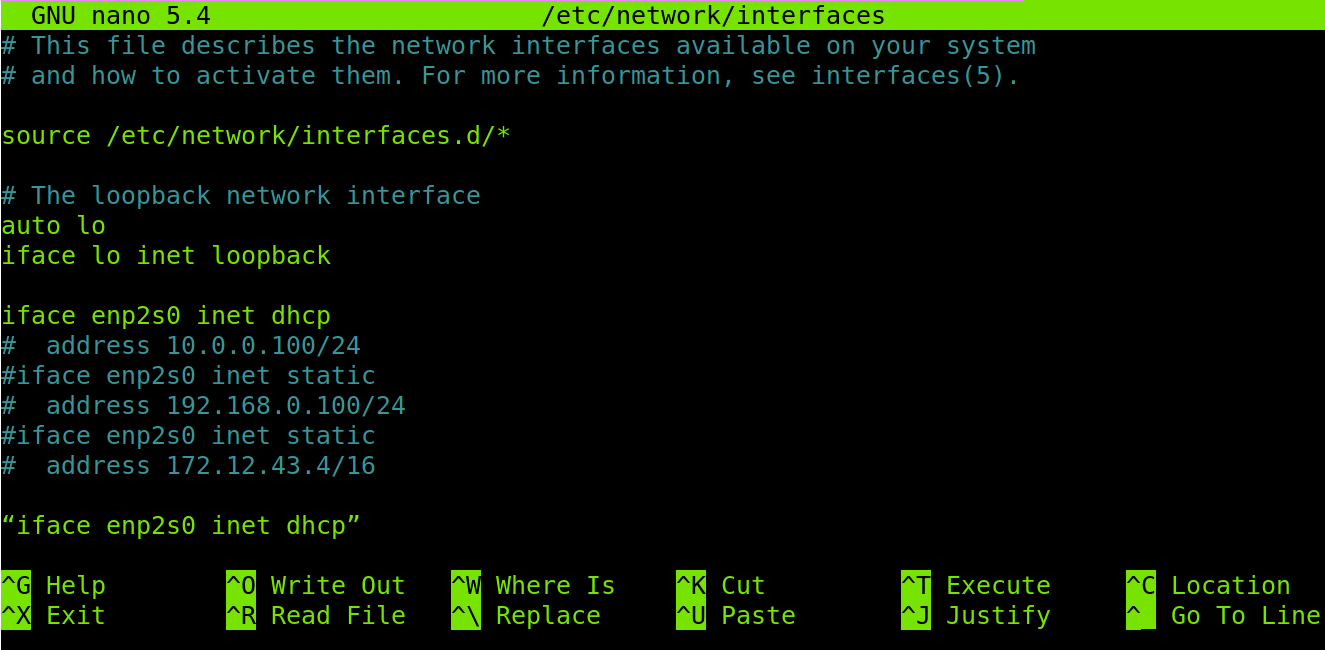
Add the following line at the end of the screen shown in the previous screenshot.
In CentOS systems, you need to edit the /etc/sysconfig/network-scripts file and add the following line:
Deleting Route Tables in Linux
If you want to remove the default gateway, you can run the following command (based on previous examples):
Or
Both methods are acceptable.
Conclusion
As you can see, understanding routing tables is easy as long you have basic networking knowledge. From the middle level, there are no pretexts to avoid this subject. This may save you if you try to connect to a network failing to assign you an IP address with DHCP requiring you to fully configure your device with a proper IP address and the correct routing table. It is essential to say the route add command was replaced by the IP route add command. However, most sysadmins still use the first command belonging to the net-tools package (I recommend you to install it), which includes additional features such as the ifconfig command. Many users consider net-tools methods to be easier. Others also prefer it despite the IP command implementing additional features. The important thing is both methods are acceptable and give the same results. You don’t need to learn both of them as long as you know how to read their man pages.
route command man page: https://man7.org/linux/man-pages/man8/route.8.html
IP route man page: https://man7.org/linux/man-pages/man8/ip-route.8.html
Thank you very much for reading this article explaining routing tables and using the “route add” command. Keep following us for more professional Linux tutorials.