Authentication is a major part of any Laravel project. Many packages exist in Laravel for implementing REST API authentication, such as Passport, Sanctum, JWT, etc. Laravel sanctum is a simple and lightweight Laravel package to implement a REST API authentication system for mobile applications, single-page applications (SPAs), and token-based APIs. It can generate multiple API tokens for the users, and the single-page application can be authenticated using the user’s session. It can be used as an alternative to Laravel Passport API. Laravel sanctum is better than Laravel Passport in many cases. It is simpler than Laravel Passport, and it does not require OAuth2 authentication like Passport authentication. The ways of implementing Laravel Sanctum authentication and checking the REST API by using postman have been shown in this tutorial.
Pre-requisites:
You have to complete the following tasks before starting the steps for implementing the Laravel sanctum authentication system.
Create a new Laravel project named sanctumProject. Here, the composer has been used to create the Laravel project. If the composer is not installed before then, you must install it before executing the following command.
Go to the project folder.
All examples of this tutorial have been tested in Laravel version 9+. Check the installed version of Laravel.
Run the following commands to install and run the postman.
Setup Database:
You have to create a database in MySQL to implement the authentication task. Complete the following tasks to create a database and set up the database for the Laravel project.
- Run the following SQL command to create a database named l_sanctum from the MySQL prompt.
- Open the .env file of the Laravel project and initialize the values for the following information based on the database.
DB_HOST=localhost
DB_PORT=3306
DB_DATABASE=l_sanctum
DB_USERNAME='username'
DB_PASSWORD='password'
Install and Setup Laravel Sanctum:
You have to do the following tasks to install and set up the Laravel Sanctum.
Run the following command for downloading necessary files to install the Laravel sanctum package.
Run the following command to publish the sanctum configuration.
The following output will appear after publishing the Sanctum package successfully.
The migration file for the users table is created by default when creating the Laravel project. Run the following migrate command to create the users table used for authentication.
Setup Middleware:
To use the Sanctum, you have to add the following line in the ‘api’ section of the Kernel.php file. Open the Kernel.php file from the location, app/Http/Kernel.php, and add the line.
The ‘api’ section of this file will be looked like the following image.
Create the API:
Go to the project folder and run the following command to create the controller for the API authentication. AuthController.php file will be created inside the app/Http/Controllers folder after executing the command.
Open the AuthController.php and replace the content with the following script. The register() function has been used in the script to validate the submitted user’s data and insert the valid data into the users table. The login() function has been used in the script to authenticate the user by checking the credentials submitted for the login.
namespace App\Http\Controllers;
use Illuminate\Http\Request;
use Illuminate\Support\Facades\Hash;
use Illuminate\Support\Facades\Auth;
use App\Models\User;
class AuthController extends Controller
{
public function register(Request $request){
$post_data = $request->validate([
'name'=>'required|string',
'email'=>'required|string|email|unique:users',
'password'=>'required|min:8'
]);
$user = User::create([
'name' => $post_data['name'],
'email' => $post_data['email'],
'password' => Hash::make($post_data['password']),
]);
$token = $user->createToken('authToken')->plainTextToken;
return response()->json([
'access_token' => $token,
'token_type' => 'Bearer',
]);
}
public function login(Request $request){
if (!\Auth::attempt($request->only('email', 'password'))) {
return response()->json([
'message' => 'Login information is invalid.'
], 401);
}
$user = User::where('email', $request['email'])->firstOrFail();
$token = $user->createToken('authToken')->plainTextToken;
return response()->json([
'access_token' => $token,
'token_type' => 'Bearer',
]);
}
}
Add route for the API:
Open the api.php file from the routes folder and add the following lines. The first line has been used to add the AuthController information. The second line has been used to add the API route to register user. The third line has been used to add the API route to authenticate the registered user.
Route::post('/register',[AuthController::class,'register']);
Route::post('/login', [AuthController::class, 'login']);
Testing API authentication using Postman:
Run the postman application. Set the request type to POST and write the following URL.
http://127.0.0.1:8000/register
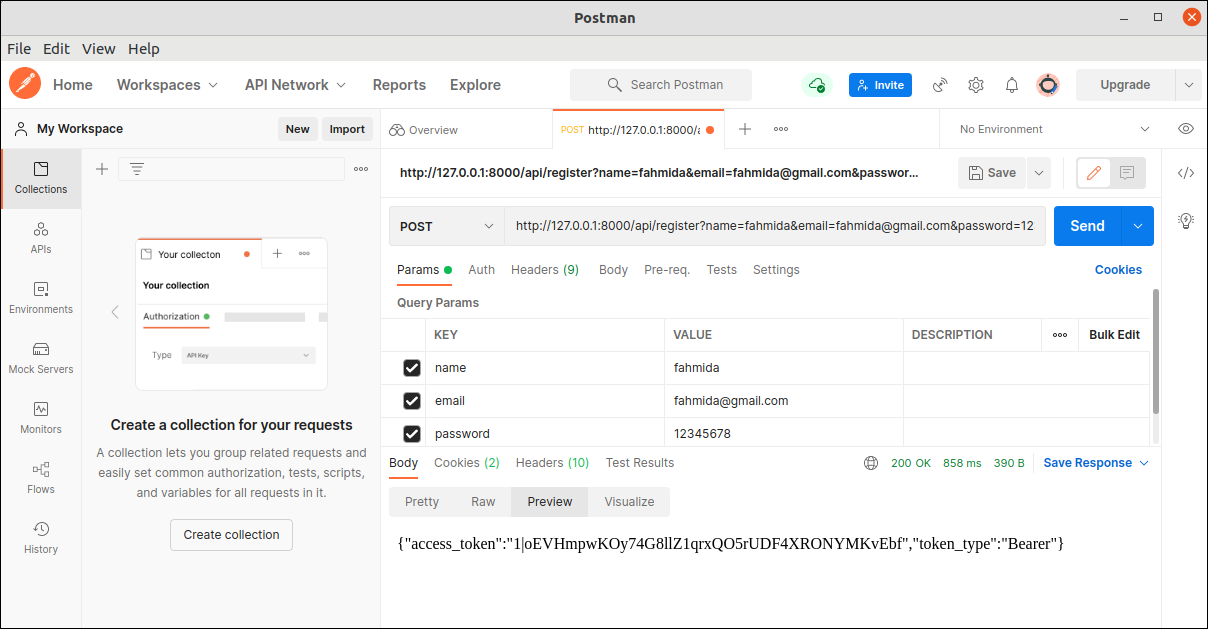
After adding the required parameters to register a new user account, click on the Send button. If the new user information is inserted successfully into the users table, then an access_token information will be displayed like the following image.
Open the users table from the database by logging into the MySQL server or opening the PHPMyAdmin from the browser to check any new record has been inserted or not into the users table. The following image shows that a new user record has been inserted into the users table after sending the data by using the postman application.
Now, you can check the API authentication by using the postman. Write the following URL in the postman application after selecting the POST as the request type. Type the valid email address and password to authenticate the existing user and click on the Send button. If the provided user’s information is valid, the access_token information will appear like the following image. The error message will appear for the invalid user’s information.
Conclusion:
The simple way of implementing API authentication in the Laravel project using the Sanctum package has been shown in this tutorial. Laravel users will get the concept of API authentication and be able to implement and check the authentication using postman after reading this tutorial.


