Within this guide today, we will be showing you a way to use the resize2fs instruction on the Linux shell to resize a partition. Before moving towards the resizing of partitions, we have to make sure that our Linux system is fully updated and upgraded. If not, open your shell application from the Linux system and try out the instruction shown below using the “apt” utility on its query area. The update instruction would update your Linux system in a few minutes.

After the Linux system update, make sure you have been using the upgraded system. By trying the upgrade instruction via the “apt” utility, you can make sure that the system is upgraded.

The process of upgrading the Linux system i.e., Ubuntu 20.04, might require your confirmation to proceed with the system update. You have to tap “y” from the keyboard and press Enter.

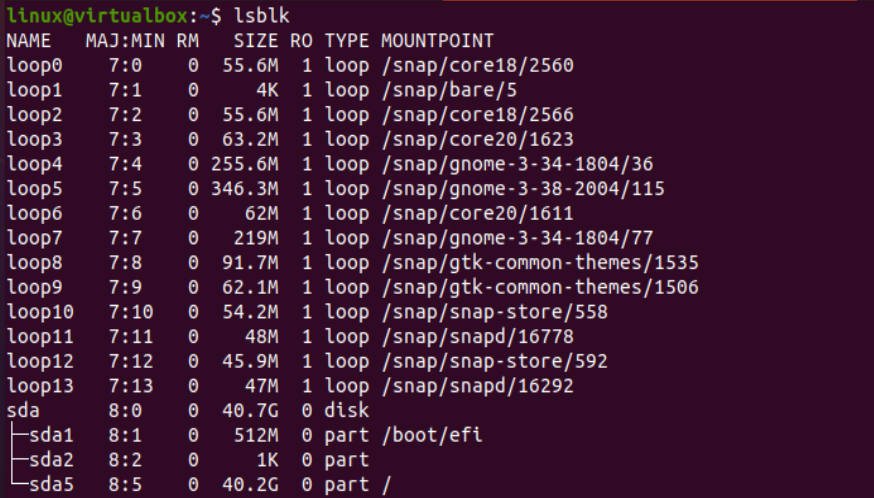
Before resizing a partition, we must have an idea about all the disks or devices in our Linux system. To check for the partitions, Linux provides the “lsblk” instruction. After running it, we have all the devices listed on the terminal screen. Our virtual drive “sda” is listed below in the list with a size of 40GB. Along with that, it has 2 partitions. The sd1 partition is the root directory while the other ones are primary drives.
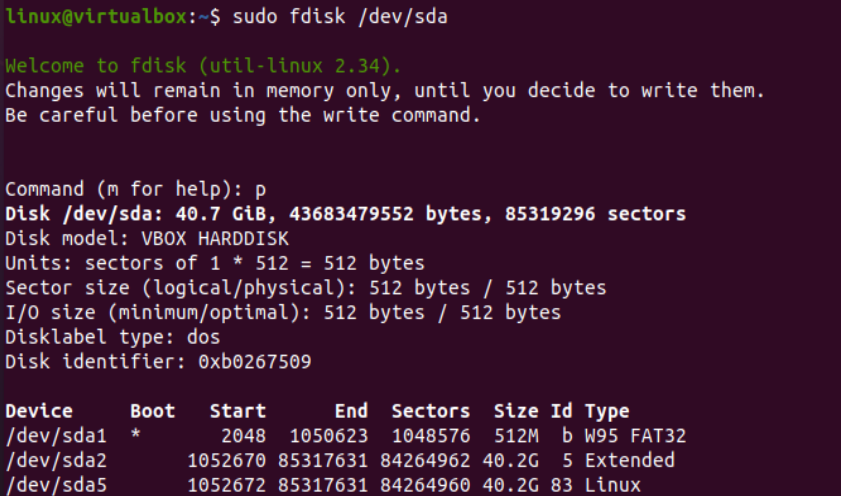
Whenever you want to get more information regarding in the drive you have, along with its partitions, you tend to use the fdisk instruction in the shell. The fdisk instruction should be utilized with the path to the “sda” drive i.e., “/dev/sda”.
After running this instruction, you will get to the interface where you can make up adjustments to sda. Write “p” to get the drive information like its model, total units in bytes, its sector size, its input/output parsing size, label type i.e., des, and its identifier number along with the information regarding its partitions. You can see the total amount of memory assigned to each partition and the type of partitions along with some ID and sector data.
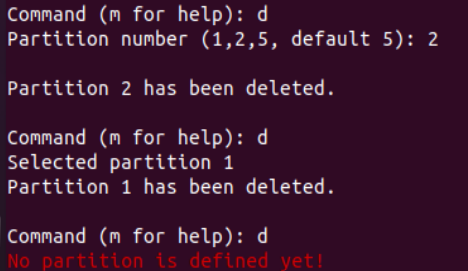
After getting the information regarding the partitions we have in the sda directory, we need to delete a partition to resize it. We can choose to delete any partition or all partitions and create new ones as well. To delete the partition from the “sda” directory, we have to add the keyword “d” in the “Command” area.
After running the “d” command, we will be asked to add the partition number according to the partitions we have. This partition number will specify the partition to be deleted. It would be showing you the partition numbers along with the default number of a partition to be deleted i.e., suggested partition number is 5.
Let’s suppose, you want to delete partition number 2 i.e., sda2. For this, enter “2” and press Enter to proceed. You will get a success message that partition 2 has been deleted successfully. After this, try using the “d” instruction once again to delete another partition of the sda device. This time, it chooses partition 1 itself and deleted it successfully as per the output. After deleting all the partitions, I won’t allow you to execute the “d” instruction anymore.
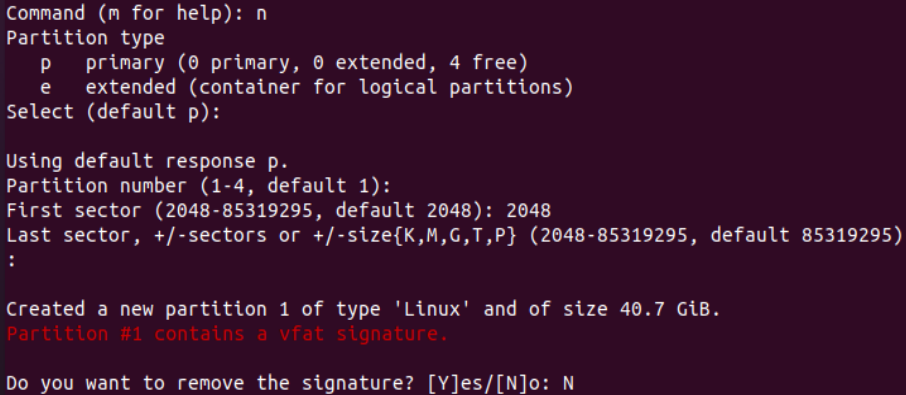
After deleting all the partitions, we have to create a new partition within the same sda device. For this, try out the “n” command in the command area we have been provided with. After using this instruction, you will be provided with two options to choose the partition type. The “p” refers to the “primary” partition and “e” stands for the “extended” partition. The “Select” query area wants you to specify the type of partition you wanted to create. If you don’t specify any of it, it will choose the primary partition by default as shown in the image below. You need to add a number to the partition. If not specified, it will choose number 1. Specify the size for this partition i.e., 2048 equals 40GB.
After choosing the sector, your partition will be created successfully i.e., partition of size 40 has been generated. After this, you will be requested a question if you want to remove the signature or not. Tap “Y” to remove it; otherwise, tap “N” to avoid removing the signature. Here, we are not going to remove the signature.
After using the “p” command once again, you will see that the device “sda1” has been created with size 40 and is of type “Linux”.

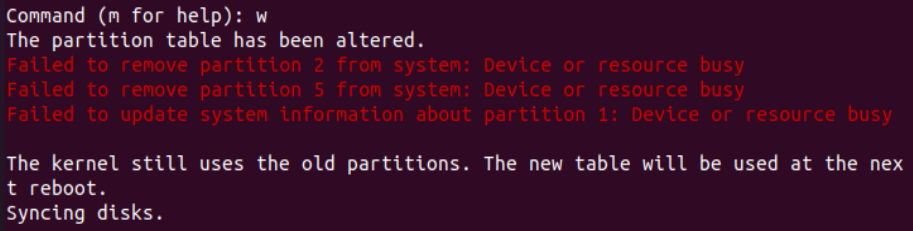
It’s time to write the changes. For that, you have to use the “w” instruction on the same sda interface and your partition table will be altered successfully. The disks then will be synced together.
It’s time to use the resize2fs instruction to resize your sda1 device according to the new partition we have created. For this, use the “resize2fs” instruction along with the path “/dev/sda1” in the Linux terminal as shown. After using this instruction, your sda1 partition will be resized.
![]()
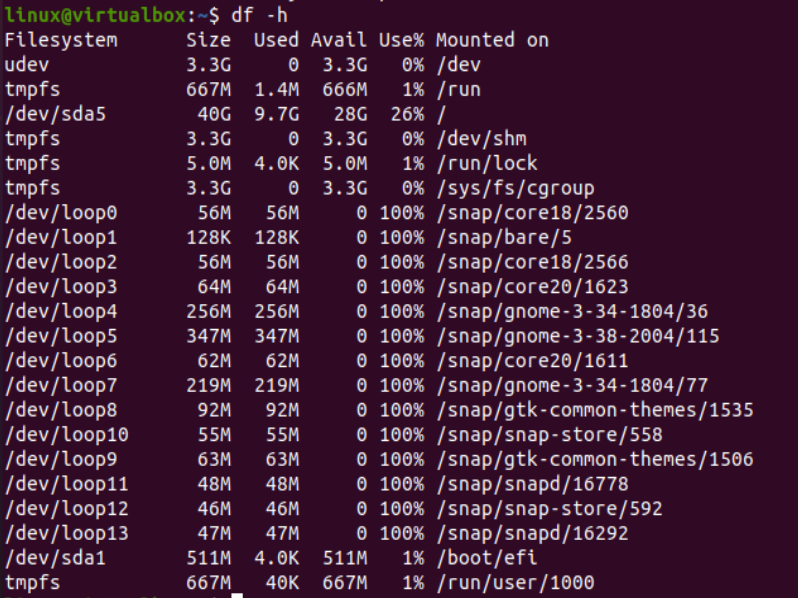
The use of the “df” instruction with the “-h” option is showing us that the partition sda1 has been resized automatically.
Conclusion
We have explained the use of resize2fs instruction in the terminal shell to resize the file system. To achieve that, we need to delete the previous partitions and have to create new partitions. After this, we can resize the file system without affecting the total size.