Pre-requisites:
Install GitHub Desktop
GitHub Desktop helps the git user perform the git-related tasks graphically. You can easily download the latest version installer of this application for Ubuntu from github.com. You have to install and configure this application after download in order to use it. You can also check the tutorial for installing GitHub Desktop on Ubuntu to know the installation process properly.
Create a GitHub Account
You will be required to create a GitHub account to check how the branch name can be renamed remotely.
Create a Local and Remote Repository
You have to create a local repository with one or more branches to check the commands used in this tutorial for renaming any branch locally. You have to publish the local repository to your GitHub account to check the way of renaming the branch remotely.
Rename a Local Branch:
You can rename a local branch by executing the git command from the terminal or by using the GitHub Desktop application. Both ways have been described in this part of the tutorial.
Rename a Local Branch from the Terminal
Open the terminal and go to the local repository location that contains one or more branches.
Run the following command to check the list of the existing branches of the current repository:
The following output shows that the repository contains two branches. These are main and secondary, where the main is the active branch.
Git checkout command is used to navigate between the branches and provide updated information about the particular branch if the branch is published in the remote server.
Run the following command to switch into the branch, named main, and get its updated information:
The following output shows that the branch named main is now active and up to date with the main branch of the remote server.
You can rename any active branch locally using the -m option.
Run the following commands to rename the branch named main with a new name, master, and check the branch if it is renamed properly or not.
$ git branch
The following output shows that the main branch is renamed to master properly.
Run the following command to get the list of local and remote branches:
The following output shows that the main branch is renamed to master locally but the remote server contains the branch name, main.
Rename a Local Branch Using GitHub Desktop
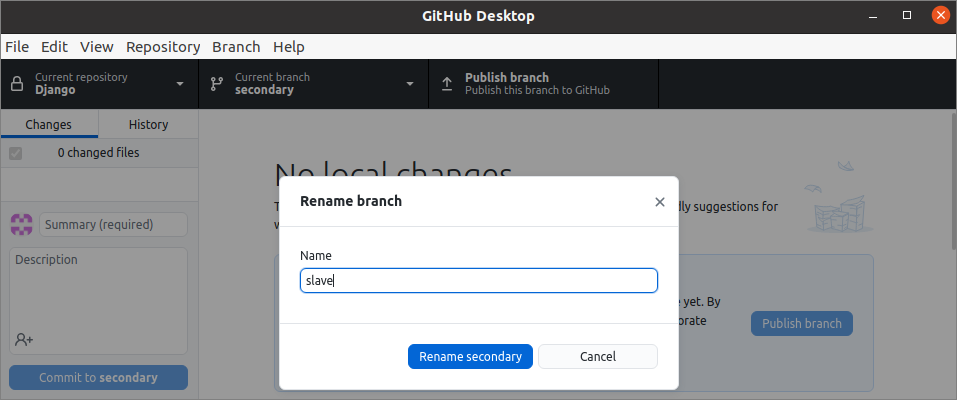
The branch name can be renamed locally without typing any command using the GitHub Desktop application. Open the application. Then click on the “Branch list” menu item from the “View” menu to show the branch list of the current repository. Click on the “Rename” menu item from the “Branch” menu after selecting the branch name that you want to rename. The following dialog box will appear to set the new name of the branch. Here, the slave is set as the new branch name to rename the branch named, secondary. The branch name will be renamed locally after clicking the “Rename secondary” button.
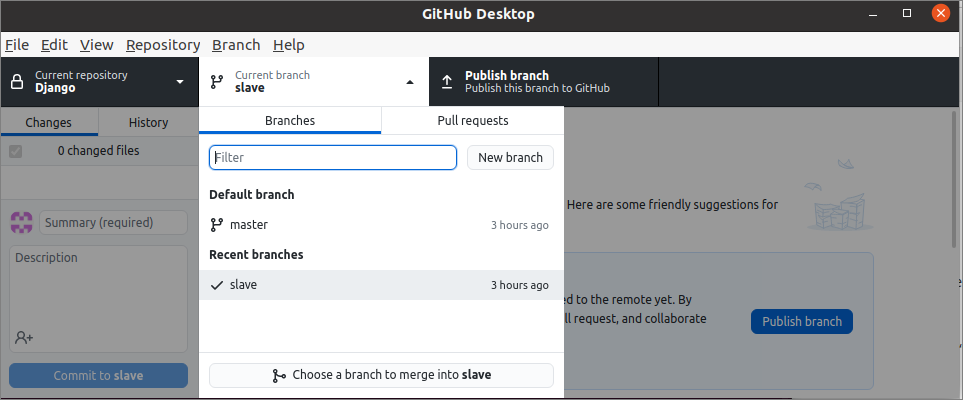
Now, if you check the branch list again, the new branch name will appear in place of the previous one.
Rename a Remote Branch
The branch name can’t be renamed directly on the remote server. You have to delete the branch name first, before renaming the branch remotely. After that, you have to run the push command to rename the branch remotely.
Run the following command to get the list of local branches:
Run the following command to get the list of local and remote branches:
Run the following command to rename the remote branch “slave” to “secondary”:
The output of the first command shows that the local repository contains two branches named “master” and “secondary”. The output of the second command shows the list of the local and remote branches. The remote branches are “main”, “master”, and “slave”. When the third command has been executed, then the username and the password of the git account have been given to authenticate the account and the branch name has been renamed from “slave” to “secondary”.
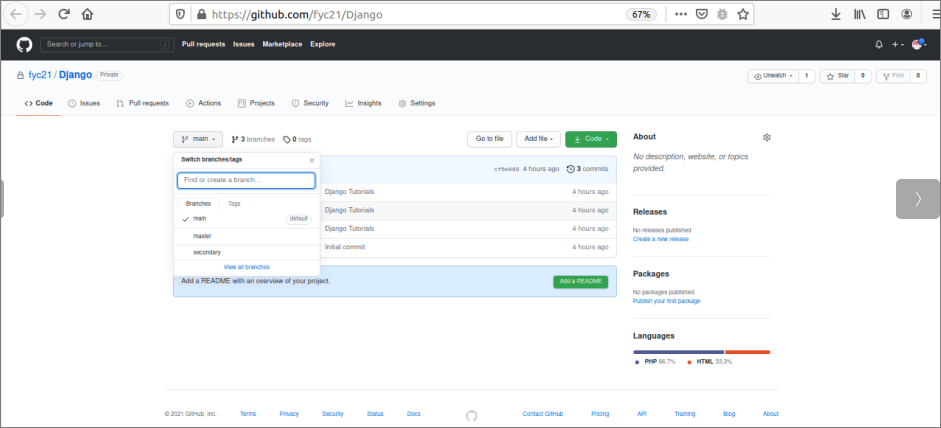
You can also check if the branch name is renamed properly or not in the remote server by opening the repository from “github.com” with the valid username and password. In this tutorial, the repository name in the remote server is Django. Open the Django repository and click on the dropdown button of the branch where the branch “main” is active by default. The following branch list shows that the repository contains three branches, namely “main”, “master”, and “secondary”. Here, the “slave” branch has been renamed to “secondary”.
Conclusion:
The branch name of any repository can be renamed locally and remotely by using the command or GitHub Desktop. Both ways have been explained in this tutorial using a simple demo repository to help the readers rename the name of the branch when required.


