
- It does not overwrite the recovered data but fills the gaps in case of iterative recovery. However, it can be truncated if the tool is instructed to do it explicitly.
- Recover data to a single file from multiple files or blocks.
- Supports multiple types of device interfaces such as SATA, ATA, SCSI, MFM drives, floppy disks, and SD cards.
In this guide, I will be exploring this incredibly useful data recovery tool. I will also discuss its installation process, and how to use it to recover a block device or partition.
- Installing ddrescue
- Understanding Basics
- Important Considerations
- Using ddrescue
- Recovering the Corrupted Block
- Restoring the Image File to a new Block
- Recovering Block to Another Block
- Recovering Specific Data From the Recovered Image Files
- Advanced Features
- How ddrescue Works
- Conclusion
Note: I am using the Linux distribution (Ubuntu 22.04) for the instructions in this guide. The installation process of the ddrescue utility may differ, but the instructions will be the same across all the Linux distributions.
Installing ddrescue
To install ddrescue on Linux, especially Ubuntu and its flavors or Debian-based distros, use:
To install it on REHL, Fedora, and CentOS, first enable the EPEL (Extra Packages for Enterprise Linux).
The above command is for newer versions of the respective distribution.
Then execute the following command to install the ddrescue:
For Arch-based Linux distributions such as Arch-Linux and Manjaro, use the below-given command to install the ddrescue recovery utility.
Since I am using Ubuntu 22.04, I will use the APT package manager to install it.
Understanding Basics
Before using the ddrescue tool to recover data, I would recommend users who are new to the recovery process understand some naming conventions of Linux.
Linux recognizes blocks (devices) as files and places them in the /dev directory. To list the files in the /dev directory, use the ls /dev command.
The hard drives (storage blocks) are represented with sd followed by alphabets; in the case of multiple storage devices the files will be represented as /dev/sda, /dev/sdb, and so on.
If the storage device has partitions, then they will be represented by a number with the respective drive file name, such as /dev/sda1, /dev/sda2, and so on.
To list all the blocks and other connected devices with the system, use the list block lsblk command:
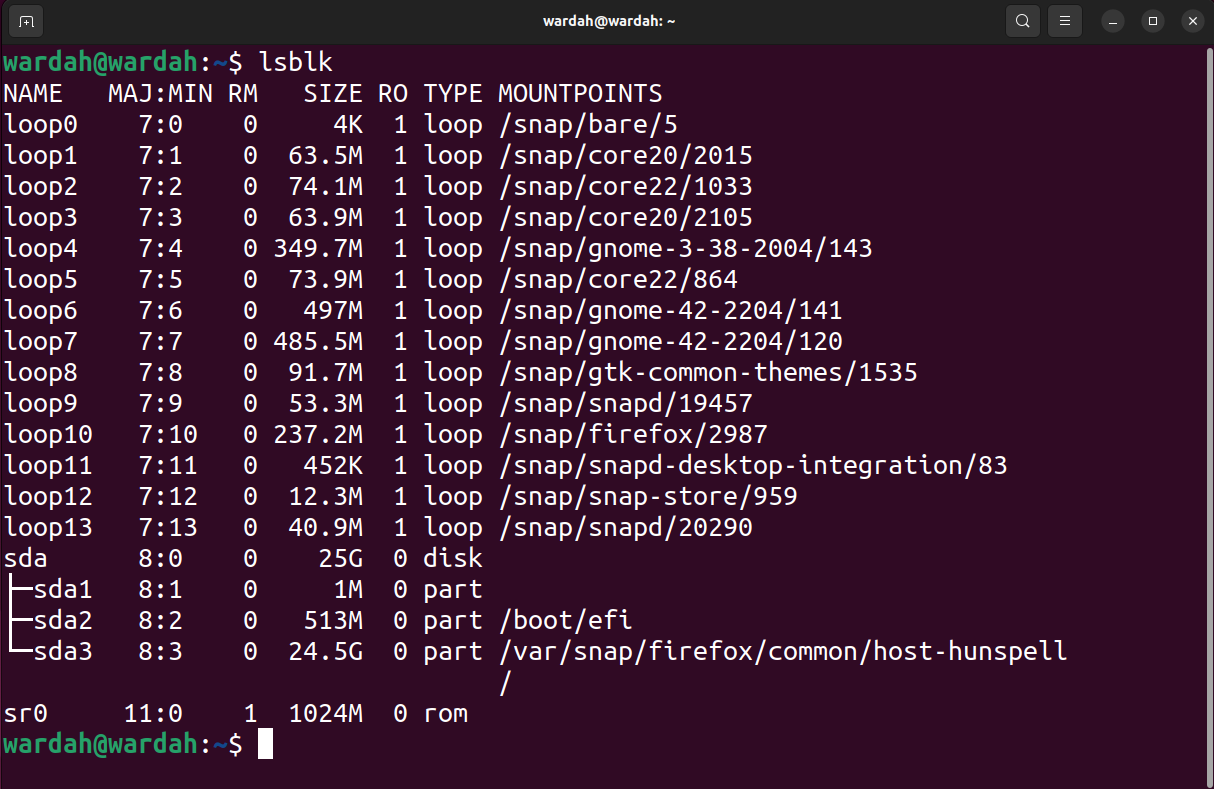
The ddrescue command can recover the entire block (containing MBR & partitions) or a partition as well. On the other hand, if you need to recover only specific files from a specific partition, then it is better to recover the partition instead of the entire block.
Important Considerations
Before using the ddrescue utility, some very key points should be considered:
- Do not try to recover a mounted block, the block should not be even in read-only mode.
- Do not try to repair a block with I/O errors.
- The system can change the input and output device names on reboot. Ensure the device names are correct before starting the copying process.
- If you are using a separate block as an output device, then any data on the device will be overwritten.
Using ddrescue
After installing the ddrescue utility and understanding the naming conventions, the next step is to identify the failing disk and recover it using the ddrescue tool.
Recovering the Corrupted Block
The first example will encompass the process of recovering the entire block. First, list the blocks using the lsblk command:
The -o flag is used to specify which type of information (fields) the command should output. I have mentioned the NAME, SIZE, and FSTYPE or file system type.

Now, you can identify the target block, partition, and location to save the rescued image file.
Another important thing to note is that on Linux, the block name is assigned dynamically on boot and after the reboot, the names of the blocks may change. So, be careful while noting down the block names.
Now, use the following syntax to rescue the block as an image file with a log file in the root directory.
Note: Replace [block], [path/name] of the image file, and [logfile_name] with the preferred names accordingly.
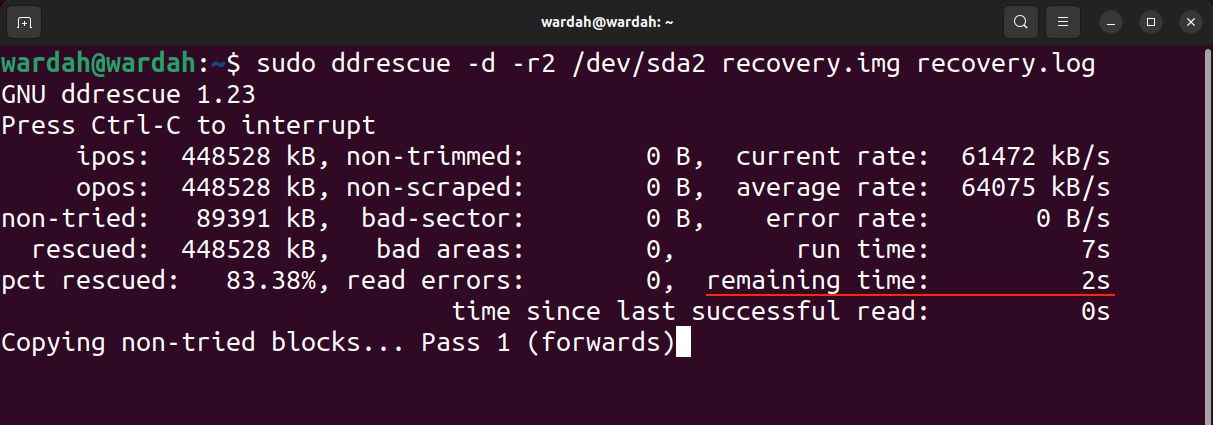
In this example, I am recovering the /dev/sda in the root directory with the image file name recovery.img. The log file also known as the map file is essential if you want to resume the recovery at any time.
Two important flags are used in the above command.
| d | –indirect | Is used to tell the tool to directly access the disk ignoring the kernel cache |
| rX | –retry-passes | In used to tell the tool to retry the bad sector X number of times |
On executing the above command, you will notice two files appearing in the file browser with the names recovery.img and recovery.log.
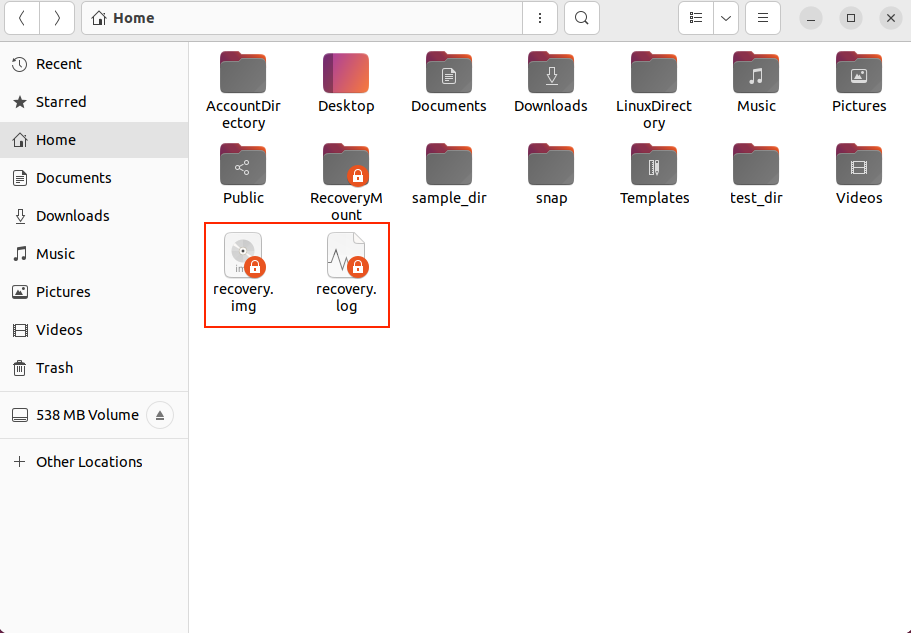
The time of recovery depends upon the size of the input block and the damage. If you are recovering a large block, I recommend having a log file because it can take several hours or even days to complete the process.
The output of the above command is given below:

In the output image, ipos is the input position of the input file from where the copy is begun and the opos is the output position on the output file where the data is being written.
The non-tried is the size of the block is not pending to be tried. The rescued indicates the size of the block successfully recovered. The pct rescued indicates the successful recovery of data in percentage. The terms, non-trimmed, non-scrapped, bad-sector, and bad areas are self-explanatory. However, the read errors term indicates the failed read tries in numbers.
The run time shows the time the tool took to complete the process, while the remaining time is the time remaining to complete the recovery process. The above output shows the remaining time 0 because the process has finished, read the output in the following image of an unfinished process.
Let’s see what we get in the log file; to open the generated log file, use the vim recovery.log command.

The current_status is + which means the process is finished, while the current_pos is the position on the block.
A list of current statuses is given in the following table:
| ? | Copying |
| * | Trimming |
| / | Scrapping |
| – | Retrying |
| F | Filling the specified blocks |
| G | Generating the log file |
| + | The process is finished |
Underneath this, the log file has status indications of the previously rescued blocks in the form of characters listed below:
| ? | The block is non-tried |
| * | The non-trimmed failed block |
| / | The non-scrapped failed block |
| – | The bad-sector failed block |
| + | Finished block |
Restoring the Image File to a new Block
Once you are done with the recovery process and have the image file. You may now want it to move to the new drive from a corrupted drive. To move the image file to a new block, first, connect that block to the system and then identify the block name using the lsblk command.
Let’s assume it is /dev/sdb, use the following command to copy the image to a new block.
The -f flag is used to overwrite the new block if there is any data. Keep in mind that the name of the log file must be different to keep it separate from the previously stored log file.
The above operation can also be done using the dd, another powerful command used to copy the files.
Before making a restore, keep in mind that the new block must be large enough to keep the entire recovered block; for example, if the recovery block is 5GB the new block should be greater than 5GB.
If the recovered image file renders a lot of the errors, then they can be repaired using the fsck command on Linux to some extent. While on Windows, you can make use of the CHKDSK or SFC commands to do this. However, the recovery depends upon the number of errors the corrupted file generated.
Now, the recovery process and restoration are done. Another important thing to note is that you can recover a corrupted block directly on another block, instead of creating an image file and then copying it to the new block. Well, in the succeeding section, I am covering this process in detail.
Recovering Block to Another Block
To recover a block directly to a new block, first connect the block to the system and again use lsblk command to identify the block name. Wrong block names can mess up the entire process and you may lose data.
After identifying the source block and the destination block, use the following command to recover the block:
Let’s assume /dev/sdb is the destination block, so to copy the /dev/sda directory to the new block use:
Again, see the critical considerations mentioned in the earlier sections before attempting this process.
Recovering Specific Data From the Recovered Image Files
In many cases, the purpose of data recovery is to find the specific files from corrupted drives. To access the specific file you need to mount the image file. On Linux, the recovered image file can be explored by using the mount command.
Before mounting the image file, make a folder or directory in which you want to extract the content of the image file.
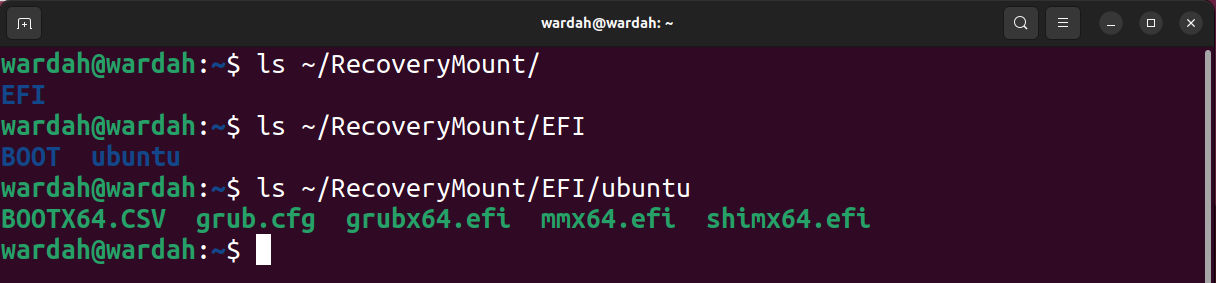
Next, mount the image file using:
The -o flag indicates the options, while the loop option is used to treat the image file as a block device.
You now have access to the image file’s contents, as displayed in the following screenshot.
To unmount the block, use the umount command.
Advanced Features
To start the recovery from a specific point, use the -i flag or –input-position. It should be in bytes, by default it is 0 bytes. This is important to resume copying from a specific point. For example, if you want to begin the copying process from the 10 GB point, use the following command.
To define the maximum size of the input device, the -s flag will be used. The -s signifies size and can also be used as –size in bytes. If the tool fails to recognize the size of the input file, use this option to specify it.
The –ask option can be quite handy, as it prompts for confirmation of input and output blocks before beginning the copying process. As discussed earlier, the system dynamically assigns names to the blocks, and they change on reboot. So, in that case, this option can be useful.
Moreover, a list of some other options is mentioned below:
| -R | –reverse | To reverse the direction of copying |
| -q | –quite | To suppress all the output messages |
| -v | –verbose | To elaborate, all the output messages |
| -p | –preallocate | To pre-allocate storage for the output file |
| -P | –data-preview | Display lines of the latest data read default is 3 lines |
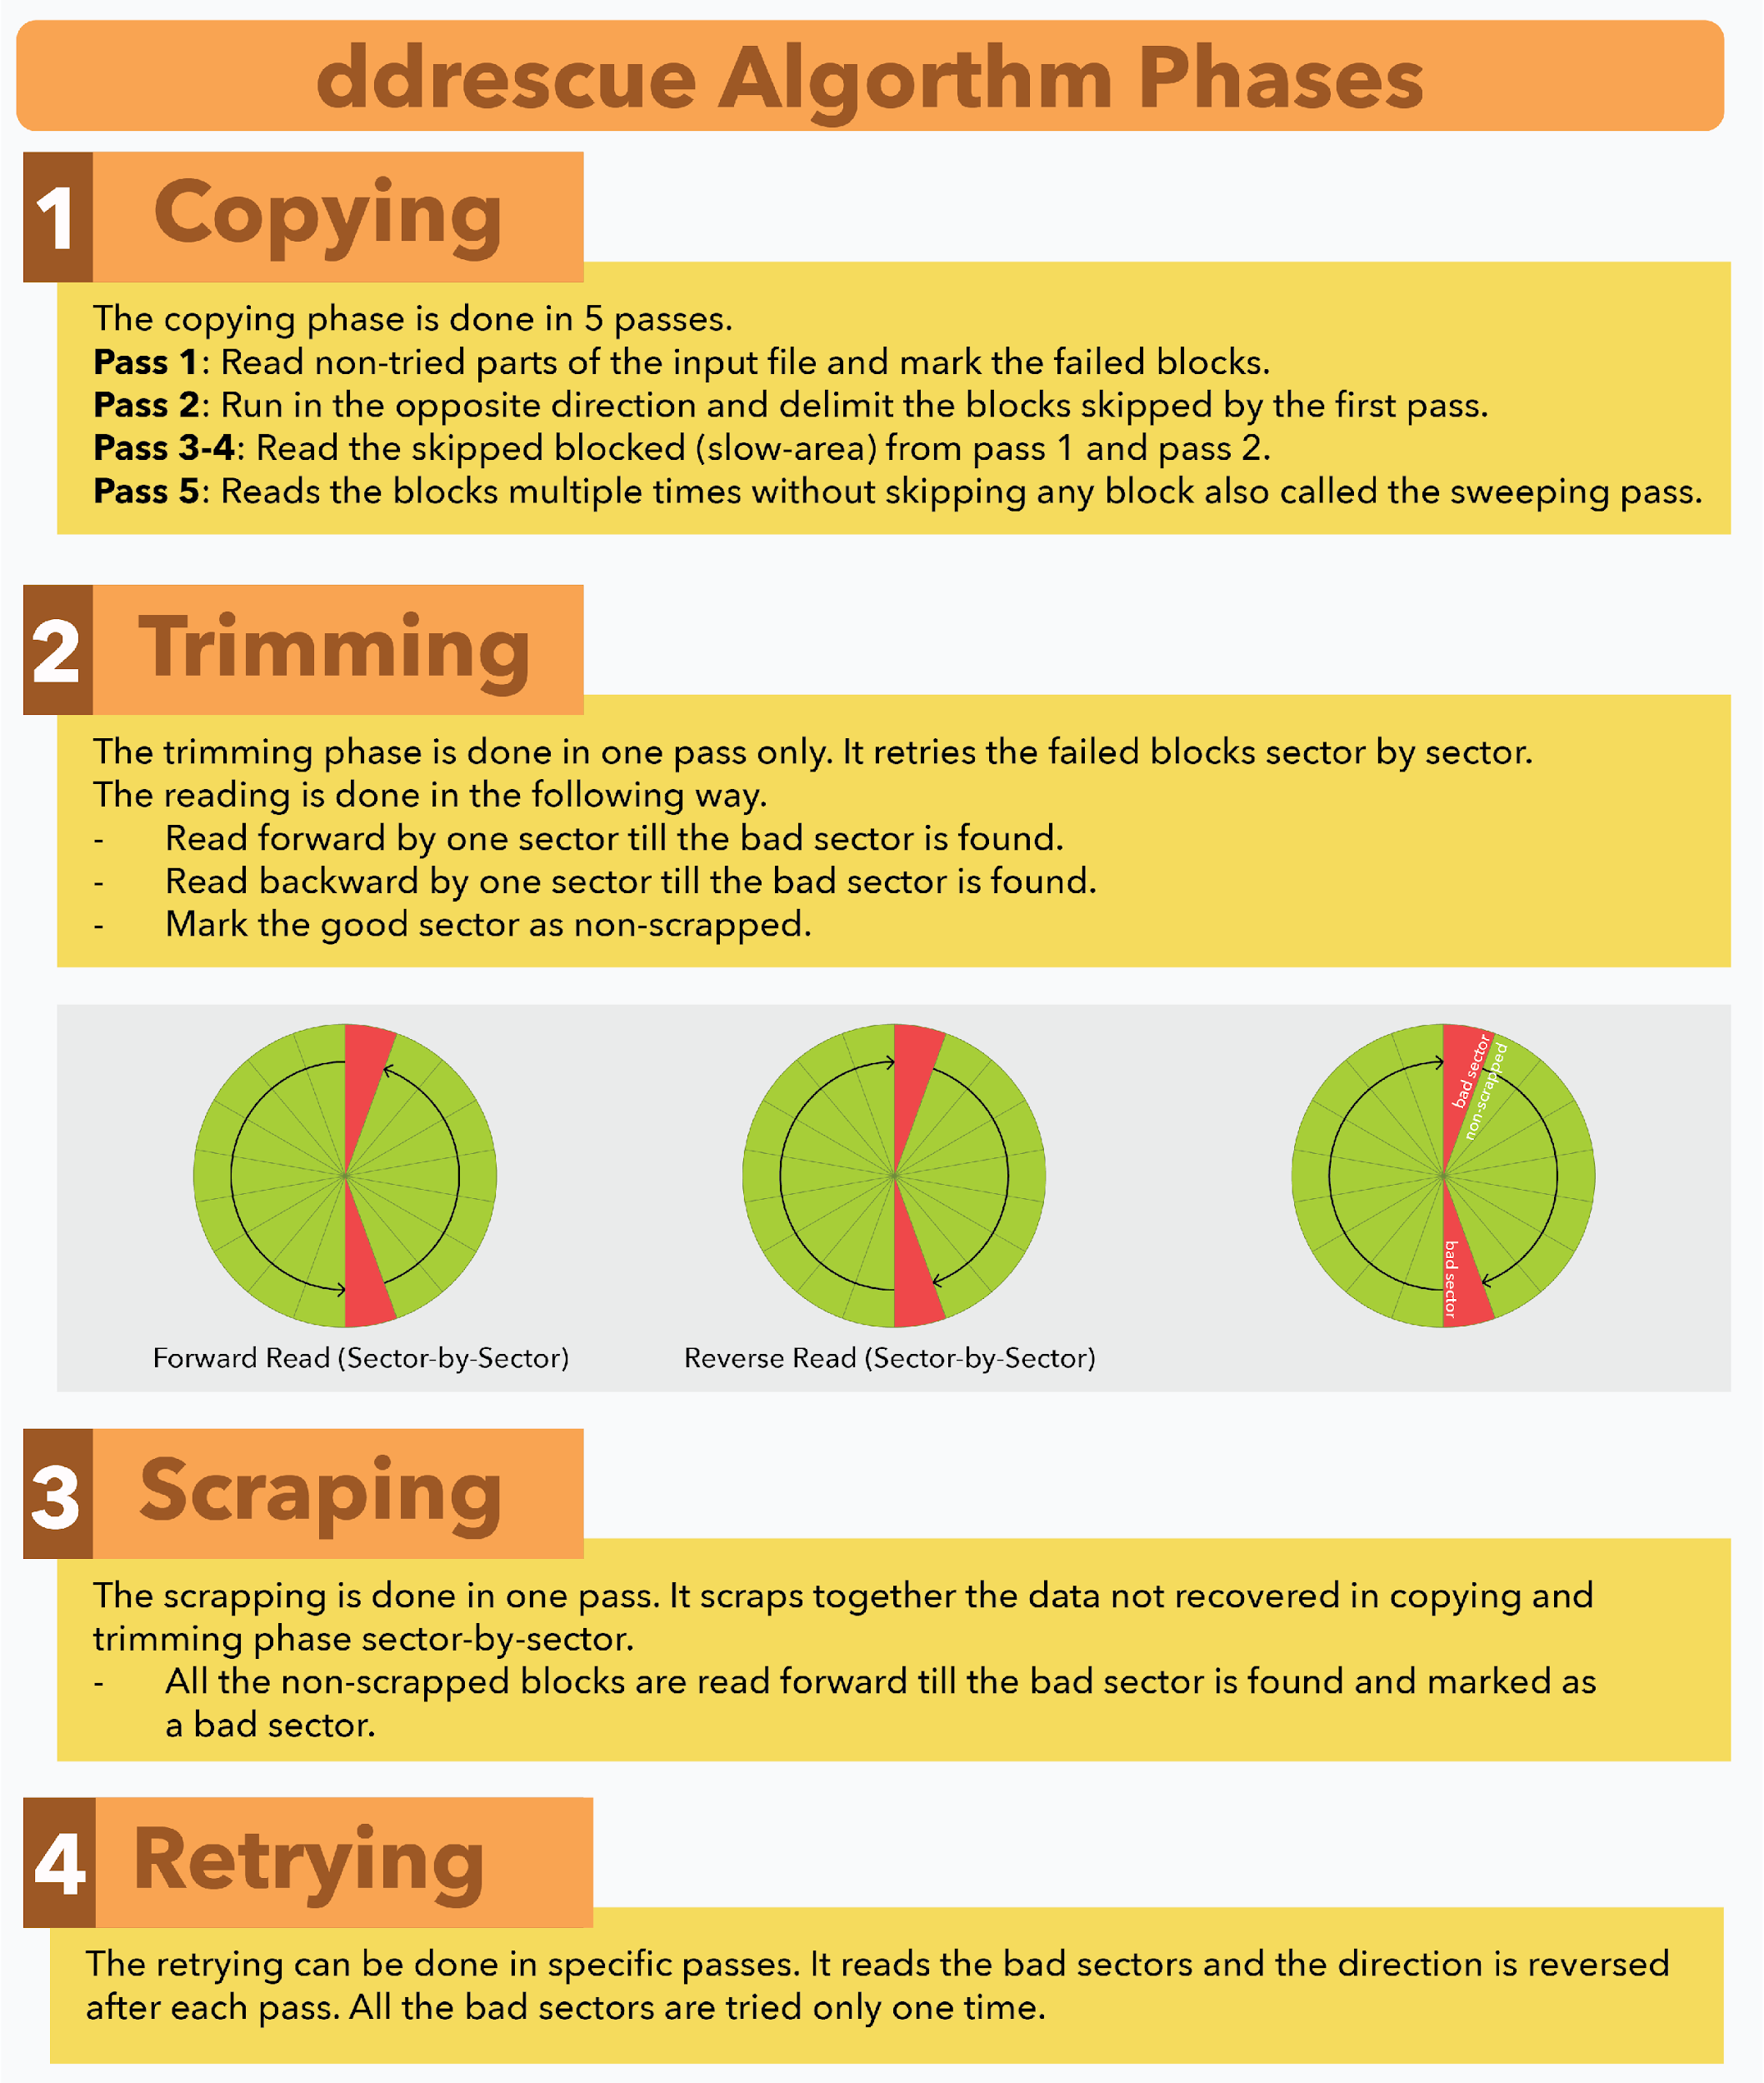
How ddrescue Works
The ddrescue uses a powerful recovery algorithm which is divided into four phases:
1. Copying
2. Trimming
3. Scraping
4. Retrying
The ddrescue algorithm execution is shown in the following image.
Conclusion
The ddrescue is a powerful recovery tool used to recover data from a corrupted or failing drive to another drive by copying the data. It can be effortlessly installed on any Linux distribution with the help of the default package manager. Note the important consideration before using this tool mentioned in this guide. The process of copying data is simple, unmount the drive and use ddrescue command with the source drive name and destination drive name. Don’t forget to use the log file, as it becomes quite useful to resume the recovery process.