Now if you want to share something from your local Web Server to your friends which are outside of the Local Area Network and they can not access your machine. Then how would you expose your localhost to your friends outside the LAN?
In this case you establish a tunnel from your localhost to the internet and share a public IP address to your friends which can be accessed from all over the internet.
Tunnels can be established by using SSH or Ngrok. Here we will discuss both the ways and then we will verify the result of tunneling using netcat.
Getting Public IP using Ngrok
Ngrok is a cross platform tunneling software which can be used to establish secure tunnels from the internet to the local network. It also captures all the traffic for inspection. Following is the method to establish tunnels from localhost to the internet.
Installing Ngrok
Before using Ngrok on your machine, we have to install it. Ngrok can be installed by using the following command in Terminal.
When you run the above command, it will install the ngrok after downloading required files. You can check whether Ngrok has been installed or not by using the following command in the Terminal.
If Ngrok has been installed it will give the version as shown in the following figure.
After installing Ngrok, now it is ready to use to establish tunnels.
Exposing Localhost to Public
Ngrok is used to expose your local web server to the internet. All we have to do is to tell Ngrok what port your local web server is listening on. Run the following command to expose your local web server to the internet
When you run the above command in the Terminal, Ngrok establishes a tunnel from your local web server to the internet through port 8080 and displays the public URL through which your local web server can be accessed. Following GUI appears on Terminal when you run the above command.
Now your localhost:8080 can be accessed from all over the internet by using the link shown in the above figure.
Inspecting the Traffic through Tunnel
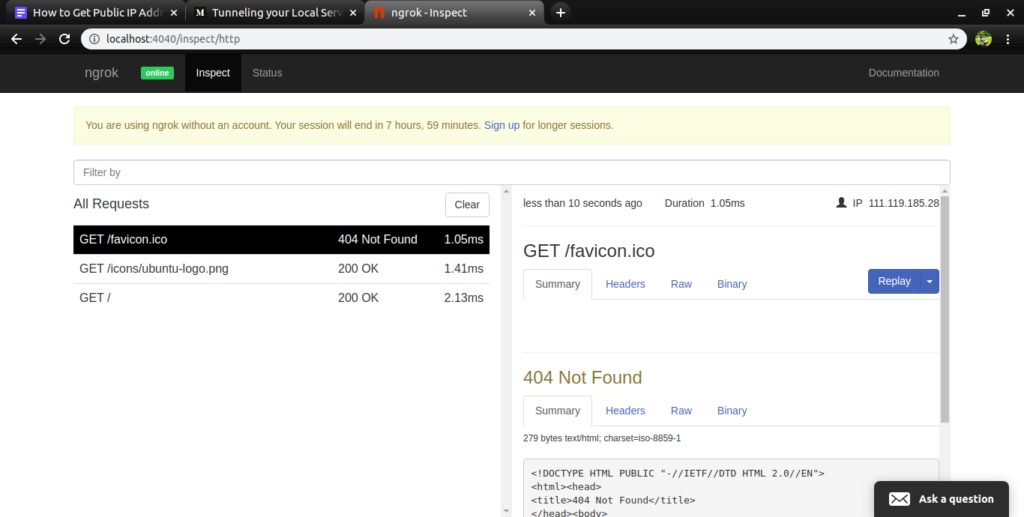
Ngrok provides us with the ability to inspect all the incoming or outgoing requests from the internet to your localhost. We can observe all the traffic by going to the following link
When you goto the above link, the browser shows you all the incoming or outgoing requests as shown in the following figure.
Terminal also shows the requests made to your local web server. The following figure shows how the terminal keeps the record of http requests.
Getting Public IP using SSH
SSH also known as Secure Shell is a secure communication protocol used for remote communication between client and server. Furthermore, SSH can also be used for establishing tunnels to make your localhost accessible to the public. In this blog we will see how to use SSH for establishing tunnels between your localhost and public internet.
Exposing Localhost to Public
Localhost can also be exposed to the public by using SSH which is basically a communication protocol. It is called SSH tunneling or SSH port forwarding. Run the following command in the Terminal of your localhost to establish a tunnel between your localhost and remote server
In the above command
- 8080 is the port that is server is listening to
- 8088 is the port that you want to expose
- remoteUser is the name of user to whom you are going to expose your web server
- IPAddress is the IP of remote user
- -R means that you are creating a connection from remote server to your localhost
Now port 8088 of your localhost can be accessed from a remote server having IP “IP Address” and username “remoteUser” through port 8080.
Remote Server Configuration
Before accessing localhost through the tunnel from a remote server, do make some changes in the sshd_config file of the remote server. This file can be opened by typing the following command in terminal.
After opening the file, make the changes as shown in the following figure.
GatewayPorts yes
After making changes, restart your SSH server to apply these changes. Now localhost is open to the remote server to be accessed.
Testing the Tunnels
So far we have established tunnels between localhost and a remote server by using SSH and Ngrok. Now we will test whether these tunnels have been established or not. We will use netcat command to test tunnels. Run the following command in the terminal of your localhost
When you run the above command in the terminal of your localhost, netcat starts listening on port 8088 of your localhost.
Now type the following command in the terminal of remote server to send message
When you run the above command in the terminal of your remote server, the message “Hello” must appear on the terminal of localhost. If this happens, then your tunnel has been established.
Conclusion
To make your localhost accessible from the internet is done by establishing tunnels between your localhost and the internet. In this blog we have discussed how to establish tunnels to make your localhost accessible to the internet. Two methods of establishing tunnels have been discussed which are SSH tunneling and Ngrok tunneling. Traffic inspection using Ngrok tunneling has also been discussed. After this, the process of testing the tunnels using netcat has been discussed. After reading this blog it will be very easy for you to make your local web server to the public.


