Firstly, log in from your system and search for PowerShell. Right-click on the popped-up PowerShell and tap on the “Run as Administrator” to avoid any inconvenience. The blue screen of PowerShell will be opened on your screen.

Now, the PowerShell has been launched successfully. Your very first task is to make sure that the Active Directory module and services are installed and configured on your Server. So, you need to get the Active-Directory Window Capability in your PowerShell to make use of further commands. For this purpose, you need to get the “RSAT-Active Directory” module using the “Get-WindowsCapability” cmdlet in the PowerShell. We have been using one of our PowerShell to do so. It uses the parameters “name” and “online”.
It will start collecting and loading the RSAT-Active-Directory module in your PowerShell. You can see that the Operating system is running its required actions to do so from the image.
Within a few seconds, it will load all the required modules for RSAT Active Directory, and below is the success output for it.
After getting the Active Directory module, you have to add it to your Server. Use the “Add-WindowsCapability” cmdlet to do so. Make sure to add the parameter “Name” to add the Active Directory module with its version as shown below.
The operating system is running the cmdlet “Add-WindowsCapability” to add the RSAT Active directory in our system.
Its output is the same as we got in getting the RSAT Active Directory module.
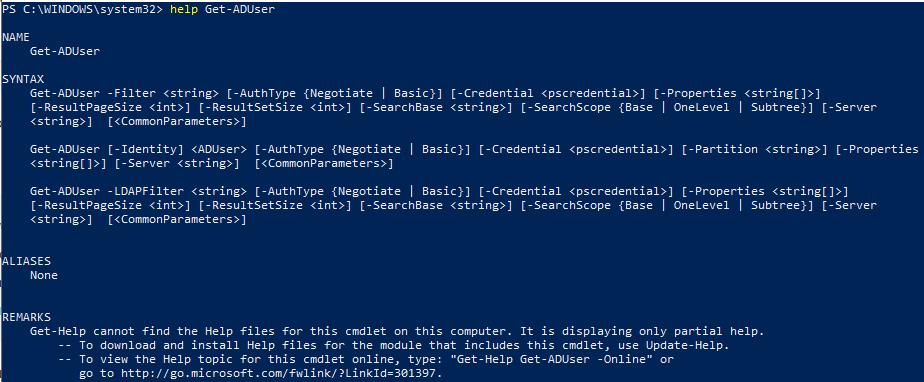
Let’s start seeing the “Get-ADUser” cmdlet by looking at its manual help first. This manual tells us the syntax, aliases, and remarks for the “Get-ADUser” cmdlet on the PowerShell.
If you want to check all the installed modules in your Windows server of Windows 10, you can do that using the “Get-Module” cmdlet on the PowerShell. This Get-Module cmdlet uses the parameter “ListAvailable” to get all the active and available modules on the PowerShell screen. The output for this command is showing that our system has an ActiveDirectory module installed and active along with its exported commands.
To get the Active Directory module, you can use the below-shown command from the image.
To get the module, along with its exported commands can be done with the command presented in the shown PowerShell image.
To use any cmdlet, we need to import its relevant module in the PowerShell as well. Let’s start by importing the Active directory module first in the PowerShell before using the “Get-ADUser” cmdlet. For this purpose, the “Import-Module” cmdlet will be used along with the module name i.e. “ActiveDirectory”. Thus, we have used the Import-Module command in the PowerShell to import the ActiveDirectory module as shown beneath. Now, the PowerShell is ready to use the “Get-ADUser” cmdlet to get the information regarding users.
Example
Let’s start with a very basic illustration. In this illustration, we will be using the “Get-ADUser” cmdlet solely on the PowerShell without any parameter. This is because we want to get all the users from the Windows Server at once. So, this command will be a single-word command. Thus, we have used it on the PowerShell as shown below.
It will simply come up by asking you to add the filter value. This value will tell a system, how many users you want to get from it. As we have added the “*” characters, thus it will display all the users currently located in the Windows Server of our system. This is the most simple way to use the “Get-ADUser”.
Let’s make up the first parameter of the Get-ADUser cmdlet. So, the very first parameter is “Filter” which is automatically used in the above command by a PowerShell. This time, we are using it in our command to get all the users using the “Get-ADUser” cmdlet as below. It will eventually display all the Windows Server users on the PowerShell screen.
When you have a lot of users in your system, you can add them in different categories to make a difference. The same works for the Windows Server. So, we will be listing all the users using the Filter parameter which belongs to specific departments when it comes to some business enterprise. We have to use the “SearchBase” parameter after the “Filter” parameter” along with mentioning the names of those departments as per the instruction used in the image.
If you want to search for users having names starting with some specific words, you can do so as well. For that. You have to use the “Name” keyword within the parameter “Filter”. You have to mention the account type of a specific user within the Filter. The “Format-Table” parameter can be utilized to get the table form of our output if you have more than one user with the same name along with their other information.
The output for the above command is shown below. It shows the Name column, SamAccountName on the PowerShell along with the information of a user.
You can also get the information regarding a single user solely along with its properties. For this purpose, you need the Identity and Properties parameter. The Identity parameter is taking the name of a user and the Properties parameter will get all its information.
Conclusion
This article contains all the demonstrations and implementations for using the “Get-ADUser” cmdlet in the PowerShell of Windows Server. We have started with getting and installing the required modules as prerequisites of Get-ADUser i.e RSAT Active Directory.


