When working with PowerShell, you can easily use the “Export-Csv” cmdlet to create a CSV file containing the target objects. Moreover, you can combine different options to specify how you want your CSV output to be. If all this sounds new, worry not. This guide uses different examples to detail how the PowerShell export to CSV works. Let’s begin!
Examples of PowerShell Export to CSV
PowerShell is mainly used for scripting to automate different tasks. When using PowerShell, you can work with various data formats including CSV. The “Export-Csv” cmdlet allows the users to use different objects that they submit to create CSV files. Let’s have examples to understand this in detail.
Example 1: Export the CSV Data from Cmdlet
For this example, let’s say you want to use the “Get-Process” cmdlet that checks the running process on your computer to create a CSV file for that data. Our object is the cmdlet that contains the objects, and the “Export-CSV” must be added to export that data to the desired CSV output.
Our command is as follows:
Our first cmdlet is the “Get-Process”, and we pipe its output to the “Export-CSV” cmdlet. Next, we use the “-Path” option to specify where we want to save the CSV output file. In this case, we name our output as “test.csv” and save it in the current directory. Still, we add the “-NoTypeInformation” option to remove the #TYPE header from appearing in the output file.
Once we execute the “export CSV” command, we can list the available CSV files to confirm that we managed to export CSV from the cmdlet object.
Next, let’s import the created CSV to check its contents. When it opens, we can confirm that we successfully got a CSV file that contains our system’s running processes and all the different properties since we didn’t specify any target properties.
Example 2: Export CSV from an Array
Sometimes, you may have your objects stored as an array instead of sourcing them from a cmdlet. When you have your array, it’s also possible to export the data to a CSV file for easy manipulation.
For this example, let’s say you are creating an array to hold the user information: “User” and “Password”. Your array could be as shown in the following. Once you created the array, export CSV with the following syntax:
We have our array named “$users” and we name our output CSV as “users.csv”.
We can use the “ls” command to confirm that our output CSV file is successfully created.
Let’s import the CSV file to see the contained data. It should have the data from the array neatly organized.
The following image confirms that we successfully used PowerShell to export CSV from an array. If we had a large data set, organizing it this way makes it easily readable:
Example 3: Export CSV to a Specific Property in PowerShell
So far, we exported all the properties from our data. However, the “-Select-Object” cmdlet lets you use the “-Property” option to specify which properties from your data should be exported to the CSV file. This feature helps in narrowing down your output.
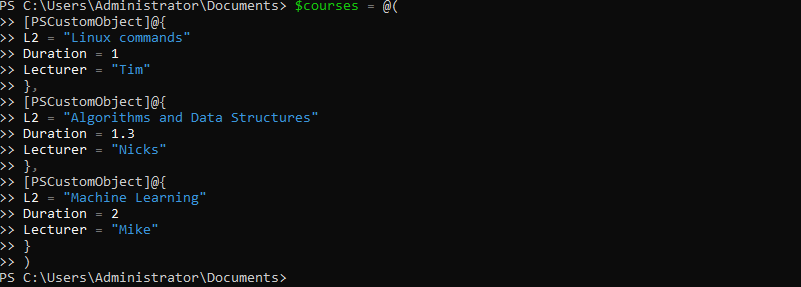
Here, we create an array named “courses” which contains three properties to export to our CSV file.
However, we can choose only to select the “L2” and “Lecturer” properties using the “Select-Object” cmdlet and then export our CSV to a file that we named “courses.csv.” Our command in this case is as follows:
Our CSV is successfully exported and is available in the current directory as we specified the target path to store it.
Let’s import the CSV file to see the exported properties from our array. The output shows that we only exported two properties, which is what we specified when exporting CSV on PowerShell. That’s how you can adjust the properties to include when exporting the data to CSV.
Example 4: Specify the Delimiter
You can specify which delimiter to use when exporting CSV. The “–Delimiter” option lets you specify which element to use as the delimiter. For instance, if we want to set our delimiter as a colon (:), we can change our earlier command to appear as follows:
We can open the created CSV output to confirm that we successfully used the specified delimiter.
Conclusion
PowerShell is a handy scripting and automation language. You can use it to convert the data objects to a CSV output. The examples in this post teach you how to use PowerShell to export CSV to transfer the data seamlessly. Keep practicing to get comfortable with PowerShell exporting CSV.


