In this article, we will explain how ping works and how to use it in the Linux system. We execute all the following-mentioned commands on Ubuntu 22.04.
How Does Ping Works?
Here is how Ping works:
- Your system sends multiple Internet Control Message Protocol (ICMP) Echo Requests to the remote system’s IP address or URL and then waits for the response.
- The remote system, if reachable, receives the ICMP Echo packet requesting an echo reply.
- The remote system then sends back the ICMP Echo Reply packet.
When you run the Ping command, it usually sends several ICMP packets and then waits for the response. The Ping result tells whether you can reach the remote device on your local network or the internet. This might help you evaluate whether a network connectivity issue is on your local network or somewhere beyond. Ping also measures the round-trip time which is the time a packet takes to transmit from the sender to the host and then back to the sender. A longer response time indicates network congestion routing issues or packet loss.
Ping Command Syntax
The syntax of the ping command is:
In the given syntax, the hostname is the name of the website or you can use the IP address.
To check whether your target hostname is reachable or not, run the following command in the Terminal:
The Ping command keeps on sending the packers until you stop it manually. Use Ctrl + C from your keyboard to stop pinging. After you stop the Ping process, it displays the statistics for the target system.
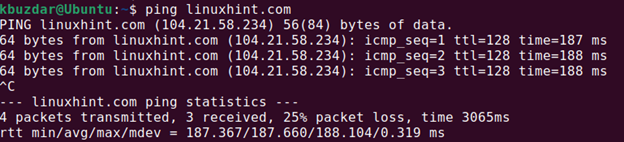
Let’s take a look at the output:
The first line shows the URL, its associated IP address, and the number of bytes sent to the target host. The next lines show the replies from the target host which include the number of bytes, IP address of the target host, TTL (time-to-live) of the packet, and the response time (in milliseconds). At the end of the output, it displays a summary of statistics which include the number of packets sent/received, packet loss (in %age), the total time the command ran, and the max, min, and average response time.
How to Use Ping Command in Linux
Now that you know what is Ping command is and how it works, let’s see how to use it in various ways:
Check Local Network Connectivity Using the Ping Command
Sometimes, you encounter problems in reaching the desired website. So, in this situation, you will need to first ping the URL or IP address of the website to see if you have reachability to this site.
If it gives a successful response, it means that the connectivity between your system and the remote site is okay.
If the Ping fails, the next step you need to check is to ping your router’s IP address to check if it is reachable or not. At the Terminal prompt, type ping followed by the IP address of your router:
If it gives a successful response, it means that the local connectivity between your system and the router is okay.
Change Ping Packet Size
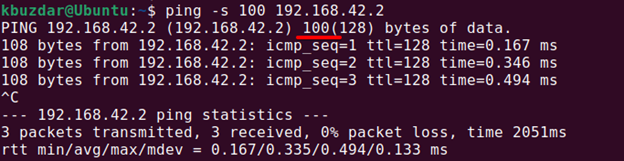
You can also change the size of packets that the ping sends to a target host. The default size of the packet is 56 (84) bytes. The parentheses number represents that sending the ping bytes 28 packet header bytes also includes in the packet size. You can change this size using the following command:
The previous command is used to test the network performance.
For example, we change the ping packet size to 100 as follows:
Set the Limit to the Desired Number of Ping Packets
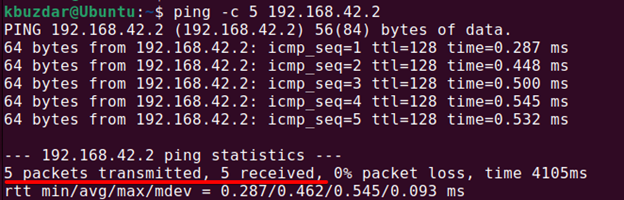
If you want to set the limits that ping requests automatically stop after the specified number of ping packets, you can use the following command:
For example, setting the ping request to 5 means after sending 5 ping packets, the ping request automatically terminates. You can see the output in the following image:
Change Ping Packet’s Time Interval
The default time interval between sending ICMP requests is 1 second in Linux. However, you can change this time interval using the -i option with ping command.
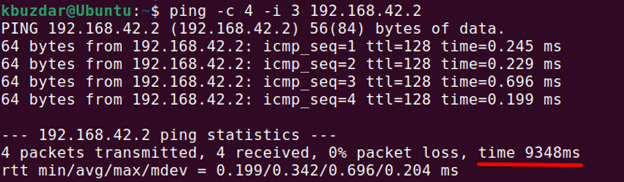
For instance, to send 4 ICMP requests with 3 seconds time interval between them, the command would be:
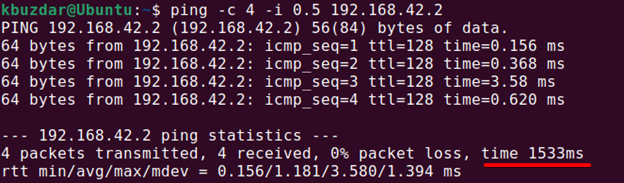
Similarly, you can also decrease the time interval. To send 4 ICMP requests with 0.5 seconds time interval between them, the command would be:
Flood a Network Using Ping Command
Ping flood is a type of DoS attack where an attacker attempts to send a huge volume of ICMP requests to a target system. To determine how your system responds to such an attack, you can stimulate a ping flood to your device. The ping flood must be executed as a root user.
To stimulate the ping flood, use the ping command with the -f option as follows:
As this command sends a large number of packets, run this command for only a few seconds and then stop it using Ctrl+C. During this process, you will see the dots and backspaces in the output. It prints the dots for the sending packets and backspaces for response. In the output, you can see that 14137 packets were transmitted in just 7921ms.

Set Timeout for a Ping Request
Using the ping command, you can also set a timeout limit for ping requests. After the specified time, the ping exits and displays the results on the Terminal regardless of how many packets are transmitted.
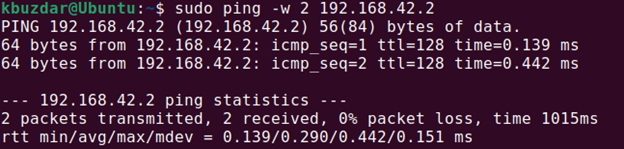
To set a timeout period, use the ping command with the -w option followed by the time in seconds.
To set a timeout of 2 seconds, the command would be:
The ping automatically stops after 2 seconds to print the results.
Make Ping Audible
Using the following ping command, you can listen to a beep whenever the target host replies to ping:
Quiet Output
To hide the ICMP replies and display the summarize statistics, you can use the ping command with the -q option as follows:

Check Ping Version
You can check the ping utility version using the following command:
![]()
Conclusion
Ping is a diagnostic utility that tests whether the target network device is reachable or not.
In this article, we have explained what is ping command and how it works in Ubuntu 22.04 Linux system. We also practiced the various usage of the ping command to check the network performance in an optimized way. Furthermore, you can work on advanced switches or tags that are used with the ping command to customize the send and response requests.