PCI stands for Peripheral Component Interconnect, is a protocol used to connect peripherals (DDR, UART, USB etc) with CPU system on early days computers or workstations. This was the protocol defined by Intel for its own architecture development. In current time, PCI is still used as a system bus on the PC’s or workstations based on Intel Architecture.
In this writing, we will go through some useful commands which user can run to explore PCI on Linux systems. lspci and setpci are majorly used commands in Linux PCI community. We will discuss few examples and use cases of these commands.
Before we start with the commands, let us explore little on Linux based PCI systems. Typically, a Linux system consists of hardware and software components. Hardware part will be based on some architecture, say x86. X86 is the architecture defined by Intel. There are several peripherals in the Hardware: CPU, DDR, USB, and UART to name few. These are all the hardware components needed for a protocol to communicate. That is where PCI comes to play. PCI is the set of rules/guidelines all the components have to follow to communicate with each other.
Now all the hardware components are connected with the PCI but this is still not enough. System is still not complete and cannot be used. An important piece is missing, i.e. Software. Software component will have the BIOS, Bootloader and OS. All of these components should be installed onto the hardware.
Software components will have the necessary software to initialize PCI and enable the commands for the user. Once the OS is installed on the system, lspci and setpci commands will be available.
Let us take an example of Ubuntu, which is Linux based OS distribution. Once the Ubuntu is installed on x86 based Hardware, lspci and setpci commands should be available by default. Personal Computers are x86 based systems. If Ubuntu is installed on them, then these are the systems which we will be discussing.
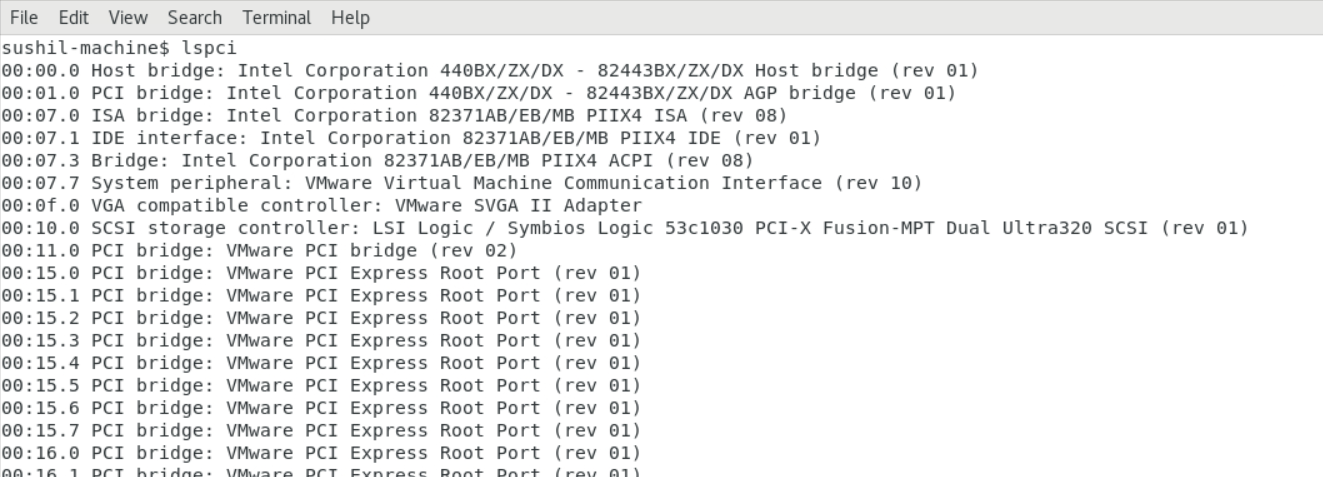
Open the terminal on Ubuntu and run lspci command. We will see the below output:
In the above picture, command has provided all the PCI devices details of the system. This gives the complete list of PCI devices on this system.
To provide some details on the different types of PCI devices, there are 3 types of PCI devices: i) Root complex ii) Endpoint device iii) PCI bridges.
Root Complex
This is the Root port for any PCI system. All the endpoint devices and bridges are connected to the root complex or root port.
Endpoint
These are the devices which provides some endpoint use case or function. For example, the graphics card or network card which is plugged into the PCI Slot on the motherboard, comes into the category of endpoint devices. Each endpoint device can have multiple functions associated with the device. Maximum functions supported by the endpoint can be 8. Any endpoint device can have function count from 1 to 8, indexing starts from 0 and goes till 78.
Bridges
These are the devices which connects different PCI buses together. Suppose in the system if multiple busses are present, then these multiple busses will be connected with the bridge devices.
In any PCI system, generally there will 1 root port or root complex device and there can be multiple bridges and endpoint devices.
lspci command lists all the endpoint devices and bridges on the Root port bridge i.e. Root Complex. Generally, the bus number assigned to this is 0. Bus 0 is the root complex bus and primary bus of the system. On single bus, there can be 256 devices and every device can have maximum 8 functions. This (bus number [B], device number [D] and function number [F]) is commonly known as the BDF combination in the PCI world. BDF combination is enough to locate any specific device in the PCI system. Assignment of these BDF is done by the BIOS in the process known as PCI Bus enumeration. PCI Bus enumeration is done by BIOS and BIOS scans all the Bus number, device number and function number to all the devices and populate them. lspci is the utility which dumps this enumerated info to the user space as requested by the user by running lspci command.
In the snapshot, there are multiple devices listed by lspci. Let us take an example line to understand the output provided by lspci:
In this output we can see first entries as 00:00.0.
First 00 stands for the bus number. This provides the details on the bus number on which this device is connected. Second 00 after colon, represents the device number. Last digit after . [dot], represents the function number.
Yes, this is the same BDF which we discussed previously.
Other string information provides some details of the device. This is the brief description of the device. As the example output tells that this is the Host bridge and also provides the manufacturer information.
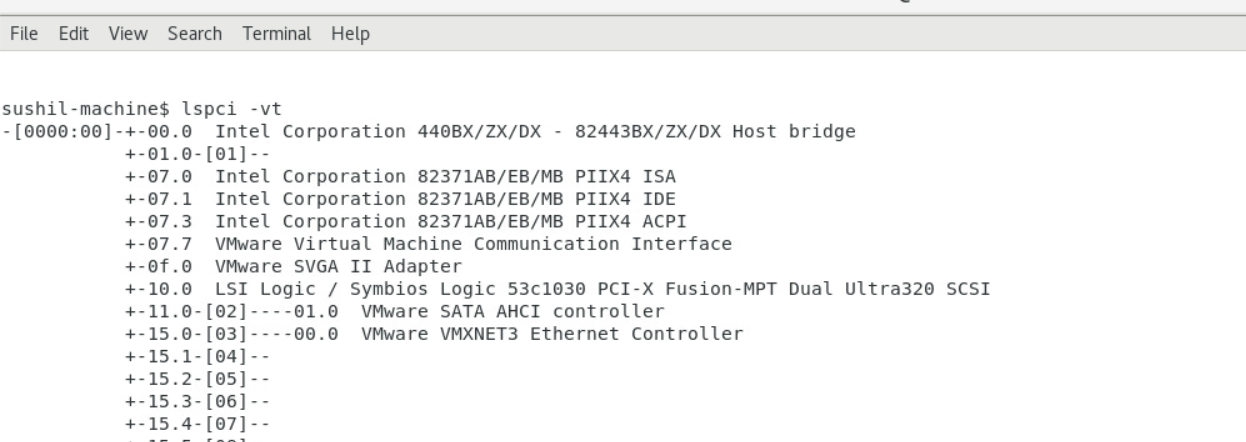
All the values in this example are 0, it doesn’t mean these will always be 0. Let us take another example with some different values:
In this example we can see the bus number as 2 for SATA Controller and 3 for Ethernet Controller device. Device numbers are 01 for SATA Controller and 00 for Ethernet Controller. Both the devices have function number as 0.
After the BDF, there is the description of the PCI device.
So far, we have discussed the default output of the command i.e. only executing the lspci command. This command also have options which can be passed to the command to provide some more details of the device. If some formatting of the output is required, there are options too. Let us explore some option of the command. Complete list of options can be seen on the man page of the command. Just to get familiar with the most commonly used options, let us take few examples.
To list the Device and Vendor ID of the PCI devices, -nnn option can be used.
Vendor ID and device ID are allocated by PCI SIG group. PCI SIG is the group which works for the development of standards of PCI and its enhancements. They define the enhancements and new versions of the PCI to match the technological developments of the system.
In the example output, we can see [XXXX:XXXX], in all the lines. First 4 digits are the vendor ID and 4 digits after the colon are the device ID. For the first line output vendor ID is 8086, which is the vendor ID allocated to Intel. Second 4 digits after colon i.e. 7190 is the device ID.
If we want to list the device based on any particular device ID, lspci with -d option can be used.
lspci -d :7190, command will provide the information of device with device ID 7190. Command has only provided the information on single device.
Example output is as follows:
If BDF is known of any device, lspci can be used to get the information of the specific device. Let us stick to the same example of BDF as 00:00.0 , -s option provides the capability to fetch the information of the device.
lspci -s 00:00.0, provides the information on the device which is connected to the bus number 0 and device and function of the device is 0.
lspci -vvv options provides the verbose information of the device. It reads the config space of the device and prints the information of the device in the detailed format. This option can be used in combination of -d or -s option. Combined usage of -s or -d and -vvv will provide the details on the specific device.
Example outputs are as follows:
lspci -vvv -d :7190
-x option provides the config space details of the device in hexadecimal format.
lspci -vt option can be used to provide the tree like output of the PCI devices. Following is the output I have in my system:
Setpci command in Linux also provides some ways to access/modify the config space of the PCI devices. To get the vendor ID of the PCI device, we can use the command as; setpci -s 00:00.0 0.w
Command will print the word i.e. 2 bytes from offset 0 of the BDF as 00:00.0. We should get the output as 8086.
Device ID are the 2 bytes present at offset 2 after the vendor ID. To get the device ID, command should be setpci -s 00:00.0 2.w
Setpci command can be used to modify the content of the config space. Only pre-requisite for this is that config field should be writing capable. Some of the devices have by default Bus master disabled. To enable the Bus mastering, at offset value of 2 should be written. To enable bus mastering of any device, command which can be used is:
setpci -s 00:01.0 4.w=2 ; this command will enable the bus mastering and hence BAR memory region can be accessed.
Conclusion
We have discussed the most popular lspci command in Linux and its commonly used options. We touched a base on few basics of PCI concepts like BDF, types of PCI devices, etc. We have also discussed a typical PCI System with few examples. We have gone through few sample examples and usage of the lspci command. We have seen little bit on setpci and couple of usage examples of setpci. With all this discussion, let us conclude on this topic.


