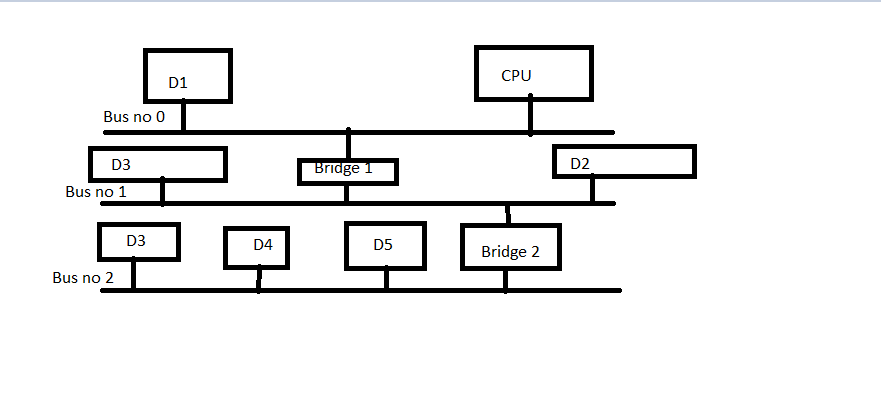
The above figure shows the PCI system, which has 3 PCI buses. Bus no 0 is the primary bus of the System as the CPU is connected to that bus; also, it is the bus where the root port bridge or the root complex is present.
Other buses, i.e., bus no 1 and 2, are connected to the primary bus with the help of PCI bridges. Bus no 1 is connected to bus no 0 with bridge 1. Bus no 2 is connected to bus no 1 with Bridge no 2. Overall, all the devices are connected, and several devices D1, D2, D3, etc., are present on different PCI buses. On any PCI system, 3 types of devices are present. Root Port or Complex device, Bridge device, and Endpoint devices. Comparing types of devices with our example diagram, CPU is the root port or complex device. Bridge 1, Bridge 2 are the PCI bridge devices. D1, D2, D3, etc., are the PCI endpoint devices of the system. D3 is present on bus no 2 and bus no 3, the same device on different buses.
PCI Config Space or Header:
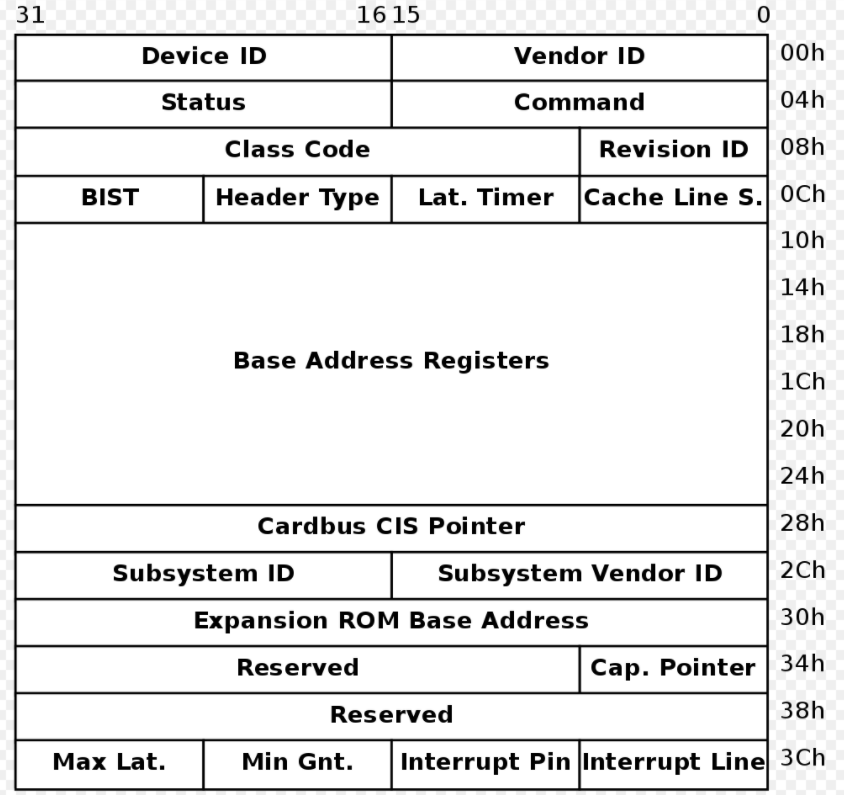
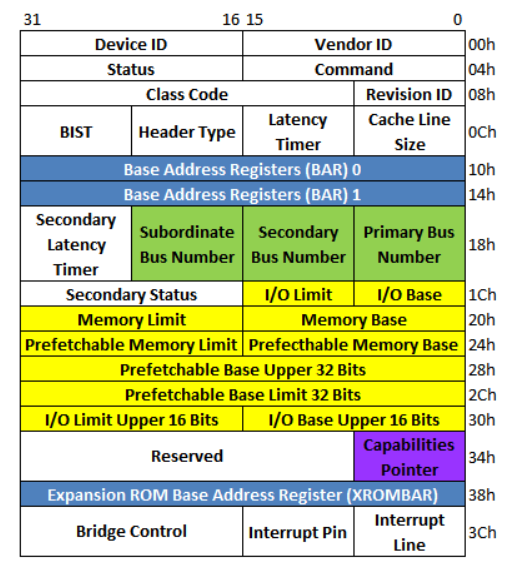
All the PCI devices have the config space or header. This is the standard memory area present in all the devices. There are two types of PCI config header, based on the two types (Bridge and Endpoint) of PCI devices. Config space is known as Type 0 for Endpoint device and Type 1 for PCI Bridges. Fields of the config header are PCI specifications defined.
Type 0 config header:
Type 1 config header:
PCI Bus Enumeration:
During the Boot-up of the system, recognizing all the PCI devices in the system is done and is known as the PCI Bus enumeration. BIOS generally enumerates all the PCI devices present on all the buses and populates them to the sysfs. Users can access the details of PCI devices present with the help of the lspci utility. Another way is to browse through the sysfs files inside the /sys/bus/pci/devices directory. This directory will have all the devices present and known to the Linux kernel.
After the PCI Bus enumeration, all the devices get the number, number, and function number. These three components are enough to locate any device.
PCI Bus enumeration is performed by BIOS(Basic Input Output System). BIOS is a firmware software specific to the Machine/platform and provided by the manufacturer itself.
Linux Kernel Root Complex driver:
On any x86 based Linux platform, there is a root complex PCI driver or Linux PCI subsystem which reads the information populated by BIOS and exports the information to the sysfs filesystem. All the PCI devices present in the system can be found inside the /sys/bus/pci/devices directory. Root complex driver also provides the flexibility to rescan or reset the devices on any PCI Bus. Even full rescanning of all the PCI Buses can be done through /sys/bus/pci/rescan.
Command to rescan all the devices:
Users should have superuser rights for issuing this command.
For any device in the sysfs directory we can find below details/information:
total 0
-rw-r--r-- 1 root root 4096 Oct 4 17:34 broken_parity_status
-r--r--r-- 1 root root 4096 Oct 2 18:19 class
-rw-r--r-- 1 root root 4096 Oct 2 18:19 config
-r--r--r-- 1 root root 4096 Oct 4 17:34 consistent_dma_mask_bits
-rw-r--r-- 1 root root 4096 Oct 4 17:34 d3cold_allowed
-r--r--r-- 1 root root 4096 Oct 2 18:19 device
-r--r--r-- 1 root root 4096 Oct 4 17:34 dma_mask_bits
lrwxrwxrwx 1 root root 0 Oct 2 19:18 driver -> ../../../bus/pci/drivers/agpgart-intel
-rw-r--r-- 1 root root 4096 Oct 4 17:34 driver_override
-rw-r--r-- 1 root root 4096 Oct 4 17:34 enable
-r--r--r-- 1 root root 4096 Oct 2 18:19 irq
-r--r--r-- 1 root root 4096 Oct 4 17:34 local_cpulist
-r--r--r-- 1 root root 4096 Oct 4 17:34 local_cpus
-r--r--r-- 1 root root 4096 Oct 2 19:18 modalias
-rw-r--r-- 1 root root 4096 Oct 4 17:34 msi_bus
-rw-r--r-- 1 root root 4096 Oct 2 19:18 numa_node
drwxr-xr-x 2 root root 0 Oct 4 17:34 power
--w--w---- 1 root root 4096 Oct 4 17:34 remove
--w--w---- 1 root root 4096 Oct 4 17:34 rescan
-r--r--r-- 1 root root 4096 Oct 2 18:19 resource
-r--r--r-- 1 root root 4096 Oct 4 17:34 revision
lrwxrwxrwx 1 root root 0 Oct 4 17:34 subsystem -> ../../../bus/pci
-r--r--r-- 1 root root 4096 Oct 4 17:34 subsystem_device
-r--r--r-- 1 root root 4096 Oct 4 17:34 subsystem_vendor
-rw-r--r-- 1 root root 4096 Oct 4 17:34 uevent
-r--r--r-- 1 root root 4096 Oct 2 18:19 vendor
sushil-machine$
Above are the files present for every device at a different path.
We will read the content of few file to verify the info :
0x7190 // device file provides the deviceid
sushil-machine$ cat /sys/bus/pci/devices/0000\:00\:00.0/vendor
0x8086 // vendor file provides the vendorid
sushil-machine$
Similarly, other files provide some other information.
Some files are write-only files : remove and rescan
remove files can be used to remove the device. Echo 1 to the file, and you will see lspci will not show this device.
echo 1 > /sys/bus/pci/devices/0000\:00\:00.0/remove
Recovery of the device from the previous step can be done through rescanning the device.
Echo 1 to the rescan file with below command :
echo 1 > /sys/bus/pci/devices/0000\:00\:00.0/rescan
Reading and writing to the config space:
lspci and setpci commands are available, which can be used to read and write the config space of any PCI device. lspci has very rich options to customize the output as per the user’s needs. setpci is another utility that can also be used to access the config space of the pci device.
We will not discuss these in detail here as there is a separate article to cover both of these utilities in detail. We will just have one example of both the commands :
lspci :
00:00.0 Host bridge: Intel Corporation 440BX/ZX/DX - 82443BX/ZX/DX Host bridge (rev 01) // output
setpci:
8086 //output ; reading a word from offset 0 in the config space. The vendor id is the output.
Reading and writing of BAR Space:
There can be a total of 6 32-bit BAR or 3 64-Bit bar. Type 0 config space can be referred to to get the offset details of the BAR.
Let us take an example of a device with the below output:
Subsystem: VMware VMXNET3 Ethernet Controller
Physical Slot: 160
Control: I/O+ Mem+ BusMaster+ SpecCycle- MemWINV- VGASnoop- ParErr- Stepping- SERR- FastB2B- DisINTx+
Status: Cap+ 66MHz- UDF- FastB2B- ParErr- DEVSEL=fast >TAbort- <TAbort- SERR- ../../../../bus/pci/drivers/vmxnet3
-rw-r--r-- 1 root root 4096 Oct 4 18:01 driver_override
-rw-r--r-- 1 root root 4096 Oct 4 18:01 enable
lrwxrwxrwx 1 root root 0 Oct 4 18:01 firmware_node -> ../../../LNXSYSTM:00/LNXSYBUS:00/PNP0A03:00/device:89/device:8a
-r--r--r-- 1 root root 4096 Oct 2 18:19 irq
-r--r--r-- 1 root root 4096 Oct 4 17:57 label
-r--r--r-- 1 root root 4096 Oct 4 18:01 local_cpulist
-r--r--r-- 1 root root 4096 Oct 4 18:01 local_cpus
-r--r--r-- 1 root root 4096 Oct 4 18:01 max_link_speed
-r--r--r-- 1 root root 4096 Oct 4 18:01 max_link_width
-r--r--r-- 1 root root 4096 Oct 4 17:57 modalias
-rw-r--r-- 1 root root 4096 Oct 4 18:01 msi_bus
drwxr-xr-x 2 root root 0 Oct 4 18:01 msi_irqs
drwxr-xr-x 3 root root 0 Jul 22 06:53 net
-rw-r--r-- 1 root root 4096 Oct 4 17:57 numa_node
drwxr-xr-x 2 root root 0 Oct 4 18:01 power
--w--w---- 1 root root 4096 Oct 4 18:01 remove
--w--w---- 1 root root 4096 Oct 4 18:01 rescan
--w------- 1 root root 4096 Oct 4 18:01 reset
-r--r--r-- 1 root root 4096 Oct 2 18:19 resource
-rw------- 1 root root 4096 Oct 4 18:01 resource0
-rw------- 1 root root 4096 Oct 4 18:01 resource1
-rw------- 1 root root 8192 Oct 4 18:01 resource2
-rw------- 1 root root 16 Oct 4 18:01 resource3
-r--r--r-- 1 root root 4096 Oct 4 18:01 revision
-rw------- 1 root root 65536 Oct 4 18:01 rom
lrwxrwxrwx 1 root root 0 Oct 4 18:01 subsystem -> ../../../../bus/pci
-r--r--r-- 1 root root 4096 Oct 4 18:01 subsystem_device
-r--r--r-- 1 root root 4096 Oct 4 18:01 subsystem_vendor
-rw-r--r-- 1 root root 4096 Oct 4 18:01 uevent
-r--r--r-- 1 root root 4096 Oct 2 18:19 vendor
sushil-machine$
Additional files with names resource[0-3] are present; these are the files that can be used to access the memory mapped to these regions. For example, to access the 4K space mapped to region 0, the resource0 file can be mapped to the user space with the mmap() function. After mapping the region0 to the user space, 4K space can be accessed as per the need/requirement.
Conclusion:
Linux PCI subsystem enumerates and populates the PCI devices. lspci and setpci devices can be used to get the information of the devices. Root complex driver of Linux also provides all the pci devices info in the sysfs files. There is a provision to reset, rescan and remove the devices from the sysfs files. BIOS performs the enumeration process, and the Linux driver parses the information and populates all the device’s info accordingly. With this much discussion, let us conclude this topic.