Database triggers, or triggers for short, refer to stored procedures that are executed as a response to an event activity within a given database object.
This differs from standard stored procedures, which require explicit invocation from the user. Since triggers are automated, they are triggered or fired when the specified event occurs, regardless of the connected user or server state.
Most relational databases support using triggers to perform automated tasks such as preventing invalid transactions, event logging, fetching and recording table access statistics, and more.
Once a trigger is created, it always runs whenever the associated event occurs. However, you may want to temporarily or permanently prevent a trigger from executing. This is where the trigger disable feature comes into play.
This post will discuss about the quick and easy steps for disabling a trigger within an Oracle database. If you are new to Oracle triggers and would like to know how to create one, check the following link:
https://linuxhint.com/oracle-create-trigger
Creating a Test Trigger
Before we discuss the methods of disabling a trigger, let us set up a sample trigger for demonstration purposes.
NOTE: This section does not cover on how to define or use the database triggers.
We want to create a trigger that logs the user activity after a delete operation. For example, suppose we have a sample_data table with the information as shown:
We first need to create a table where we store the logs for every deletion activity.
The table schema is as follows:
id number,
first_name varchar2(50),
ip_address varchar2(20),
btc_address varchar2(50),
credit_card varchar2(50),
identifier varchar2(40),
delete_date date,
deleted_by varchar2(20)
);
Next, we need to define a trigger that is executed after a delete event. The trigger definition is provided as follows:
after delete
on sample_data
for each row
declare
action_username varchar2(20);
begin
select user into action_username from dual;
insert into sample_data_logs
values (:OLD.id,
:OLD.first_name,
:OLD.ip_address,
:OLD.btc_address,
:OLD.credit_card,
:OLD.identifier,
sysdate,
action_username);
end;
To test the trigger, let us perform a delete operation from the sample_data table as shown:
Finally, we can check the logs table to ensure that the delete operation has been recorded:
Output:
As we can see, the table has an entry of the previous data before deletion, as well as the username that performed the deletion activity and the time of deletion.
In the following sections, we will demonstrate on how to disable the previous trigger. Before doing so, make sure that your target trigger is functional and you have sufficient permissions to enable or disable it.
Disable a Trigger Using PL/SQL
The first and most straightforward method of disabling a trigger is using an SQL statement. Luckily, Oracle provides us with ALTER TRIGGER statement whose syntax is provided as follows:
For example, to disable the log_user trigger that we created earlier, we can run the following:
Once executed, the trigger will no longer keep a copy of the old data and the user that performed the deletion as shown in the following:
Check the logs:
Output:
As we can see, we still have only one record.
Disable a Trigger Using SQL Developer
We can use the SQL Developer utility to disable a trigger in the graphical interface. Start by logging in to the SQL Developer.
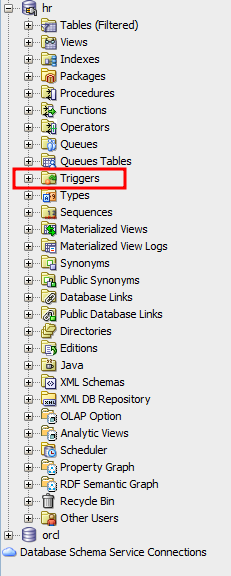
Navigate to the “Triggers” section:
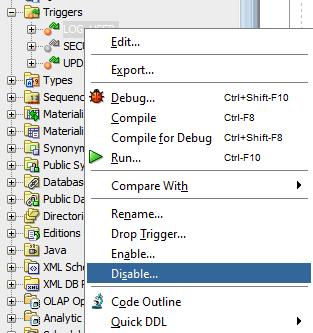
Expand the triggers directory and locate the trigger that you wish to disable. Right click the trigger name and select “Disable”.
Confirm the “Disable” operation and click “Apply”.
Once disabled, Oracle grays out the trigger, indicating that it’s inactive.
Conclusion
This article explored how to disable an Oracle trigger using PL/SQL statements and SQL Developer utility.


