However, things aren’t that simple for Linux users. Unfortunately, most of these programs are usually proprietary. To add insult to injury, these pieces of software aren’t available for Linux.
That’s where the open-source RGB control programs come in, OpenRGB in this case. In this guide, we will go over everything about OpenRGB: its features, how to install and use it, and more. Let’s get into it!
About OpenRGB
As mentioned earlier, OpenRGB is a free and open-source software developed to control RGB lighting. It is cross-platform and works well with both Linux and Windows.
One of the upsides to using OpenRGB is its extensive functionality. Using this program, you can manipulate RGB lighting in motherboards, graphic cards, mice, keyboards, RAM modules, coolers, mouse mats, and more. Furthermore, it supports many manufacturers, such as Gigabyte, ASUS, and Corsair. Here’s a list of all the devices supported by OpenRGB.
In addition to its wide collection of supported hardware, OpenRGB features two modes of operation: GUI and CLI. No matter what kind of user you are, OpenRGB is an application you can count on to deliver a useful and exciting experience.
Features of OpenRGB
OpenRGB has numerous distinctive features which put it at the top of the game. Listed below are only a handful of features:
- Select effects and colors for a wide variety of hardware
- Comes with a command-line interface and a QT5 GUI
- Create, save, and load user profiles
- Control the brightness
- Configurable autostart settings
- Synchronize the RGB lighting on different computers with multiple OpenRGB instances
- Easily create custom-user color patterns
- No manufacturer-specific applications required
- Use OpenRGB SDK to interoperate with third-party lighting control software
With that said, you should now have a basic understanding of what to expect from OpenRGB. If you’re still interested, proceed to the installation process.
Installing OpenRGB
OpenRGB is available for download as a .deb package file and a portable AppImage. We will cover both installation methods one by one.
Method 1: Installing OpenRGB With the DEB Package
The first course of action in this method is to download the OpenRGB .deb package. Once you have downloaded the package, navigate to the directory containing the file by running the following command in the Terminal:
Next, we will use the dpkg tool to install OpenRGB.
If you run into some dependencies-related error upon running the previous command, you may have to run the following command before installing the .deb package:
Method 2: Installing OpenRGB With AppImage
If the previous method didn’t work for you, or if you prefer installing OpenRGB via AppImage, this section is for you. The steps are relatively similar to what we did in the first method. Start by downloading the AppImage file from the GitLab repository.
Navigate to the Downloads directory by running the following command:
$ sudo chmod +x ~ OpenRGB_0.7_x86_64_6128731
Finally, we execute the file we downloaded through the command provided below:
And that’s all there is to installing OpenRGB on Ubuntu. If you are on some other Linux distro, worry not, as OpenRGB binaries are also available for Pop! OS, Linux Mint, Elementary OS, and more.
Using OpenRGB
With the installation out of the way, it is time we prepare to start using OpenRGB. Using OpenRGB is fairly simple. The configuration is straightforward and the user interface is intuitive. Before you launch OpenRGB and start using it, it’s time you get your RGB devices ready and connected to your system. Otherwise, they won’t show up as scanned devices in OpenRGB later.
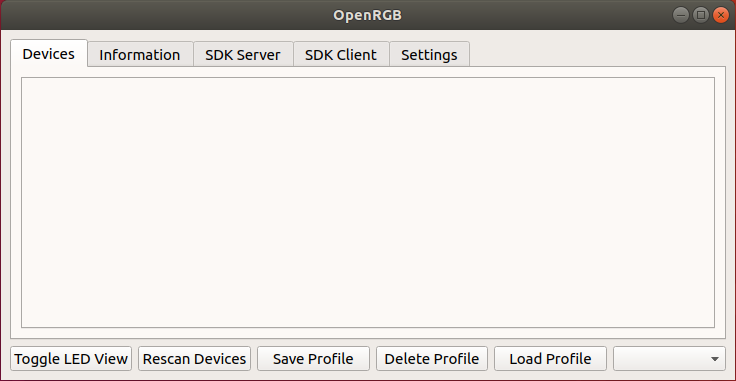
With that said, let’s open up a new instance of OpenRGB. You can find it by searching for it in the Activities menu. On the first run, it should look something like the following image:
Let’s explore each of the tabs on the top menu and explore their functionality.
- Devices: Check and configure the RGB devices connected to your system
- Information: Shows details of OpenRGB such as build date, version, and more
- SDK Server and SDK Client: Allows you to use the OpenRGB Software Development Kit to operate with third-party control software by setting up servers and clients
- Settings: Displays the names of devices supported by OpenRGB
In addition to these tabs, the buttons at the bottom allow you to save, load, and delete RGB lighting control profiles. Furthermore, you can also toggle the LED view and scan for more devices after connecting/disconnecting them.
There are a bunch of specific motherboards and RGB RAM modules, which require SMBus access to control the onboard LEDs. As previously shown, if you aren’t interested in controlling these devices, you can just use the OpenRGB app. However, if you do want to enable SMBus access, there are some steps you must take.
First, we start by loading the i2c-dev module. Next, we have to load the i2c driver. This can be done by running the commands given below:
For Intel systems, run the following commands:
$ sudo modprobe i2c-nct6775
(Secondary controller, requires patch)
For AMD systems, run the following command:
However, some Aorus/Gigabyte motherboards may have some issues with the SMBus controller. If you’d like to learn more and dive deeper into this, take a look at the official documentation of OpenRGB here.
(Optional) Uninstalling OpenRGB
In case you want to uninstall OpenRGB, run the following command:
Conclusion
RGB lighting manufacturers often don’t extend their software’s support for Linux users. This makes things much more complicated, but not when you have OpenRGB.
OpenRGB is an open-source RGB lighting control app with loads of excellent features. We’ve discussed what it offers, and how to install it and use it. Hopefully, you are now well equipped to control your RGB lighting system with OpenRGB. Check out other Linux Hint articles for tips and tutorials.


