What Is the Ntpq Command?
The performance evaluation of the NTP daemon ntpd is done using the utility program – ntpq. It utilizes the NTPv3 specification RFC1305’s Appendix B’s definition of the standard NTP mode 6 control message forms. NTPv4 uses the same formats. Note that some of the variables have changed over time.
With the options for two types of outputs, raw and pretty-printed, requests to read and write the arbitrary variables are allowed to be grouped. The ntpq can make numerous queries to the server to obtain and output a list of peers in a standard format.
If more than one request parameter is provided on the command line at the time when ntpq is launched, the NTP servers will receive the requests. These servers should be active on each of the hosts that are allocated as command line arguments.
In the absence of any request arguments, the NTP server will try to execute the commands from the standard input on the first host specified on the command line, which defaults to localhost if no other host is mentioned. When a terminal device is used as a standard input, ntpq will prompt the user for commands.
The command line options are given in the following:
| Options | Purpose |
|---|---|
| -4 | It forces the DNS resolution for the enumerated host names to the IPv4 namespace on the command line. |
| -6 | It forces the DNS resolution for the enumerated host names to the IPv6 namespace on the command line. |
| -c | Some inputs are processed as interactive format commands, and they are added to the list of instructions that must be run on the chosen host(s). There may be several -c options provided. |
| -d | It activates the debugging mode. |
| -i | This option forces ntpq to run in interactive mode. The standard output is used for write prompts. The standard input is used to read the commands. |
| -n | Instead of changing the host addresses to their canonical names, it outputs all the host addresses in dotted-quad format. |
| -p | Along with a summary of each peer’s status, it prints a list of the peers that the server is aware of. The interactive command from the peer is somewhat similar to this. |
Now, let’s see some practical examples for more help.
Example 1:
We’ll show you how to check the ntpq command version in this example. You only need to use the “ntpq –version” command as shown in the attached screenshot to check the version of the ntpq command.
Upon executing the “ntpq –version” command, you might receive the following error. In such a case, try to execute the “sudo apt install ntpsec” and “sudo apt install ntp” commands. You can also view the previously mentioned commands in the following screenshot:
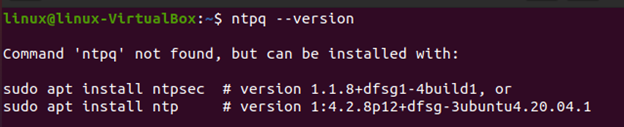
After that, run the “ntpq –version” command again. Upon doing so, you can see the current version in the output right below the executed command as we did in the following:
![]()
Example 2:
The first example was quite simple to use. Now, we’ll demonstrate on how to use the ntpq command to view the current status of NTP. The performance evaluation of the NTP daemon ntpd is done using the ntpq program. Either interactive mode or command line arguments can be used to control the program.
Type the following command (see screenshot) on your Linux or Unix-based system.
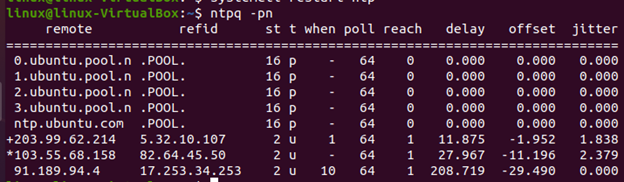
You may see the * here. This means that you are synced to a source (syspeer). Here is a working example of an ntp client where -p displays a list of the peers that the server is aware of along with a brief description of their state.
On the other side, -n does not convert to canonical host names. Instead, it outputs all the host addresses in dotted-quad format.
We execute the “ntpq –pn” command as follows:
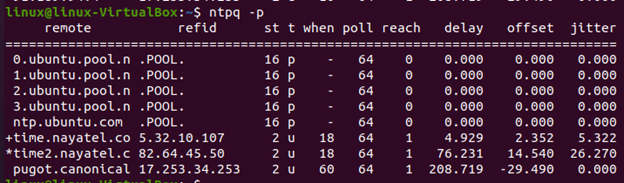
You can get the same output by executing the following command which is “ntpq –p”:
Another command that provides you with more information about the state is the “ntpq -c rv” which is provided in the following:
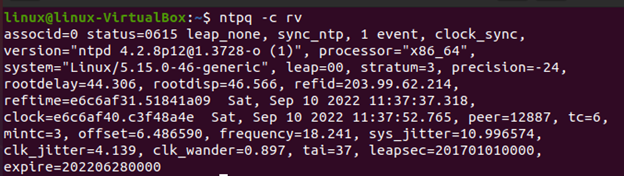
In the output, you can see a lot of information but the leap status is important here. The normal operations are indicated by leap_none, while the system that has never synchronized is indicated by the leap_alarm.
Example 3:
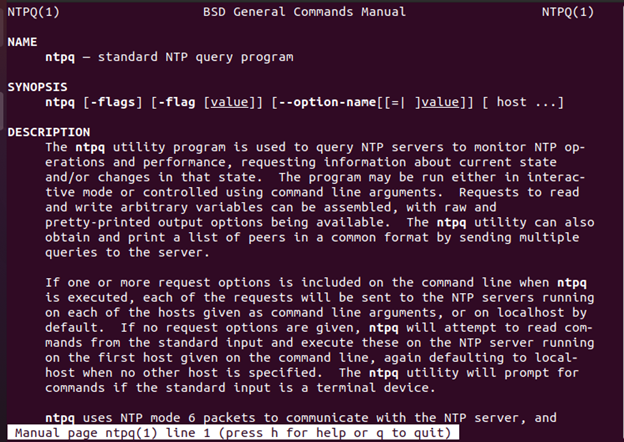
You may view the man page for the ntpq command using the command that is used in this example. To do this, use the “man ntpq” command. See the following screenshot:
![]()
In the output, you can see the name which is ntpq, the synopsis, and a complete description of the man page.
Example 4:
This example is about the timedatectl command. Additionally, it helps you to automate the system clock synchronization.
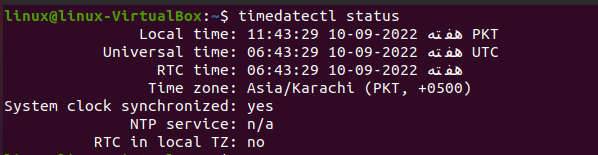
In this particular example of this article, we will show you the usage of the “timedatectl status” command. It provides the configuration details and the status of the system.
The output includes the information about the time zone, NTP status, and more. The hardware clock time is RTC time in the following screenshot:
Conclusion
The ntpq command in Linux is the subject of this article. This article thoroughly discusses each key issue, from its definition to its examples. If you are not familiar with this concept, this article contains all the information. We have also provided several examples including how to utilize the command line arguments and how to set up the Linux system to function as an NTP server. For a better understanding, you can run these examples on your system and see the results.