What is NR Built-in AWK?
“NR” is a special built-in variable of AWK that stands for “number of records”. This variable is used to deal with the number of records present in the specified files.
Examples of Using NR Built-in AWK in Ubuntu 20.04:
To learn further about the usage of NR built-in AWK, you will have to go through the following examples that have been implemented on a Ubuntu 20.04 system. However, before talking about these examples, we would like to share with you the sample text file that we have created in our Home directory named Names.txt. This file contains the names of a few individuals, followed by their respective ages. We will be using the very same text file for demonstrating all four examples. This text file is as follows:

Example # 1: Displaying Line Numbers with the Records in a Text File:
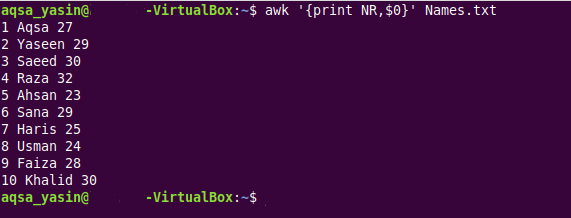
In this example, we want to display all the records of our target text file so that each record is assigned with a specific line number following an ascending order. You would have noticed above that the text file we are using did contain some records, but they were without any line numbers. Moreover, the records over here refer to the distinct lines of text present in a text file. For example, if a text file has five different lines, we will say it has five different records. To make the above-mentioned statement possible, i.e., display line numbers along with the records of our target text file, we will execute the following command in our terminal:
In this command, the “awk” keyword will tell our system that we are trying to run a command using the AWK scripting language. Then, we have a “print” command followed by the “NR” keyword and “$0” special variable. Now, this part of the command will serve the purpose of displaying line numbers along with the records present in our target text file. Finally, we have provided the name of our target text file in this command so that it can be read easily. We have executed this command simply by pressing the Enter key.
You can easily see on the terminal that as a result of executing this command, the contents of our target text file, i.e., all the records of our text file, were displayed along with their respective line numbers as shown in the image below:
Example # 2: Displaying the Records of a Text File Lying within a Specified Range:
At times, you do not want all the records of the file to be displayed or processed further; rather, you only want to use the records that lie within a specified range. Therefore, in this example, we want all the target text file records to be displayed on the terminal that lies within our specified line number range. To understand this further, you first need to look at the following command that will be used to serve this purpose:
In this command, the “awk” keyword will tell our system that we are trying to run a command using the AWK scripting language. Then, we have the ‘NR==4, NR==8’ statement that will specify the range of records to be displayed, i.e., by using this particular statement, our records from line numbers 4 to 8 (inclusive) will be displayed on the terminal. You can define this range according to your own choice. After that, we have the “print” command followed by the “NR” keyword and the “$0” special variable. Now, this part of the command will serve the purpose of displaying line numbers along with the specified records present in our target text file. Finally, we have provided the name of our target text file in this command so that it can be read easily. We have executed this command simply by pressing the Enter key.
You can easily visualize on the terminal that as a result of executing this command, the specific content of our target text file, i.e., all the records of our text file lying within the specified range, were displayed along with their respective line numbers, as shown in the image below:
Example # 3: Displaying the Line Numbers with the Specific Records in a Text File Separated by the “-” Special Symbol:
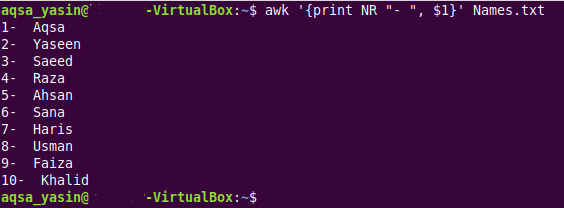
To make the contents of a text file more readable, you might want to separate the line numbers from the records by using any special symbol. Moreover, you might want a specific column of all the records to be displayed. We have designed this example to elaborate the method of displaying the line numbers with the specific column of the records of a text file separated by the “-” special symbol. For achieving this kind of output, you will have to execute the following command:
This command is pretty much similar to the command that we executed for our first example. However, the only difference is that we have specified the “-” separator in it. Moreover, instead of using the “$0” special variable, we have made use of the “$1” special variable, which will specify that only the first column of all the text file records needs to be printed.
In the output shown below, you can see that only the first column of all the records of our target text file was displayed; however, the line numbers were nicely separated from the records with the help of the “-” special symbol.
Example # 4: Displaying the Total Number of Records in a Text File:
At times, you might just want the total number of records of the file to be displayed on the terminal. For doing so, you simply need to execute the following command:
In this command, the “END” keyword will tell the system that it only needs to count the number of records of the text file, and the “print NR” statement will tell your system to print the total number of records on the terminal.
We know that we had a total of 10 records in our target text file, and this is also verified from the output of the above-mentioned command shown in the image below:
Conclusion:
This article opened with a brief introduction to the AWK scripting language. The crux of this guide was to teach you the usage of the “NR” special variable built-in AWK. First, we gave an overview of this special variable, followed by four different examples with the help of which you can understand its usage. Once you go through these examples, you will be in a good position to effectively use this special variable in AWK.


