The problem occurs when you delete the last row in your table and insert a new one. MySQL continues to increment the primary key and won’t reset the value. This creates confusion, and you can eliminate it by resetting the autoincrement to ensure the consistency in the unique identity.
Today’s post explains why autoincrement is handy and how to include it in your table. Furthermore, we will see how autoincrement gets affected when you delete and insert a row. Lastly, we will offer a solution by discussing how the MySQL reset autoincrement works. Let’s begin!
How to Use Autoincrement in MySQL
Autoincrement is an attribute that you assign to a column in your table. When assigned, a new identity for that column is created whenever you insert a new row. In most cases, the autoincrement is a numerical value that starts at 1 and increments with every new row.
Let’s create a table and see how to add the autoincrement attribute. We add it to our primary key as shown in the following:
When we insert the values into our table, we won’t insert the city_id field as it automatically increments with a sequence number.
Take a look at the following image:
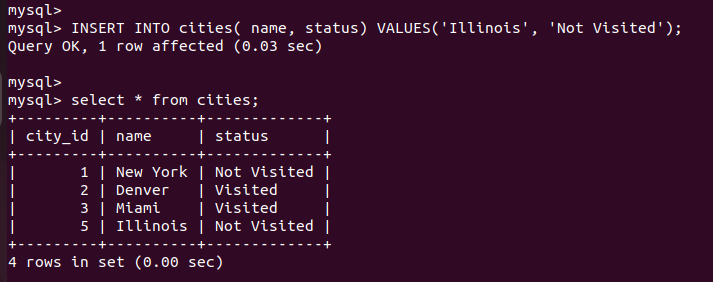
Note how the city_id autoincrements from 1. Any new row that we add has its city_id as 5, incrementing sequentially. However, the autoincrement gets affected if we delete the last row and insert a new one.
Let’s delete the row where the city_id = 4:
If we add a new row, note how the autoincrement proceeds from 5, yet we deleted 4.
To maintain the consistency, you can use the MySQL reset autoincrement option to ensure that the new row starts at 4, not 5.
MySQL Reset Autoincrement
We’ve seen the error that occurs when we delete a row where we have the autoincrement attribute to a column. There are different ways to resolve this problem.
1. Via the ALTER TABLE Statement
With “L”, you can use the ALTER TABLE statement whenever you want to change a table name or a field. Still, you can use it to reset the autoincrement column in your table and specify a value.
Here’s the syntax for the ALTER TABLE regarding resetting the autoincrement in MySQL:
First, let’s delete the newly added row to help see the difference when we reset the autoincrement and insert a new row.
With the row being deleted, let’s now reset the autoincrement and give it a value of 4 to ensure that the new row takes a sequence from 4 and not 5, as it happened earlier.
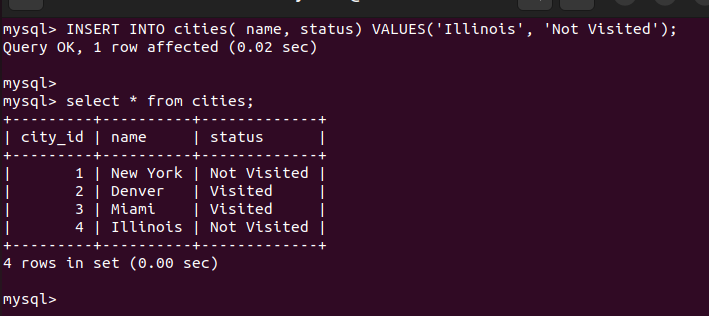
Insert the row again and note how we confirm that the new row gets inserted with its autoincrement as 4 if we inspect the table which confirms that we successfully reset it.
That’s the first and most reliable option to use.
2. Via the Truncate Option
MySQL has the “truncate” command that comes in handy when you want to reset the autoincrement by deleting all contents of the specified table without deleting the table’s structure. The autoincrement will reset to zero and start sequentially as you insert the rows.
The drawback with this option is that it’s ineffective when you don’t want to delete all the table contents. Nonetheless, the following is the syntax to use:
3. Via the Drop and Create Options
The last way of resetting the autoincrement is by dropping and creating the table with one statement. Combining the DROP TABLE and the CREATE TABLE command permanently removes your table and all its records and recreate it. Doing so rests the autoincrement at the expense of your table records.
Use the following syntax and note that you only use it when you want to start new table records:
CREATE TABLE table_name(filed_name(s) datatypes);
Your table will get deleted and recreated after executing the previous commands.
Conclusion
Different instances can make you want to reset the autoincrement attribute in your field on your table. We’ve seen the three methods that you can use. However, using the ALTER TABLE MySQL statement is the most recommended option. The other two methods will delete your table records. That’s it! Go ahead and practice the MySQL reset autoincrement methods.


