This tutorial will explore how we can enable and configure various logging levels in the MySQL server. This determines what and how the log messages are created within the server.
MySQL Logging
Depending on the MySQL server installed and the configuration, MySQL will create a log file of the events in the server.
There are five types of log files supported in the MySQL server. These include:
- Error log – this log file contains the logs of the errors encountered when starting, running, or stopping the MySQL server.
- ISAM log – This is part of administrative log-level utilities. This log contains all the modifications made to the ISAM tables.
- Query log – As the name states, this log file contains the records of user connections and executed queries.
- Binary Log – Holds the log of the statements that modify the server. The mysqldbinlog utility handles this logging.
- Slow log – holds the logs of the queries that exceed the long_query_time parameter value.
NOTE: Keep in mind that some of the logs discussed above are used in internal MySQL operations. As a regular user, various MySQL providers may abstract various logs.
We will only need to know the Error Log, General/Query Logs, and Slow Logs for this tutorial.
MySQL Enable Logging
Before configuring various logging levels in MySQL, we must ensure that the logging feature is enabled in the MySQL server.
Foremost, locate and edit the MySQL config file.
Keep in mind that the location of the MySQL configuration file may vary depending on system configuration, installation method, operating system, etc.
In the log file, add the entries as shown:
log_error=/var/log/mysql/error.log
general_log_file= /var/log/mysql/mysql.log
general_log = 1
log_slow_queries= /var/log/mysql/mysql-slow.log
long_query_time=10
The configuration above enables error logs, general logs, and slow logs. In addition, you can change the location of the log files by specifying the target path in the configuration above.
Save the changes and continue to restart the server.
In Windows, you can enable MySQL logging by editing the my.ini file with the following options.
general_log_file="mysql.log"
slow-query-log=1
slow_query_log_file="mysql-slow.log"
long_query_time=10
log-error="mysql.err"
Similarly, you can change the path and file names of the log files to your liking. By default, MySQL will store the logs files in the Data directory (Windows only).
MySQL Logging Levels
MySQL supports up to eight logging levels. Each level determines the details included in the log files and the type of messages.
By default, the MySQL shell will run at logging level 5. This includes an error, warnings, and informational messages.
The following are the supported logging levels and what each entails.
| Log Level (Numeric) | Log Level | Operation | Verbosity Level |
| 1 | None | Logging Disabled | 0 |
| 2 | Internal | Internal Error | 1 |
| 3 | Error | Error | 1 |
| 4 | Warning | Warning | 1 |
| 5 | Info | Informational | 1 |
| 6 | Debug | Debug | 2 |
| 7 | Debug2 | Debug2 | 3 |
| 8 | Debug3 | Debug3 | 4 |
When starting the MySQL shell, you can configure the verbosity level using the –verbose parameter.
- Verbosity Level 0 – No Messages are displayed.
- Level 1 – Internal error, error, warning, and information messages.
- Level 2 – includes all level 1 messages and Debug messages.
- Level 3 – Adds Debug2 messages to Level and Level 2.
- Level 4 – Adds Debug3 messages. These include highly detailed log messages.
Specifying MySQL Log Level in the Shell
To specify the log level you wish to use, we can use the mysqlsh command as shown:
You can specify the log level as a numeric value or its string representation as:
NOTE: In Windows, the mysqlsh command is located in “C:\Program Files\MySQL\MySQL Shell 8.0\bin”.
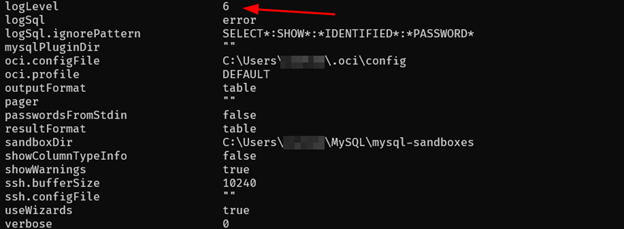
To view the current log level, Open your MySQL Shell:
Once in the shell, run the command:
This should list the MySQL Shell options, including the current log level:
Closing
And that’s it; you have successfully discovered how to work with MySQL Logging options. Keep in mind that MySQL log options are extended beyond the scope of this tutorial. You can check the docs for more.