Assuming that you have produced two tables with a FOREIGN KEY inside a foreign key relationship, rendering one parent and child table. After that, an intended for one FOREIGN KEY should be fixed for another to be successful throughout the cascading activities, then we specify an ON DELETE CASCADE statement. Perhaps if a single FOREIGN KEY statement determines the ON DELETE CASCADE, the cascading functions will trigger an exception.
Let us grasp how throughout the MySQL table, we could use the ON DELETE CASCADE statement.
You have to open the recently installed MySQL command-line Client Shell to proceed with the working. Upon opening, you will be asked to enter your password to continue using MySQL command-line client shell, as appended below.
![]()
Next, we’re going to build two tables called “order” and “customer”. Both the mutual tables are connected with the delete cascade function utilizing a foreign key. An “order” is the parent table at this point, and the child table is the “customer”. With the accompanying scripts, together with respective records, you have to construct both tables. Use the below “use” command to select the database you want to work in or create tables within. Here “data” is the database we are using.
![]()
Create Parent Table:
First of all, you have to create the table “order” along with its fields using the CREATE TABLE command, as shown in the below query. The column “ID” will be used in the next table “customer” as a foreign key.
Let’s add some data to this table. You have to execute the below-shown queries in MySQL command-line shell and run each command individually in the command-line or simply add all the commands in the command-line in a single step. You can also use MySQL Workbench GUI to add data to the table.
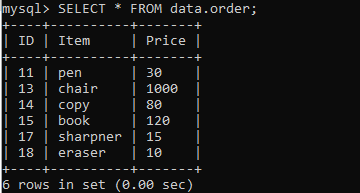
Now let’s check the table “order” after putting values in it. You can use the SELECT command for this purpose as follows:
You can see that the data has been successfully saved into the table “order” as expected.
Create Child Table with DELETE Cascade:
Now, it’s the turn for another table called “customer” to be created.
First, you have to type the “CREATE” keyword along with the table name. Then, you have to add field or column names along with their data types. You have to name the last column, which will be used as the foreign key in this table, the same as you named it in the previous table. As you know the column “ID” from table “order” has been used as the foreign key in the table “customer” as “OrderID”. After that, you have to add the “CONSTRAINT” keyword, which is used to initialize the FOREIGN Key, along with the reference of the previous table. Now you have to use the “DELETE CASCADE” statement along with the “ON” keyword.
After the table has been created, and the DELETE CASCADE has been successfully exerted on this table, it’s time to insert some values into this table. Try the below instructions one by one in the MySQL command-line client shell to do this.
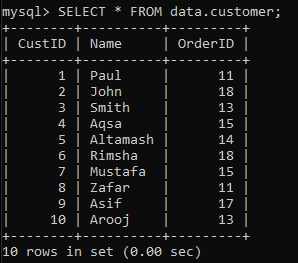
Subsequently, do the insertion of queries. It is a point to check the table whether the data has been successfully added or not. So try this below-command to do this:
Here, you can have a glimpse of the table output that the data is efficiently assigned to it and without any mistake or fault.
Delete Records:
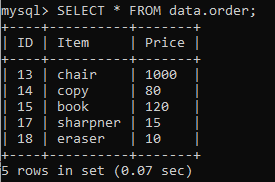
Now when you delete any data or row from the parent table, it will also delete the data or row from the child table due to the enabled DELETE CASCADE on the foreign key mentioned in the child table. Let’s try the DELETE query first, then check the results. We will be deleting the data from the table “order” where the “ID” is “11”. If the same “ID” will be found in the table “customer” in the foreign key column, “OrderID”, then the relative row or data in the table “customer” will also get deleted. Try the below-command in the command-line to do so:
First, let’s check the parent table. Then, type the SELECT command found below to retrieve the remaining records of the table “order”” after the deletion of some records. You will see that the record of the table, where the “ID” was “11”, has been successfully deleted from this table. This means that the relative records of the same ID value, “11”, would be deleted from the child table as well.
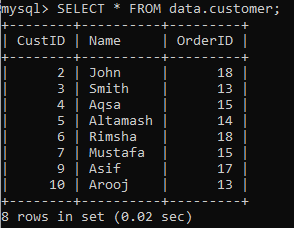
Fetching the records of the child table using the SELECT command is as simple as you did before. Just try the command below, and you will have the results.
On getting the results, you can see that the record of “CustID” having a value of “1” that has been deleted fully. This is because the column “OrderID” has a value of “11” in its first row, which leads to the deletion of that row.
When you try to drop the parent table using the DROP command, MySQL will prevent you from doing so. This is because the parent table has enabled the DELETE CASCADE on it. So to drop the table, you have to first remove the DELETE CASCADE from it.
Conclusion:
We have done with the explanation of DELETE CASCADE in MySQL. To make it clearer, try more examples at your end.


