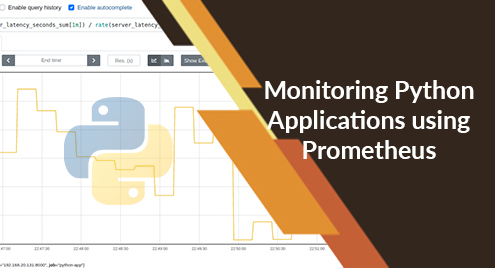
In this article, I will show you how to use the Prometheus Python Client Library to monitor Python applications with Prometheus. So, let’s get started.
Things You Will Need
To follow this article, you must have the following items installed on your computer:
i) Prometheus
ii) Python PIP
If you need any assistance on installing Prometheus on Ubuntu, read the article How to Install Prometheus on Ubuntu 20.04 LTS.
If you need any help with installing PIP on your computer, depending on your Linux distribution read one of the articles below.
- CentOS/RHEL 7: Install Python PIP on CentOS 7
- Ubuntu 17.10: Install PIP on Ubuntu
- Ubuntu 20.04: How to Install Python PIP Tool on Ubuntu 20.04
- Debian 10: Install Python PIP Debian 10
- LinuxMint 20: How to Install PIP in Linux Mint 20
- Arch Linux: Getting Started with PIP on ArchLinux
Installing Prometheus Client Library
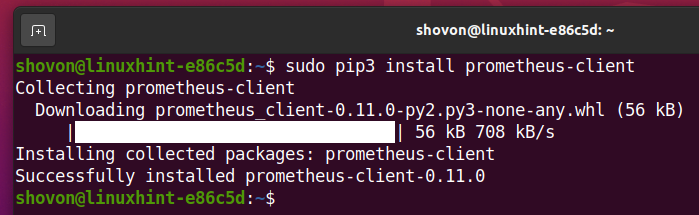
Once you have PIP installed on your computer, you can install the Python Prometheus client library on your computer with the following command:

Python Prometheus Client library prometheus-client should be installed.
Setting Up Python App for Monitoring with Prometheus:
To keep all the project files organized, create a new project directory. I will call it python-prometheus/. I will create the python-prometheus/ project directory in the ~/projects directory in this article.
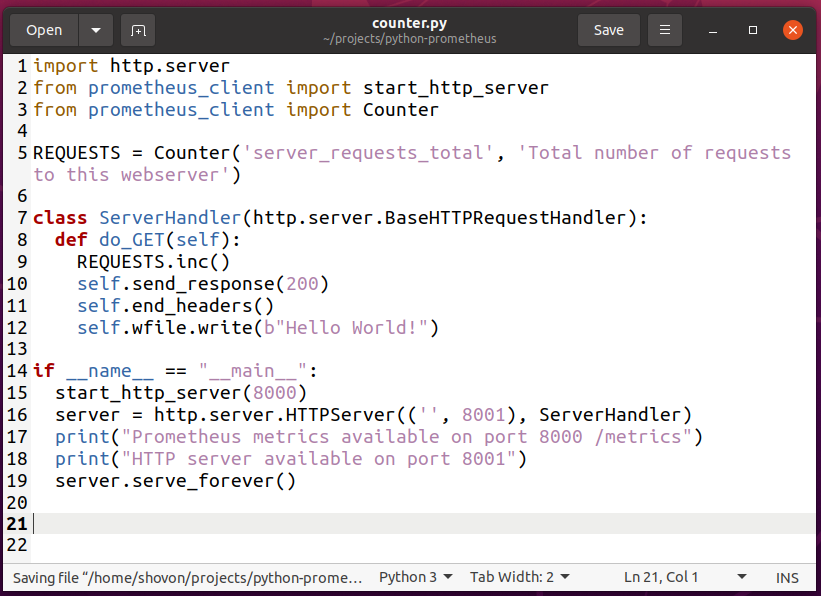
Create a new file hello_world.py and type in the following lines of codes.
from prometheus_client import start_http_server
class ServerHandler(http.server.BaseHTTPRequestHandler):
def do_GET(self):
self.send_response(200)
self.end_headers()
self.wfile.write(b"Hello World!")
if __name__ == "__main__":
start_http_server(8000)
server = http.server.HTTPServer(('', 8001), ServerHandler)
print("Prometheus metrics available on port 8000 /metrics")
print("HTTP server available on port 8001")
server.serve_forever()
Once you’re done, save the hello_world.py file.
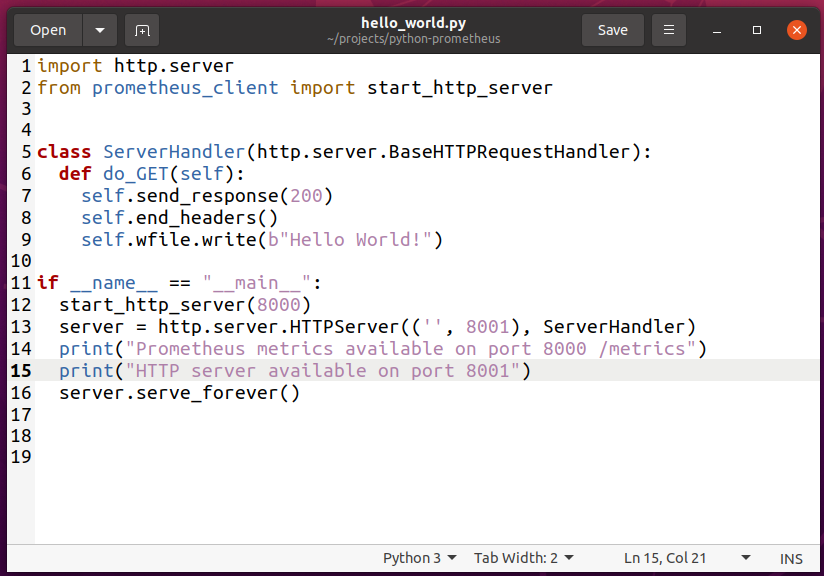
Here, line 1 imports the http.server Python module.
![]()
Line 2 imports start_http_server from the prometheus_client library.
![]()
Line 11 checks whether the script is directly executed or imported on other Python scripts. If the script is directly executed from the terminal, then lines 12-16 will be executed.

Line 12 starts the Prometheus metrics HTTP server on port 8000.
![]()
Line 13 creates a new HTTP server on port 8001 using the http.server module. The HTTP server uses the ServerHandler class to serve the HTTP requests to the client. Let’s assume that this is your web server and you want to monitor it using Prometheus.
![]()
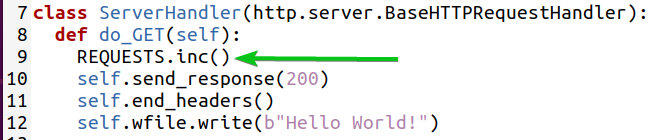
The ServerHandler class is defined in lines 5-9. It implements only the do_GET() method. This method prints the message Hello World! when you access the web server on port 8001.

Line 14-15 prints some messages on the terminal when you run the hello_world.py script.
![]()
Finally, line 16 starts the web server on port 8001.
![]()
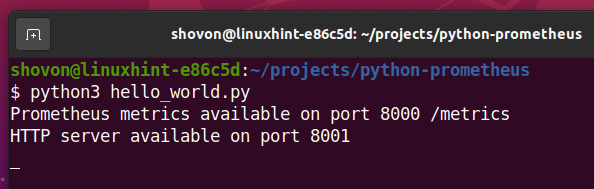
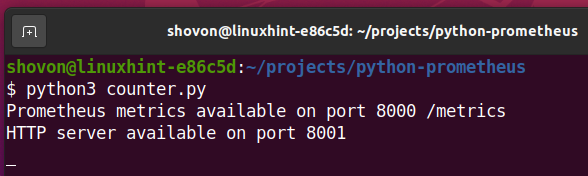
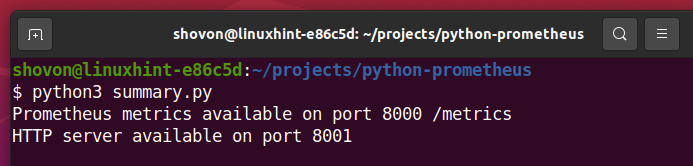
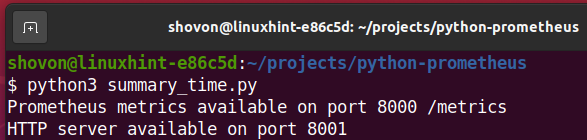
Now, you can run the hello_world.py script as follows:

The Prometheus metrics server and your web server should start. The Prometheus metrics should be available on port 8000 and your web server should be available on port 8001.
Now, find the IP address of your computer with the following command:
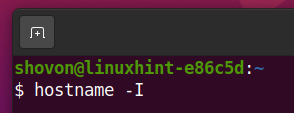
The IP address of your computer should be printed on the screen.
The IP address of my computer is 192.168.20.131. It will be different for you. So, make sure to replace it with yours from now on.

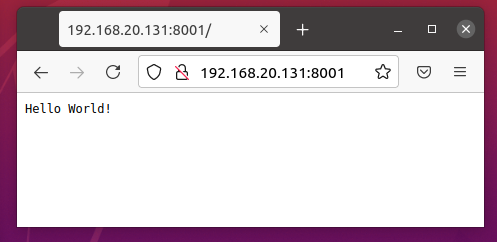
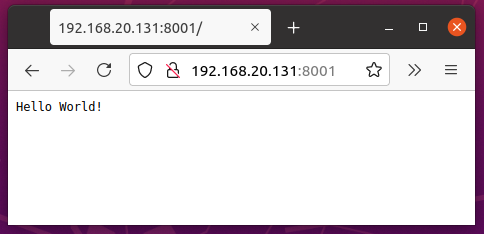
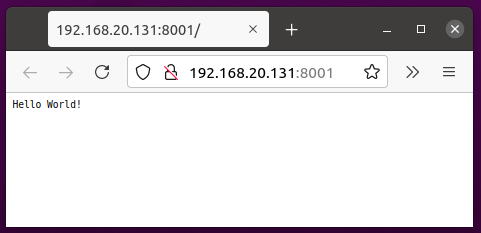
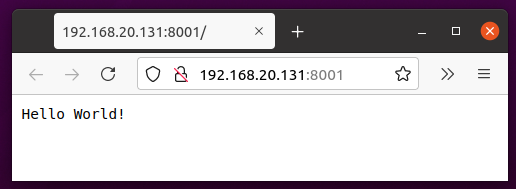
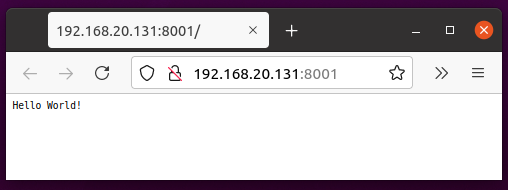
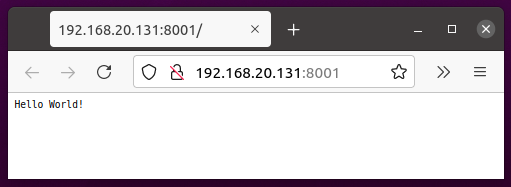
You can visit the URL http://192.168.20.131:8001 from your favorite web browser to access your web server.
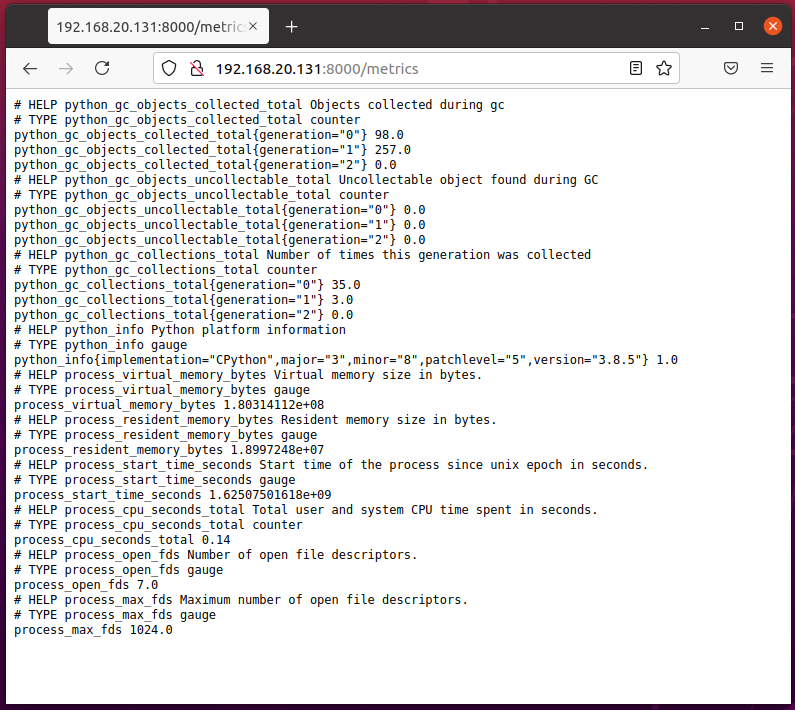
To access the Prometheus metrics, visit the URL http://192.168.20.131:8000/metrics from your favorite web browser.
Now, you have to add your Python app to Prometheus.
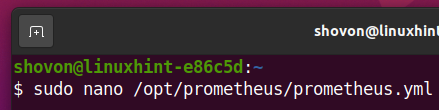
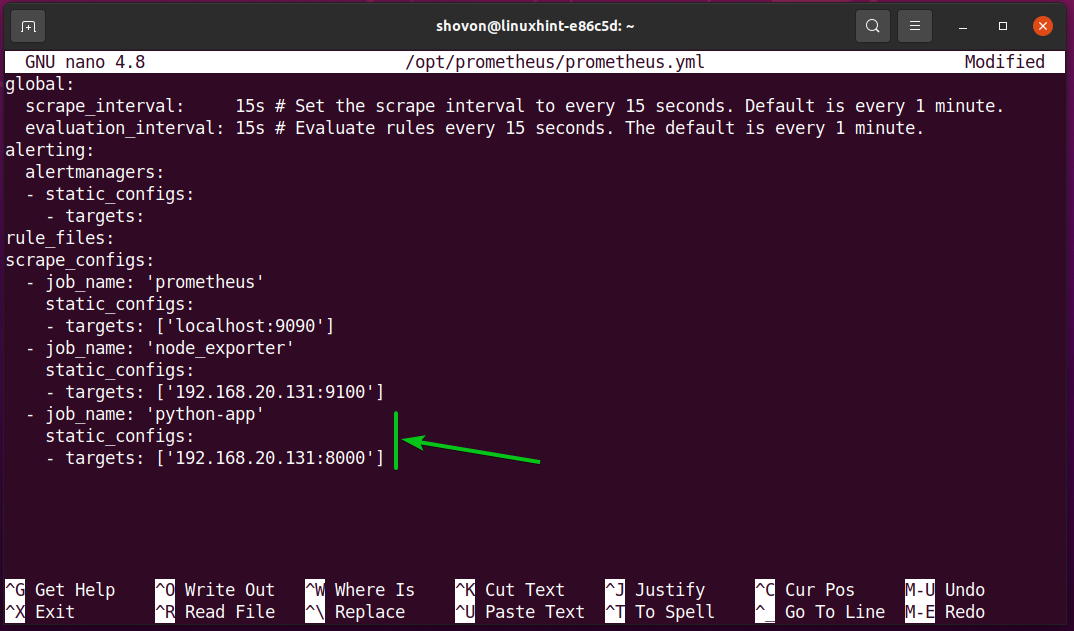
To do that, open the Prometheus configuration file prometheus.yml with the nano text editor as follows:
Add the following lines in the scrape_configs section of the prometheus.yml configuration file:
static_configs:
- targets: ['192.168.20.131:8000']
Once you’re done, press <Ctrl> + X followed by Y and <Enter> to save the prometheus.yml file.
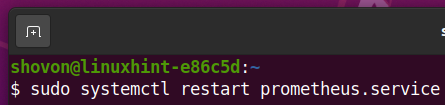
For the changes to take effect, restart the prometheus systemd service with the following command:
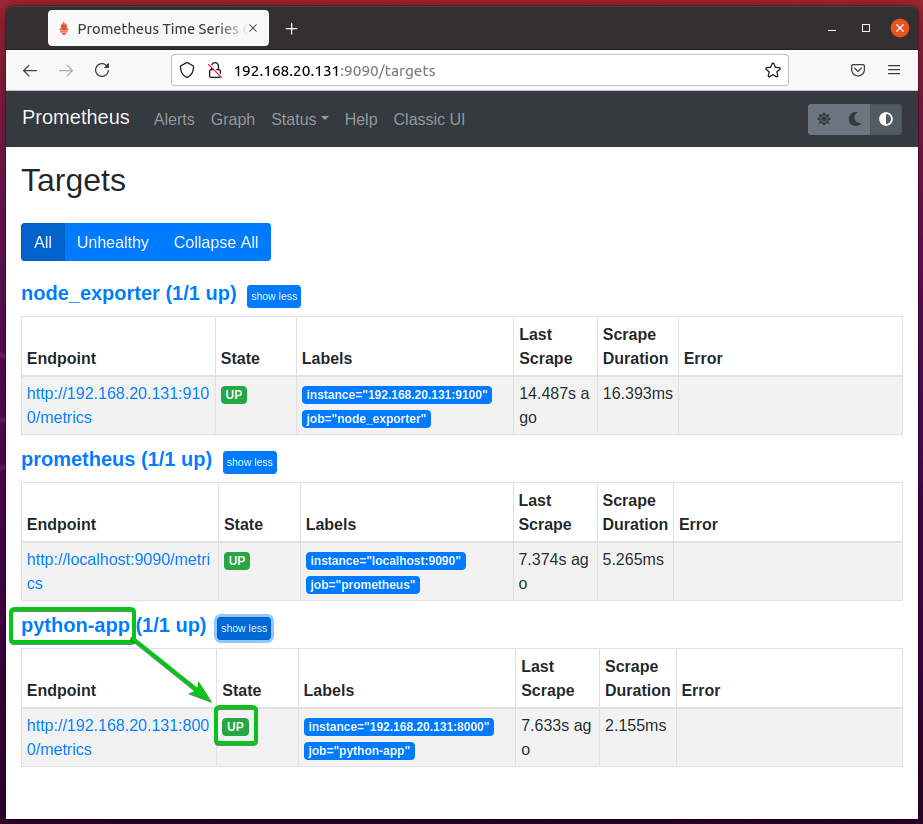
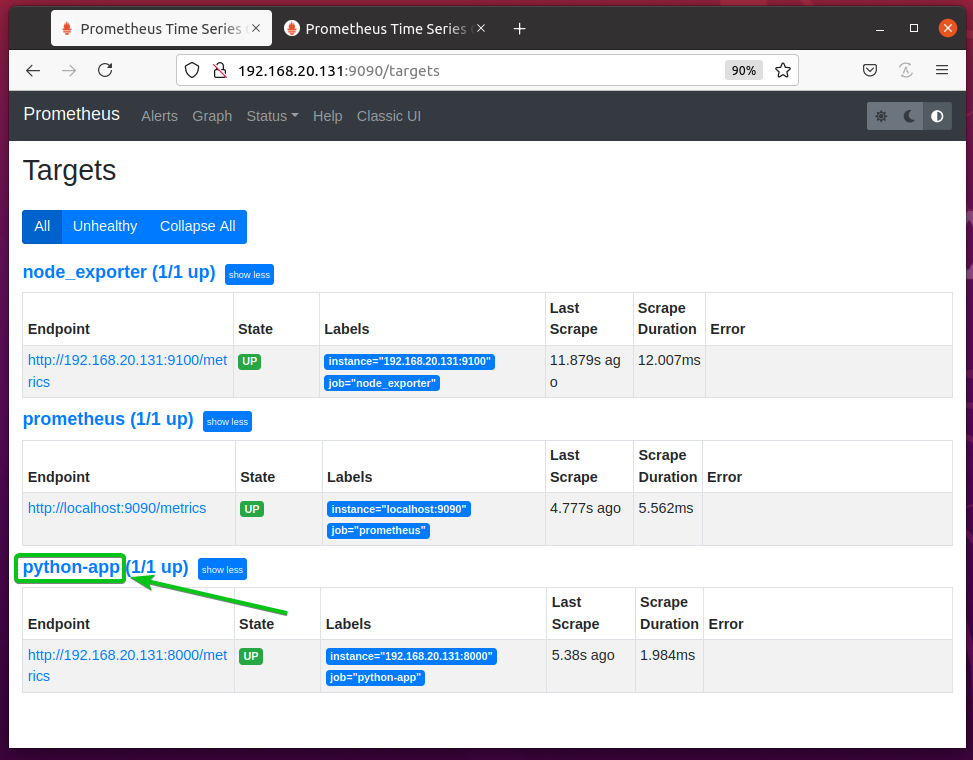
To verify whether Prometheus is monitoring your Python app, navigate to the URL http://192.168.20.131:9090/targets from your favorite web browser. You should see that your python-app target is in the UP state. So, Prometheus can scrape metrics from your Python app. Everything is working just fine.
NOTE: Here, 192.168.20.131 is the IP address of the computer where Prometheus is installed. It may be different for you. So, make sure to replace it with yours from now on.
Now, if you navigate to the Graph page and start typing in Prometheus property python_, you should see some properties starting with python_ as in the screenshot below.
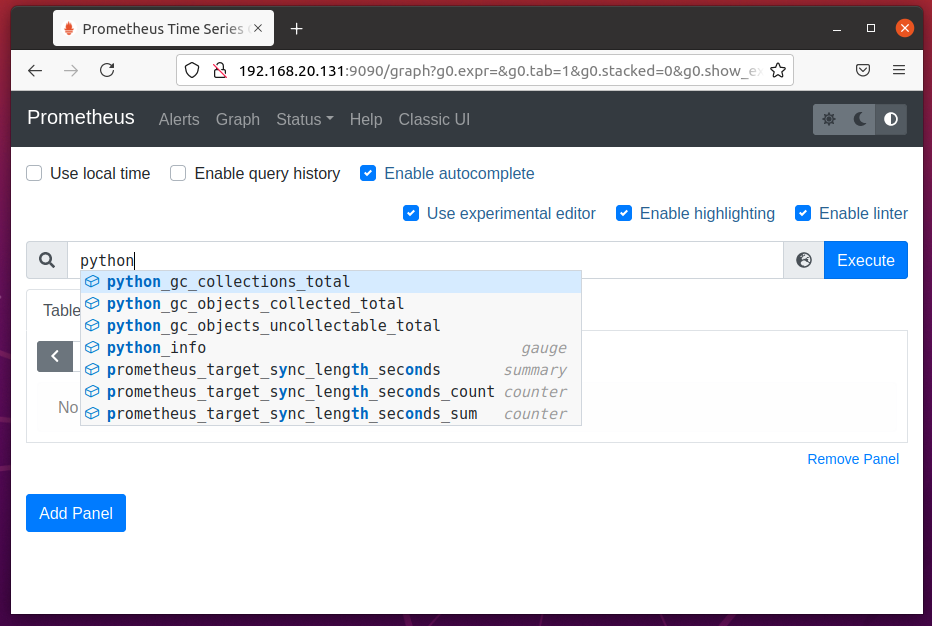
As you can see, the python_info property shows the Python version the app is using. From the data, you can see that the app is using Python 3.8.5.
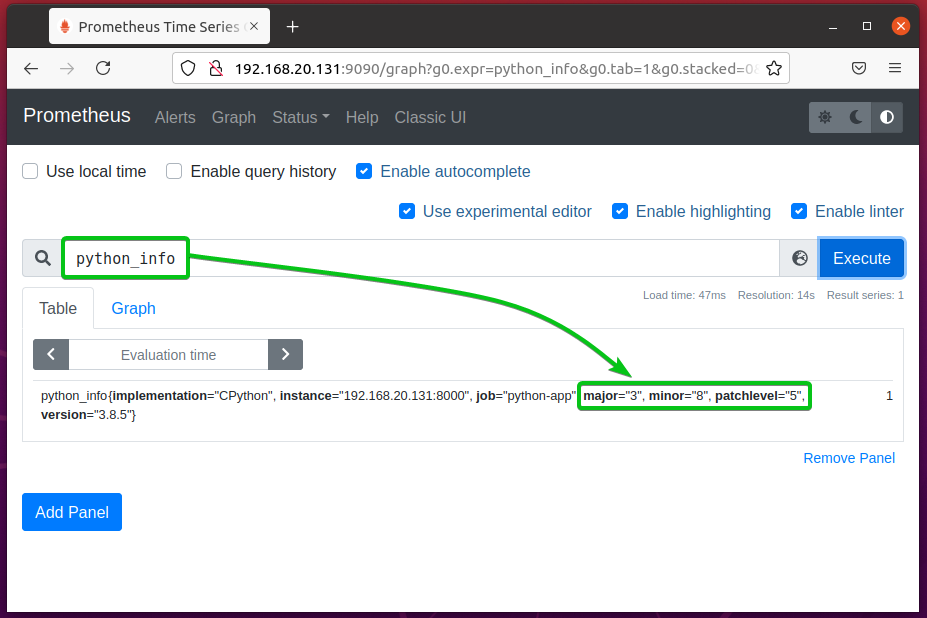
As you can see, I am running Python 3.8.5. So, Prometheus is collecting metrics from the Python app correctly.

In this article, I am using the http.server library to set up a simple web server and monitor it with Prometheus. If you want, you can use other libraries like Flask, Twisted, etc. Your app doesn’t have to be a web server. You can monitor any type of Python application with Prometheus. Check the official Python prometheus-client GitHub page for more information.
Available Metrics
At the time of this writing, Prometheus offers 4 types of metrics for monitoring Python applications:
Counter
It is used to count the number or size of an event. i.e. number of visitors, number of page views, number of errors, amount of data served by the web server. An initial value can be set to a Counter. From that value, the Counter value increases. You can’t decrease the value of a Counter. But, if you stop the Python script and run it again, the Counter will reset.
Gauge
It is used to count the number or size of the current state of an event. i.e. the number of requests that are currently being processed, the amount of memory the program is using, the number of users currently logged in. Unlike Counter, the value of the Gauge can be increased and decreased.
Summary
It is used to track the latency of an event. i.e. the time that a function took to complete a task, the amount of time required to serve a webpage, the amount of time required to respond to an API request.
Histogram
It is used to track the size and number of events in a pre-defined bucket. A bucket is an array of sorted numbers (integers and fractions) that the Histogram uses to group data. It can also be used to calculate quantile and percentile.
The Histogram metric type is a little more complex compared to Counter, Gauge, and Summary. So, it may be a little hard for you to understand. An example should make it easy for you.
Let’s say, you have a website. You want to know how many requests took less than 1ms, 2ms, 3ms, 4ms, 5ms, 6ms, 7ms, 8ms, 9ms, and 10ms respectively to respond. You also want to know how many requests took more than 10ms to respond. You want to check how many ms 95% (95 percentile or 0.95 quantile) of the requests took to respond on average as well. You can do that with Histogram.
Using Counter
To experiment with the Counter metric, create a new Python script counter.py in your project directory and type in the following lines of codes.
from prometheus_client import start_http_server
from prometheus_client import Counter
REQUESTS = Counter('server_requests_total',
'Total number of requests to this webserver')
class ServerHandler(http.server.BaseHTTPRequestHandler):
def do_GET(self):
REQUESTS.inc()
self.send_response(200)
self.end_headers()
self.wfile.write(b"Hello World!")
if __name__ == "__main__":
start_http_server(8000)
server = http.server.HTTPServer(('', 8001), ServerHandler)
print("Prometheus metrics available on port 8000 /metrics")
print("HTTP server available on port 8001")
server.serve_forever()
Once you’re done, save the Python script counter.py.
NOTE: The Python script counter.py is almost the same as hello_world.py.
Here, line 3 imports Counter from the prometheus_client library.
![]()
Line 5 creates a Counter object and it is stored in the REQUESTS variable. The 1st argument is the counter property that you want to define. In this case, the counter property is server_requests_total. The 2nd argument is a hint of what this counter property is for. It can be anything meaningful.
![]()
Line 9 increments the counter by 1 using the inc() method of the Counter object.
NOTE: The value of the Counter is set to 0 by default.
You can increment the counter by an integer (i.e. 2) as follows:
![]()
You can also increment the counter by a fraction (i.e. 2.5) as follows:
![]()
Now, run the Python script counter.py as follows:
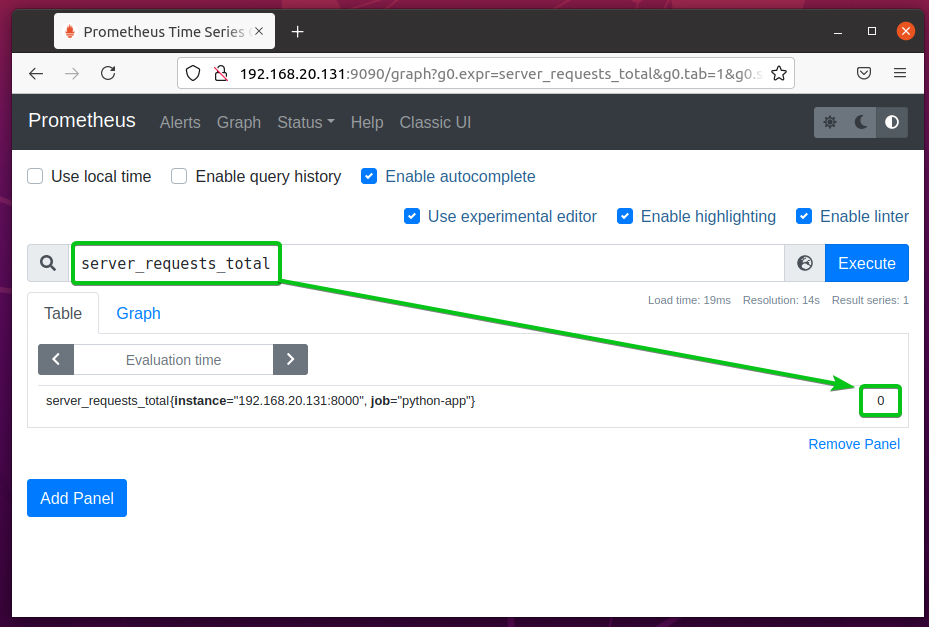
The server_request_total counter property should be available the next time you refresh the Prometheus Graph page.
By default, it is set to 0 as you can see in the screenshot below.
Now, visit the Python web app at the URL http://192.168.20.131:8001 from your favorite web browser and keep pressing <F5> for a while. <F5> reloads the webpage and it should be counted as a pageview. So, the server_requests_total counter should increase every time you press <F5>.
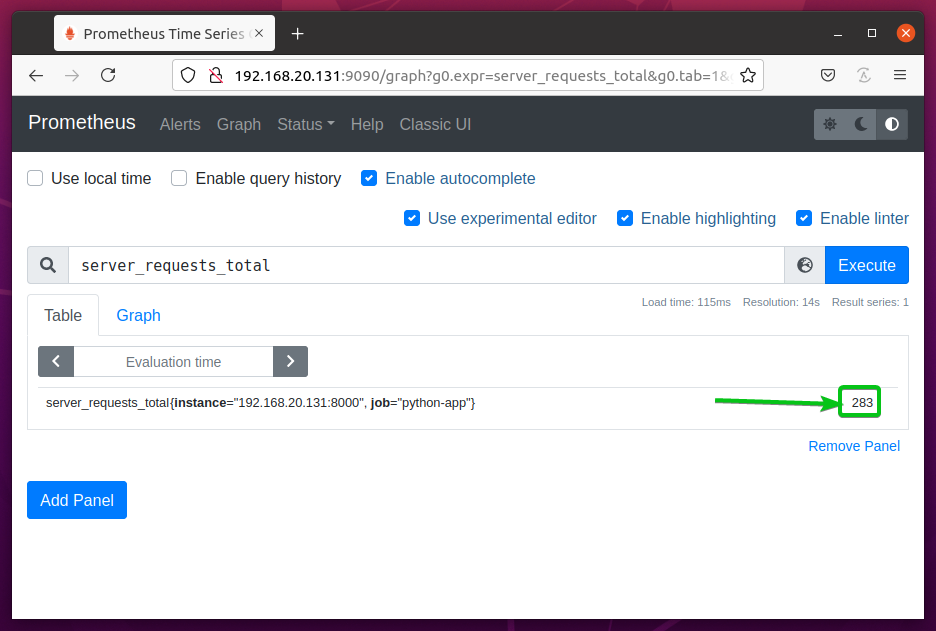
After a few minutes, reload the Prometheus Graph page you should see that the server_requests_total counter value increased.
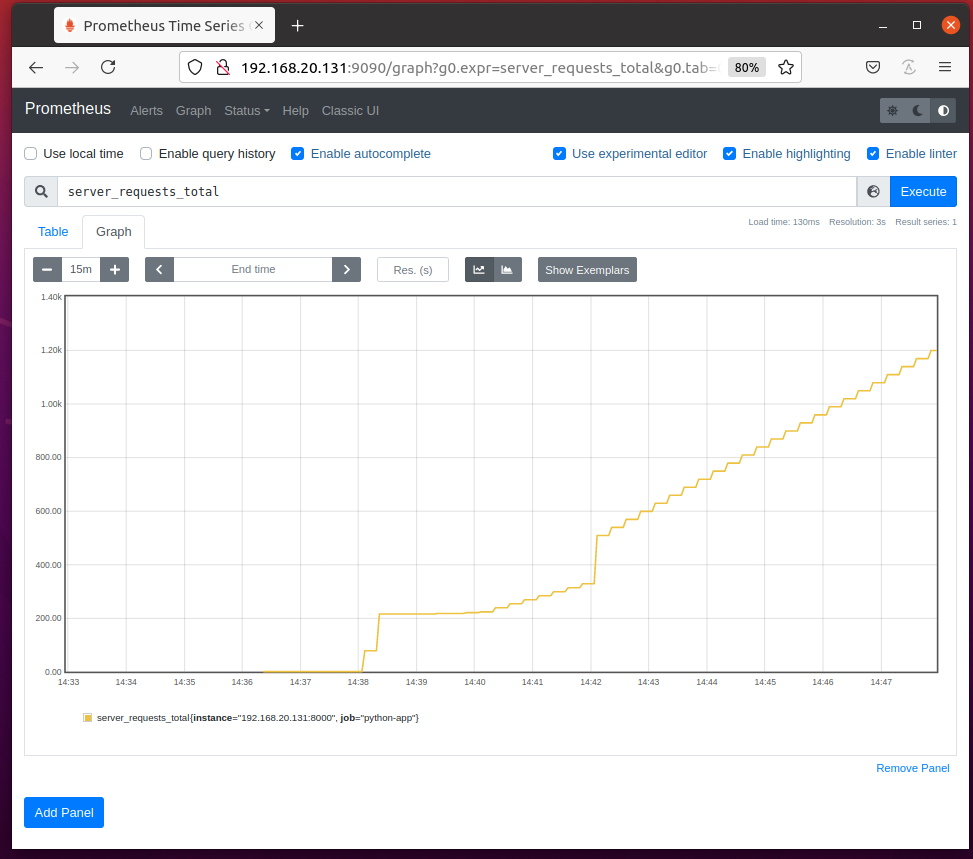
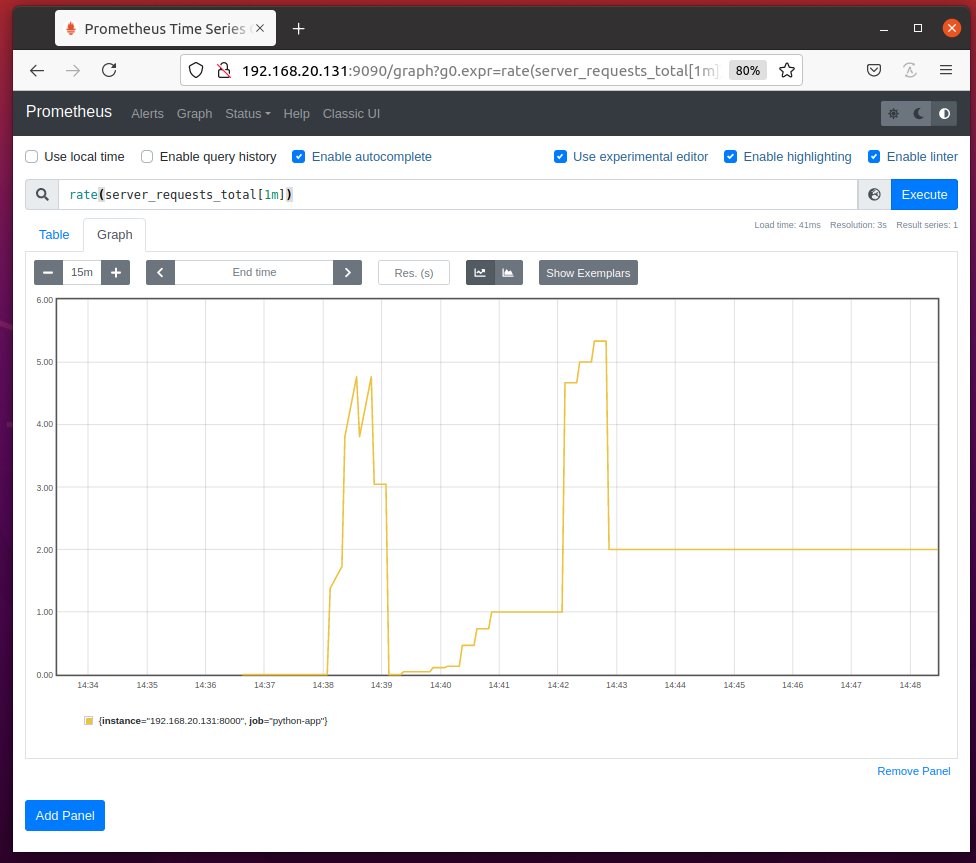
In the Graph tab, the server_requests_total counter should look as shown in the screenshot below.
To find the number of requests per second, run the query rate(server_requests_total[1m]).
The rate() function calculates the rate of change of counters averaged over a specific timeline (1m or 1 minute in this case).
Handling Counter Exceptions with Utilities
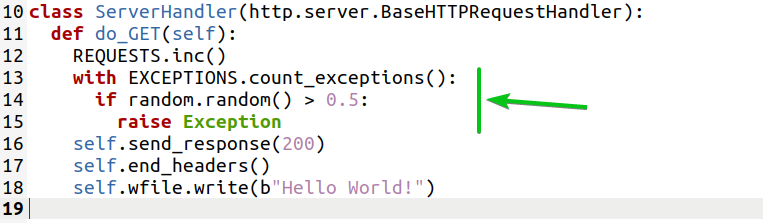
You can use the count_exceptions() utility method of the Counter object to count the number of exceptions/errors raised by your Python app.
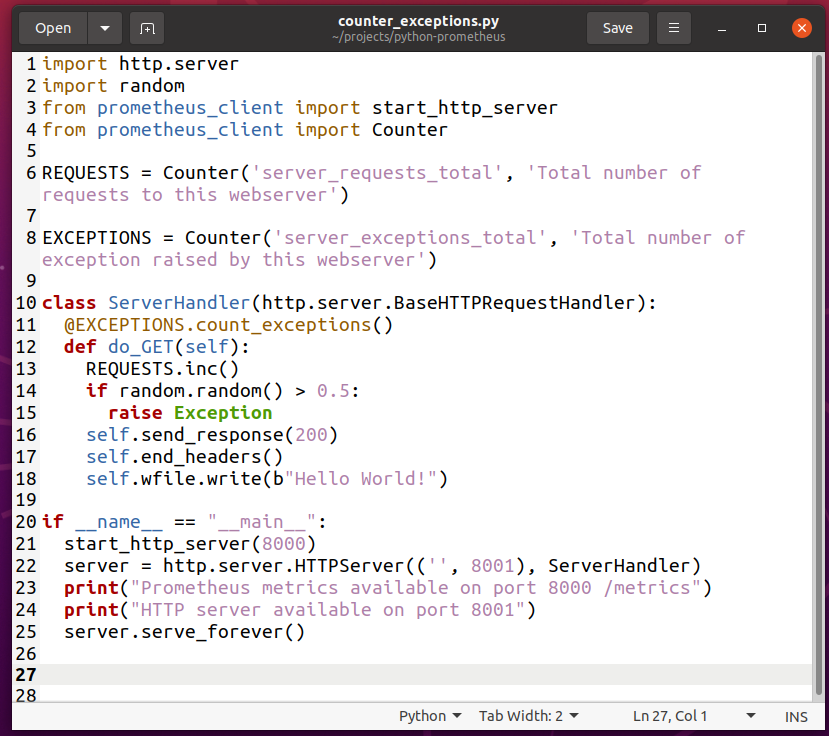
To experiment with counting exceptions with Counter, create a new Python script counter_exceptions.py and type in the following lines of codes:
import random
from prometheus_client import start_http_server
from prometheus_client import Counter
REQUESTS = Counter('server_requests_total',
'Total number of requests to this webserver')
EXCEPTIONS = Counter('server_exceptions_total',
'Total number of exception raised by this webserver')
class ServerHandler(http.server.BaseHTTPRequestHandler):
@EXCEPTIONS.count_exceptions()
def do_GET(self):
REQUESTS.inc()
if random.random() & gt; 0.5:
raise Exception
self.send_response(200)
self.end_headers()
self.wfile.write(b"Hello World!")
if __name__ == "__main__":
start_http_server(8000)
server = http.server.HTTPServer(('', 8001), ServerHandler)
print("Prometheus metrics available on port 8000 /metrics")
print("HTTP server available on port 8001")
server.serve_forever()
Once you’re done, save the counter_exceptions.py Python script.
NOTE: The Python script counter_exceptions.py is almost the same as counter.py.
Here, line 2 imports the Python random module.
![]()
Line 8 creates a server_exceptions_total counter and stores it in the EXCEPTIONS variable.

Line 11 uses the count_exception() method of the EXCEPTIONS Counter object as a function decorator for the do_GET(self) method defined on line 12. It will count the exceptions raised in the do_GET(self) method.

Line 14-15 are used to generate dummy exceptions randomly so that you can test whether exceptions are counted.
Line 14 generates a random floating-point number between 0 and 1 (i.e. 0.824865381594498, 0.3011596771609122) using the random.random() method and checks if it is greater than 0.5. If it is, then line 15 raises an Exception.
![]()
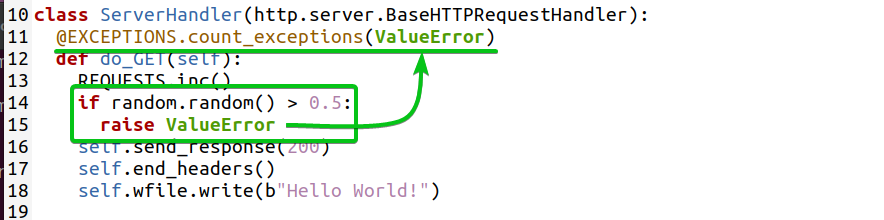
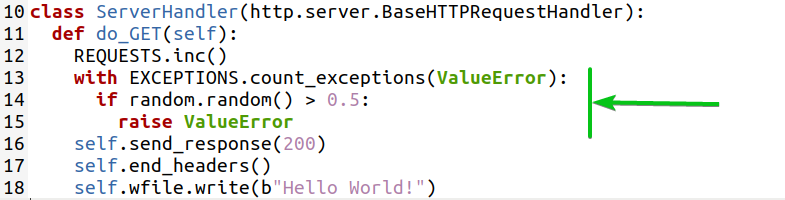
If you want, you can also count specific types of exceptions. For example, to count the ValueError exception, you can write the function decoration as follows:
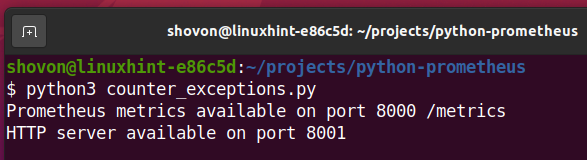
Now, run the Python script counter_exceptions.py as follows:
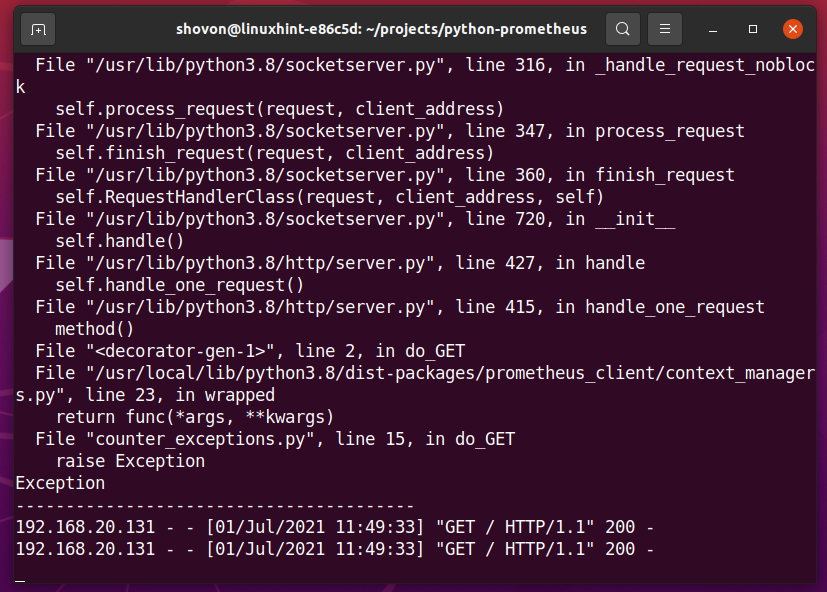
Visit the Python web app at the URL http://192.168.20.131:8001 from your favorite web browser and keep pressing <F5> for a while. This should generate some exceptions and the value of the server_exceptions_total counter should increase.
On the terminal, you should see some errors as shown in the screenshot below. This confirms that some exceptions were generated.
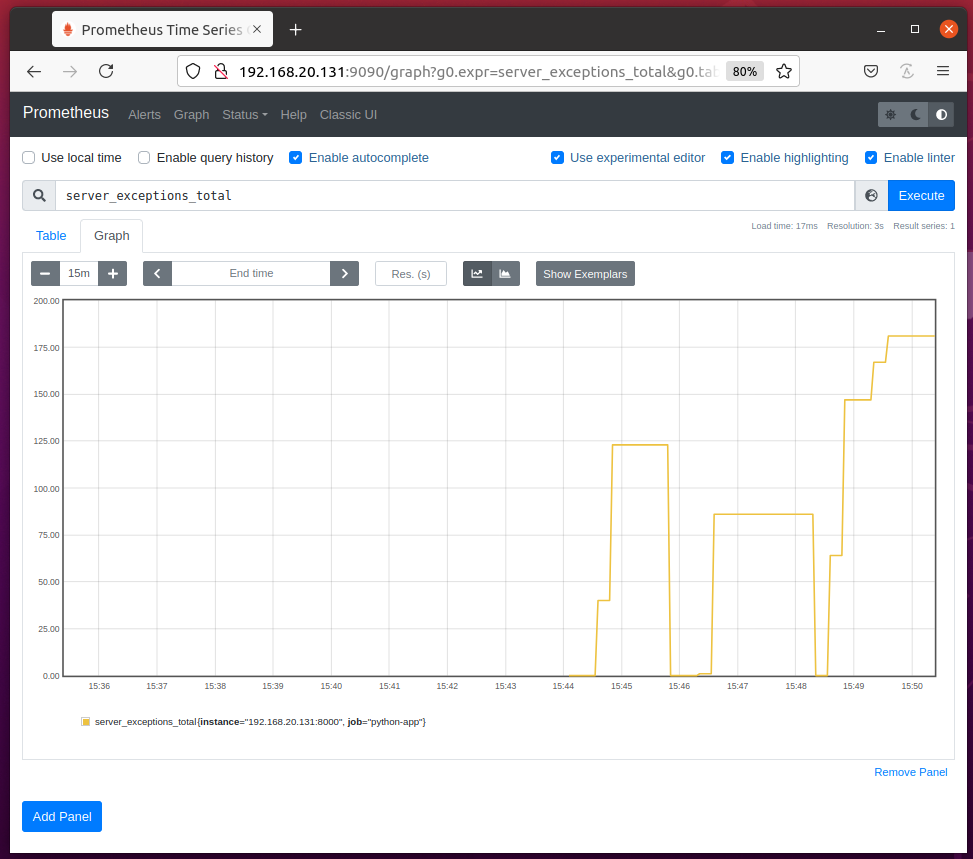
You should be able to access the server_exceptions_total counter from the Prometheus Graph page as you can see in the screenshot below.
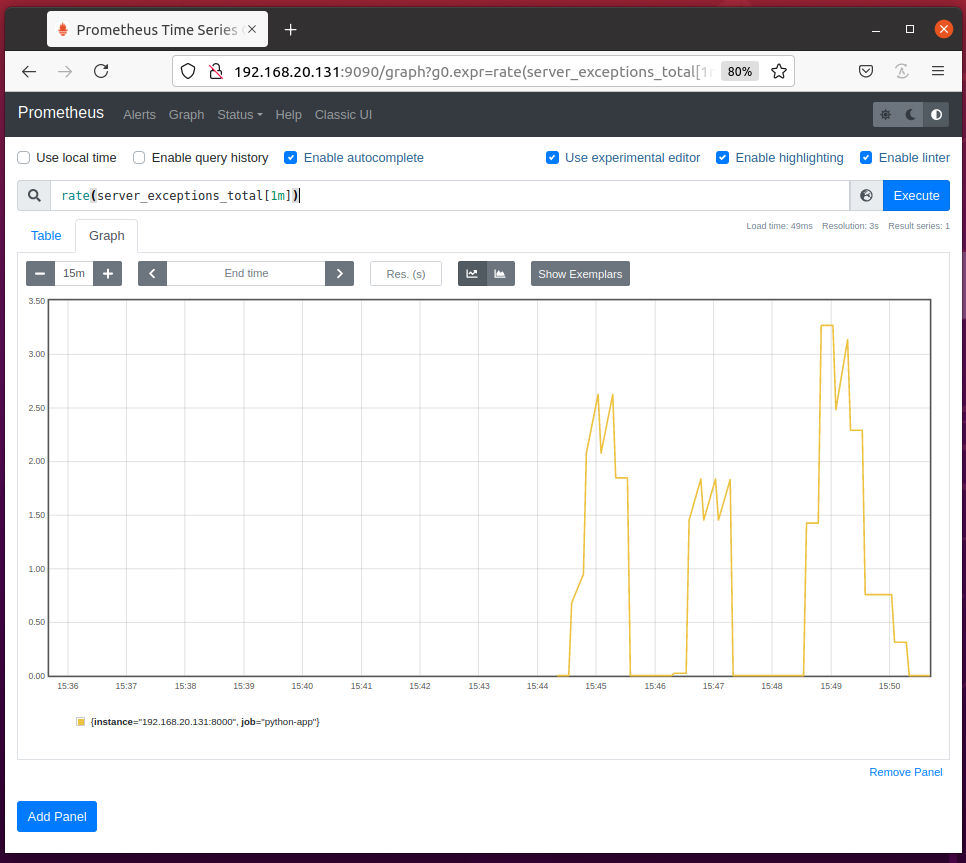
You can also calculate the exceptions raised per second using the rate(server_exceptions_total[1m]) query as you can see in the screenshot below.
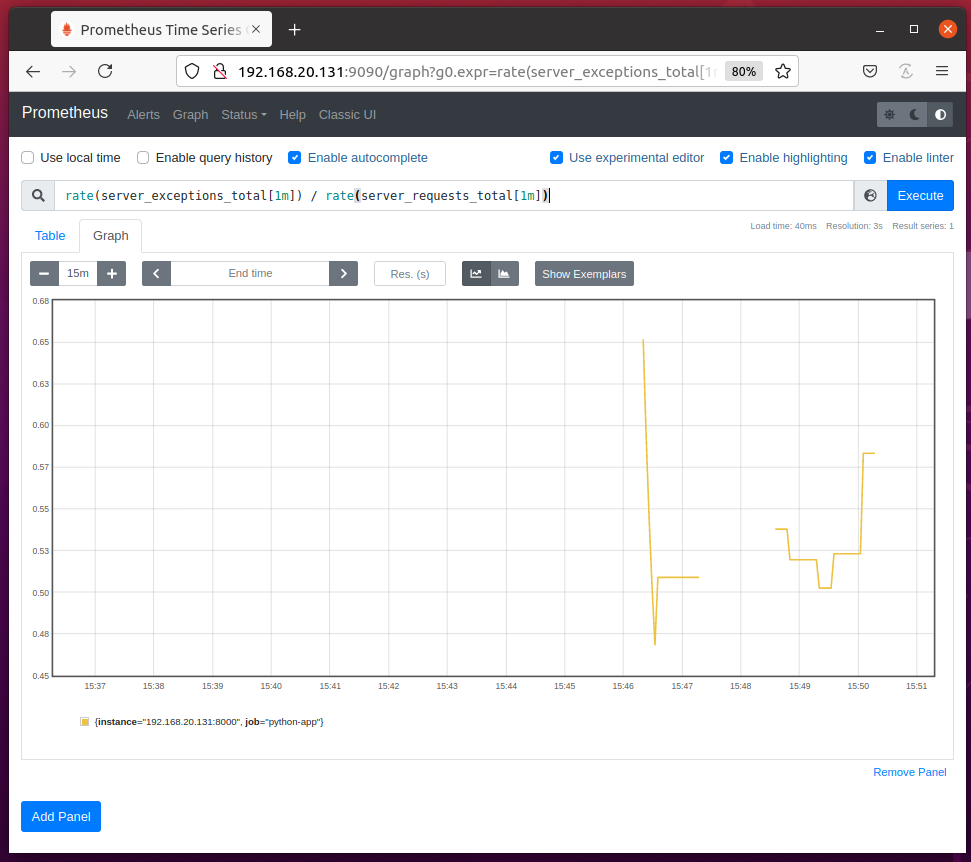
You can calculate the ratio of the exception per request using the Prometheus query rate(server_exceptions_total[1m]) / rate(server_requests_total[1m]) as you can see in the screenshot below.
You can also count exceptions raised within a block of code using the count_exceptions() utility method of the Counter object.
Here, line 13 uses the count_exception() utility method to count the exceptions raised in the marked code block (lines 14 and 15) below.
In the same way, you can use the count_exception() utility method to count specific types of exceptions raised within a block of code.
Here, line 13 uses the count_exception() utility method to count the ValueError exceptions raised in the marked code block (lines 14 and 15) below.
Using Gauge
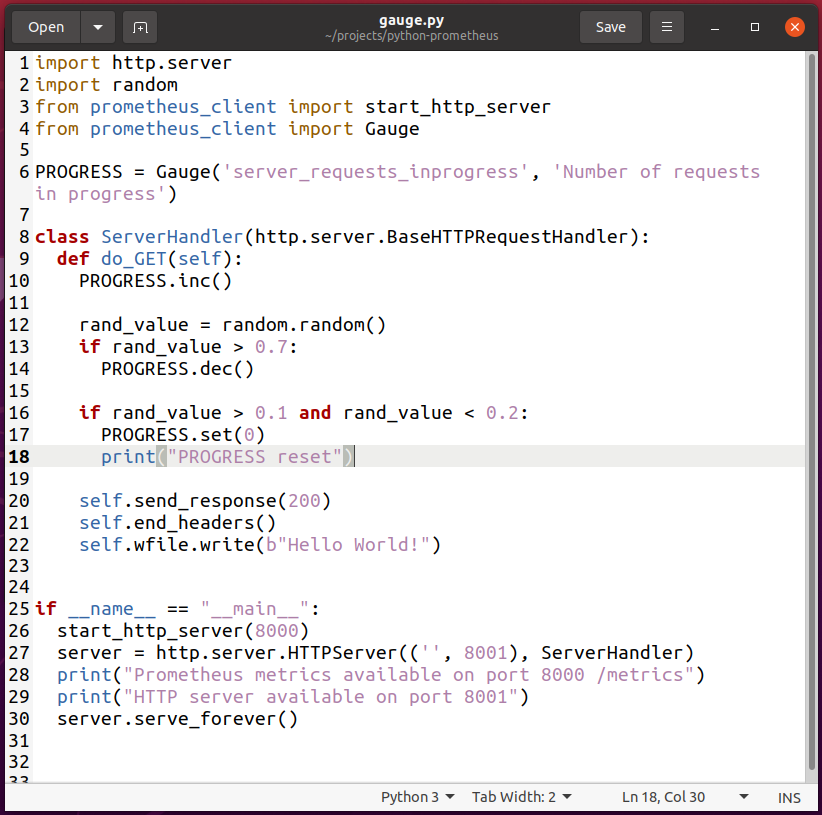
To experiment with the Gauge metric type, create a new Python script gauge.py and type in the following lines of codes:
import random
from prometheus_client import start_http_server
from prometheus_client import Gauge
PROGRESS = Gauge('server_requests_inprogress',
'Number of requests in progress')
class ServerHandler(http.server.BaseHTTPRequestHandler):
def do_GET(self):
PROGRESS.inc()
rand_value = random.random()
if rand_value > 0.7:
PROGRESS.dec()
if rand_value > 0.1 and rand_value < 0.2:
PROGRESS.set(0)
print("PROGRESS reset")
self.send_response(200)
self.end_headers()
self.wfile.write(b"Hello World!")
if __name__ == "__main__":
start_http_server(8000)
server = http.server.HTTPServer(('', 8001), ServerHandler)
print("Prometheus metrics available on port 8000 /metrics")
print("HTTP server available on port 8001")
server.serve_forever()
Once you’re done, save the gauge.py Python script.
NOTE: The Python script gauge.py is almost the same as hello_world.py.
Here, line 2 imports the Python random module.
![]()
Line 4 imports Gauge from the prometheus_client module.
![]()
Line 6 creates a Gauge object and it is stored in the PROGRESS variable. The 1st argument is the gauge property that you want to define. In this case, the gauge property is server_requests_inprogress. The 2nd argument is a hint of what this gauge property is for. It can be anything meaningful.
![]()
Line 10 increases the value of the server_requests_inprogress gauge by 1 using the inc() method of the Gauge object.
![]()
To simulate requests to the web server to be in the progress state (waiting to be served), I have generated a random number. Depending on that random number, the value of the server_requests_inprogress gauge decreases (the request is served) and resets (no more requests are waiting to be served).
Line 12 generates a random number using the random.random() method and stores it in the rand_value variable.
![]()
Line 13 checks whether the random number stored in rand_value is greater than 0.7. If it is, then line 14 decreases the server_requests_inprogress gauge by 1 using the dec() method of the Gauge object. This indicates that one more request is served (let’s assume).
![]()
Line 16 checks whether the random number stored in rand_value is between 0.1 and 0.2. If it is, then line 17 resets the server_requests_inprogress gauge to 0 using the set() method of the Gauge object. This indicates that all the requests are served (no more requests in progress). Line 18 also prints the message PROGRESS reset on the terminal to help you debug this program.

In the same way as Counter, you can increment the gauge value by an integer (line 10) or a fraction (line 11) using the inc() method of the Gauge object.

You can decrement the gauge value by an integer (line 14) or a fraction (line 15) using the dec() method of the Gauge object.
![]()
You can also set an integer (line 18) or a fraction (line 19) as the gauge value using the set() method of the Gauge object.
![]()
Now, run the Python script gauge.py as follows:
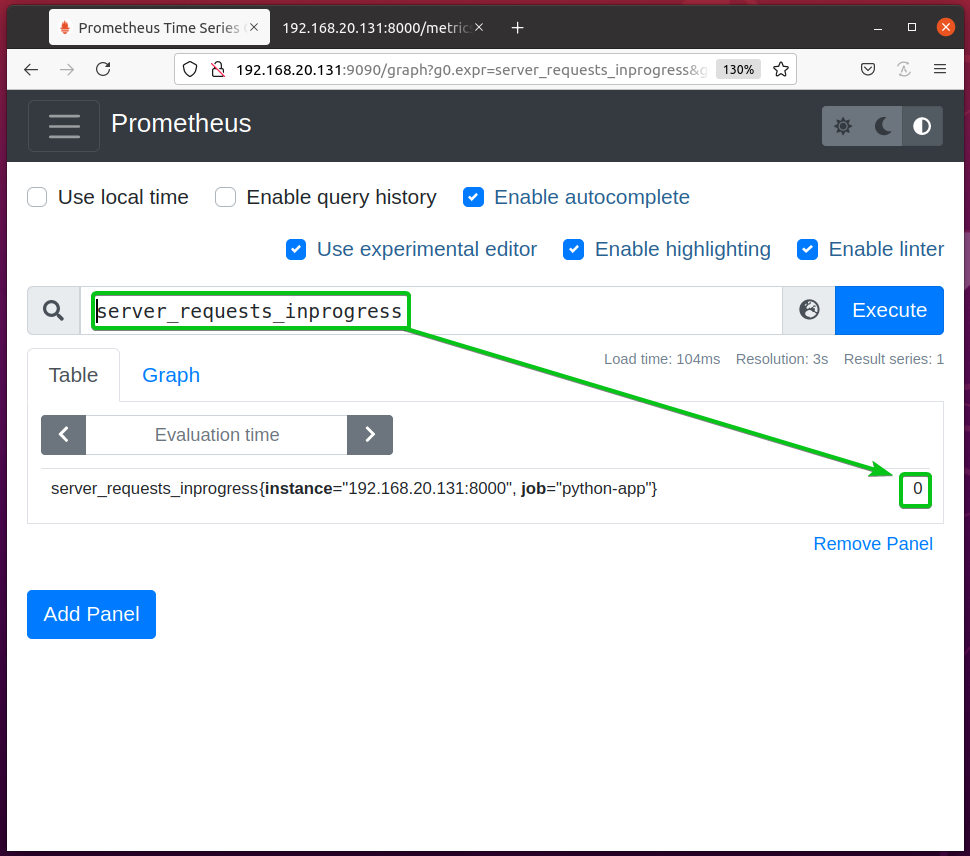
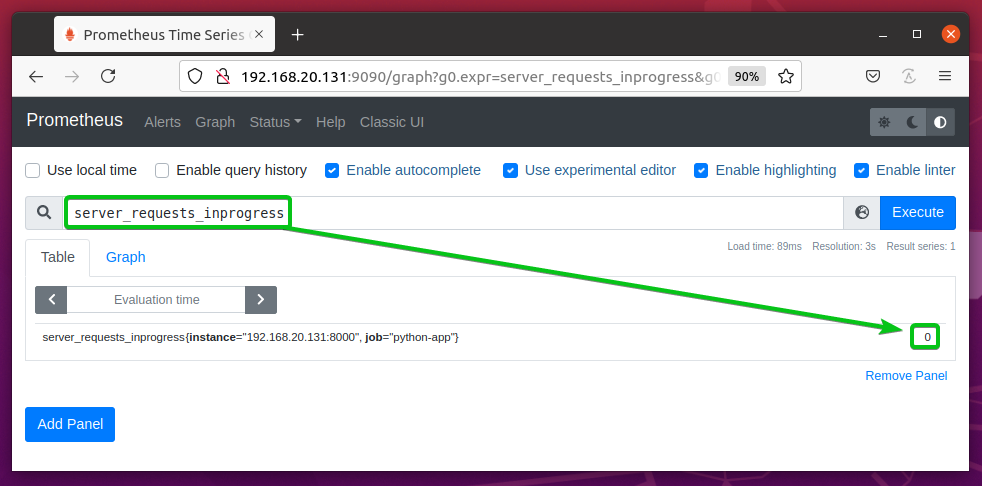
The server_requests_inprogress gauge should be set to 0 by default.
Visit the Python web app at the URL http://192.168.20.131:8001 from your favorite web browser and press <F5> (reloads the page) a few times.

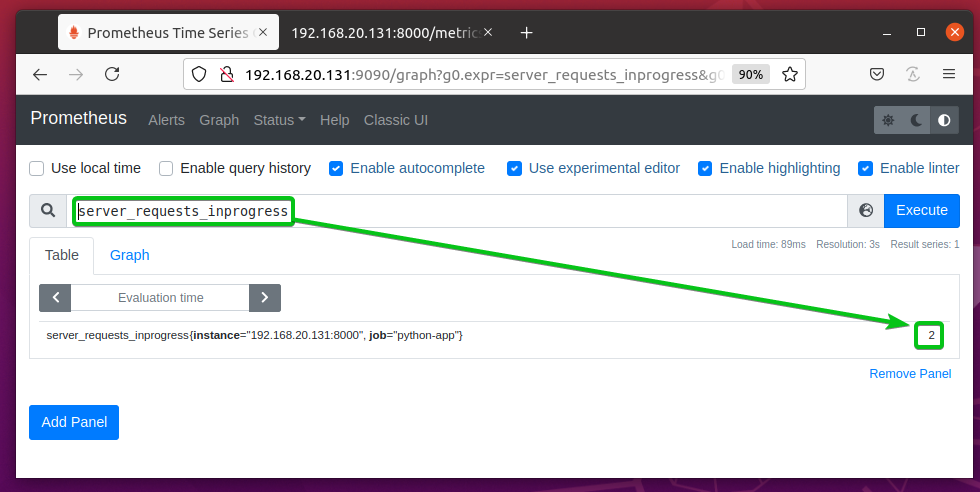
Refresh the Prometheus Graph page and you should see that the server_requests_inprogress gauge value is greater than 0.
Visit the Python web app at the URL http://192.168.20.131:8001 from your favorite web browser and keep pressing <F5> (reloads the page) for a while so that the server_requests_inprogress gauge resets a few times.

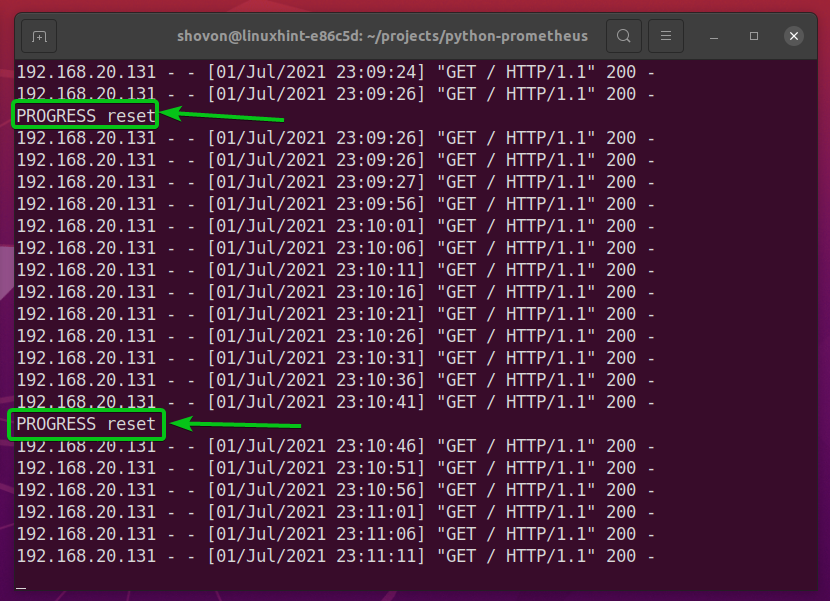
When the server_requests_inprogress gauge resets, the Python script should print PROGRESS reset on the screen as marked in the screenshot below.
Refresh the Prometheus Graph page and you should see that the value of the server_requests_inprogress goes up and down and resets (goes to 0) once in a while.
Tracking Progress with Gauge Utilities
You can use the in_progress() utility method of the Gauge object to track the IN PROGRESS status of a function/method or a block of code of your Python app. The value of the gauge property will be increased (by 1) when the function/method or the block of code starts executing and will be decreased (by 1) when the function/method or the block of code finishes executing. This is how Prometheus can tell whether a function/method or a block of code is in progress (still being executed).
To track the in progress status of a function/method, you can use the in_progress() utility as a function decorator.
To experiment with tracking the progress of a function/method, create a new Python script gauge_track_inprogress.py and type in the following lines of codes:
import time
from prometheus_client import start_http_server
from prometheus_client import Gauge
PROGRESS = Gauge('server_requests_inprogress',
'Number of requests in progress')
class ServerHandler(http.server.BaseHTTPRequestHandler):
@PROGRESS.track_inprogress()
def do_GET(self):
time.sleep(.1)
self.send_response(200)
self.end_headers()
self.wfile.write(b"Hello World!")
if __name__ == "__main__":
start_http_server(8000)
server = http.server.HTTPServer(('', 8001), ServerHandler)
print("Prometheus metrics available on port 8000 /metrics")
print("HTTP server available on port 8001")
server.serve_forever()
Once you’re done, save the gauge_track_inprogress.py Python script.
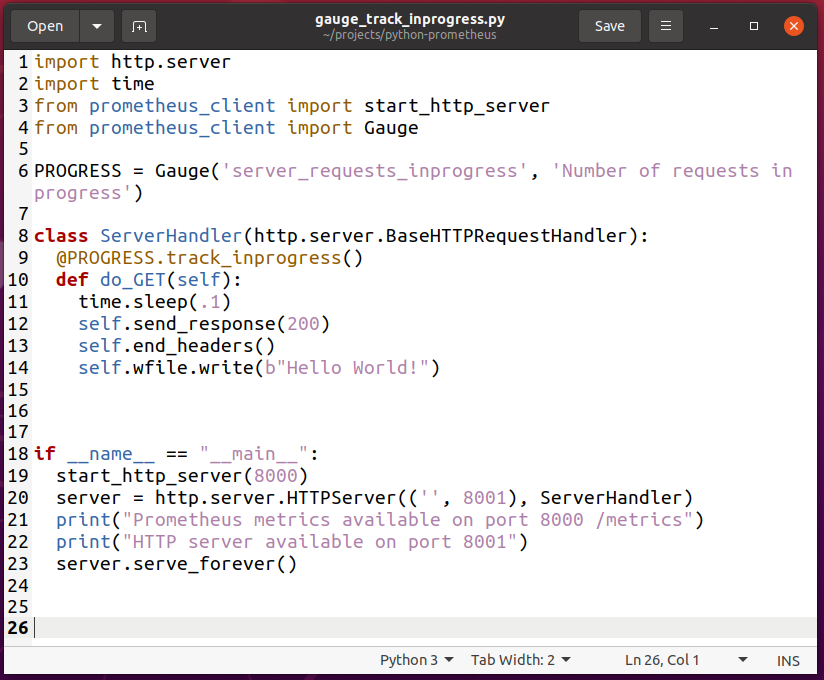
NOTE: The Python script gauge_track_inprogress.py is almost the same as gauge.py.
Here, line 2 imports the Python time module.
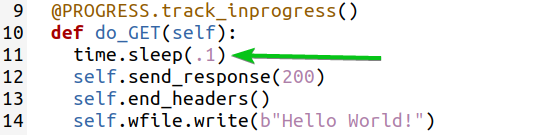
![]()
Line 9 uses the track_inprogress() method of the PROGRESS Gauge object as a function decorator for the do_GET(self) function defined on line 10.
![]()
In line 11, I used the time.sleep() method to delay the response of the web server to 100ms or 0.1s so that we can test whether tracking works.
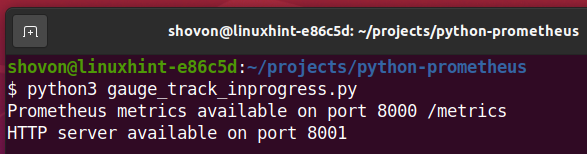
Now, run the Python script gauge_track_inprogress.py as follows:
The server_requests_inprogress gauge should be 0 at first as you can see in the screenshot below.
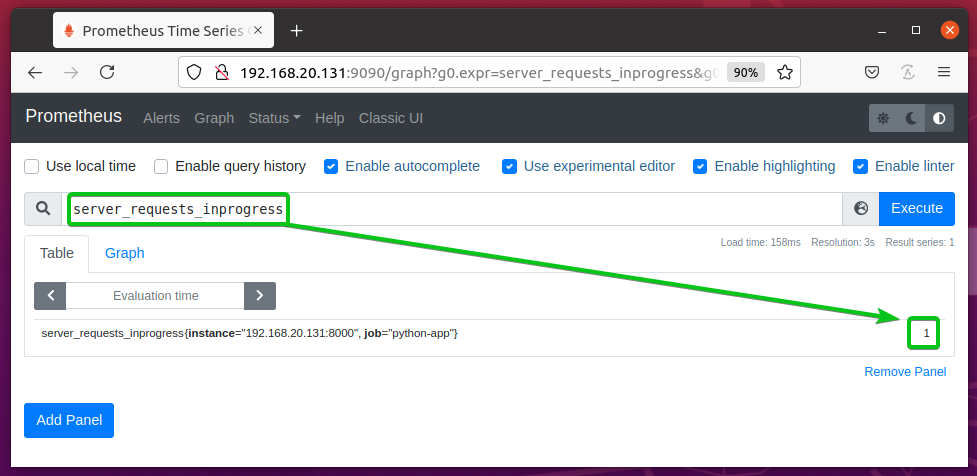
Visit the Python web app at the URL http://192.168.20.131:8001 from your favorite web browser and keep pressing <F5> (reload the page) for a while.

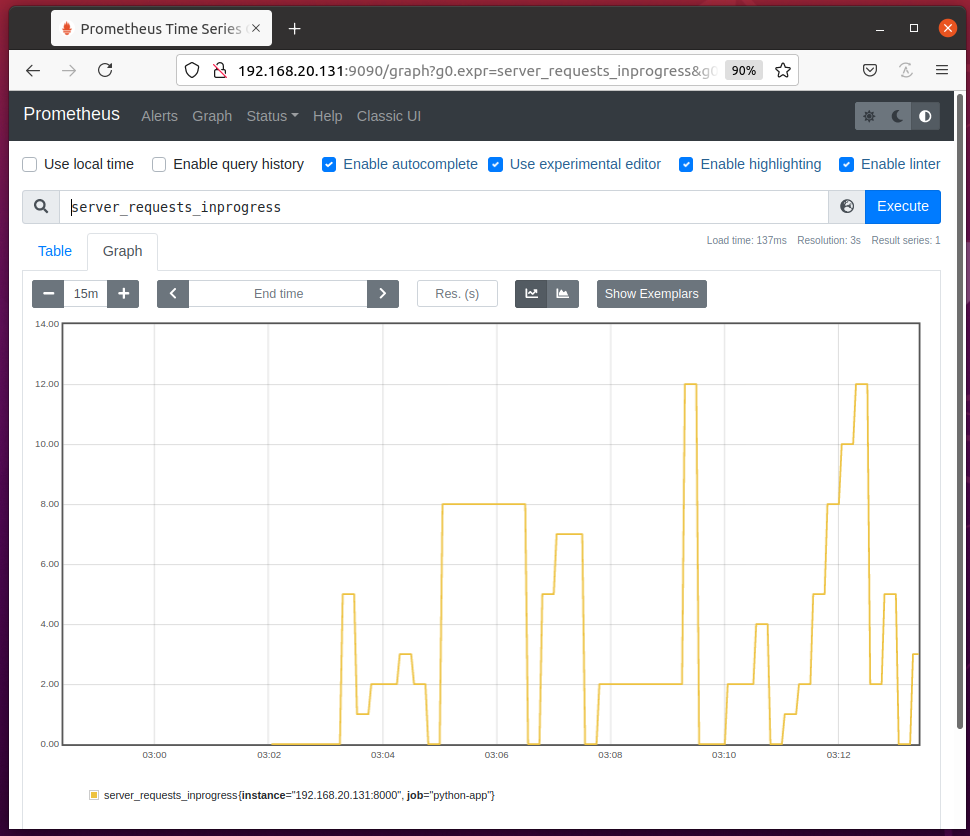
Once in a while, you should see that the server_requests_inprogress gauge is set to 1 as in the screenshot below.
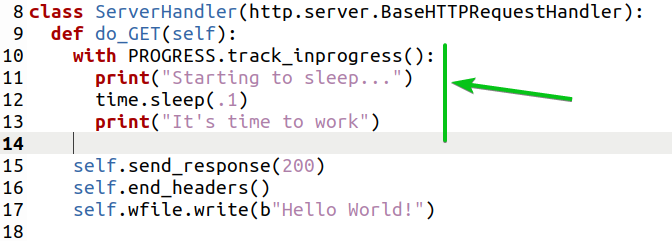
You can also track the in progress status of a block of code using the track_inprogress() utility method of the Gauge object.
Here, line 10 uses the track_inprogress() utility method to track the in progress status of a block of code (lines 11, 12, and 13) as marked in the screenshot below.
Tracking Time with Gauge Utilities
You can use the set_to_current_time() method of the Gauge to let the prometheus_client library automatically set the current time to the gauge property. You can use the Gauge set() method and the Python time.time() method to do the same thing as well. But, I just want to show you how to use the Gauge method set_to_current_time().
Create a new Python script gauge_track_time.py and type in the following lines of codes:
import time
import random
from prometheus_client import start_http_server
from prometheus_client import Gauge
REQUEST = Gauge('server_last_request_time', 'Last request start time')
RESPONSE = Gauge('server_last_response_time', 'Last request serve time')
class ServerHandler(http.server.BaseHTTPRequestHandler):
def do_GET(self):
REQUEST.set_to_current_time()
time.sleep(random.random())
self.send_response(200)
self.end_headers()
self.wfile.write(b"Hello World!")
RESPONSE.set_to_current_time()
if __name__ == "__main__":
start_http_server(8000)
server = http.server.HTTPServer(('', 8001), ServerHandler)
print("Prometheus metrics available on port 8000 /metrics")
print("HTTP server available on port 8001")
server.serve_forever()
Once you’re done, save the gauge_track_time.py Python script.

NOTE: The Python script gauge_track_time.py is almost the same as gauge.py.
Here, line 2 imports the Python time module. Line 3 imports the Python random module.
![]()
Line 7 creates a gauge property server_last_request_time. The time when a web page is requested will be stored in this gauge property.
![]()
Line 8 creates a gauge property server_last_response_time. The time when a web page request is served will be stored in this gauge property.
![]()
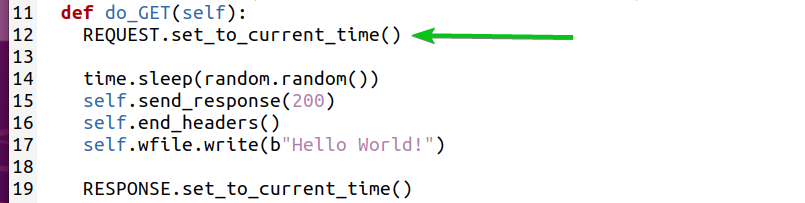
When a web page is requested from the web server, line 12 sets the current time to the server_last_request_time gauge property.
Line 14 uses the time.sleep() method and random.random() method to simulate a random delay.
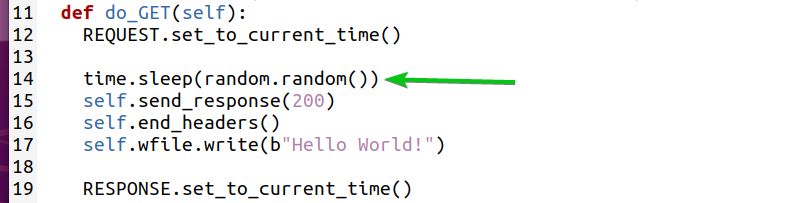
When a web page is served, line 19 sets the current time to the server_last_response_time gauge property.

Now, run the gauge_track_time.py Python script as follows:

Visit the Python web app at the URL http://192.168.20.131:8001 from your favorite web browser and press <F5> (reload the page) every 2-5 seconds.
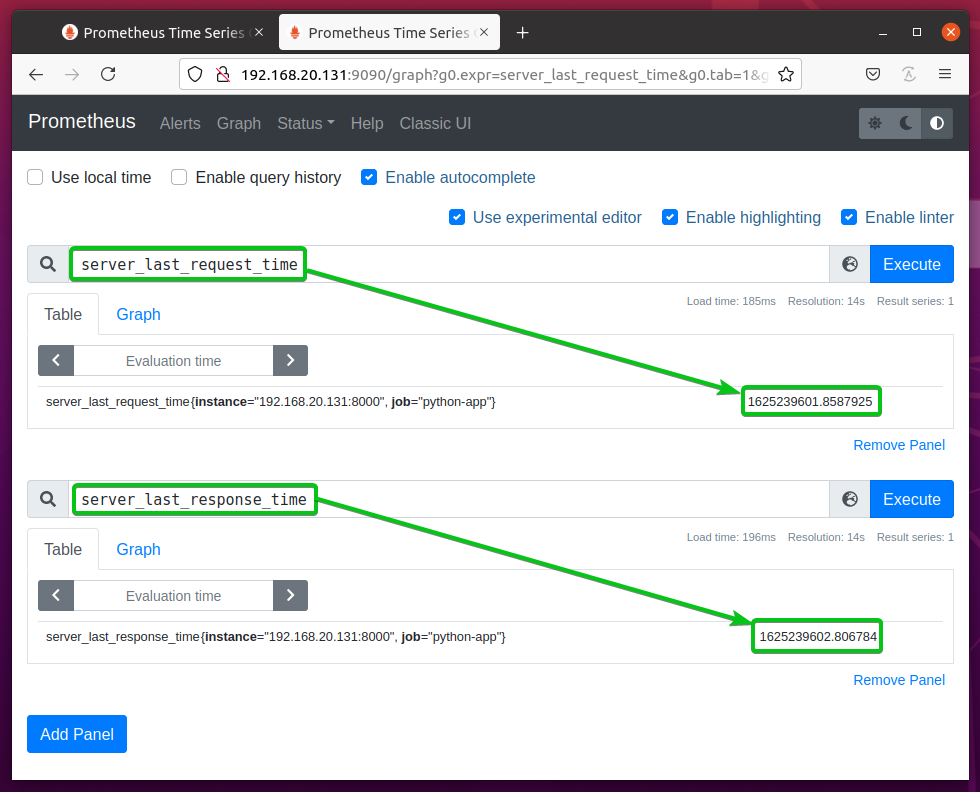
As you can see, the time when the web page is requested from the web server is stored in the server_last_request_time gauge property and the time when the web page is served is stored in the server_last_response_time gauge property. Also notice that server_last_response_time is greater than server_last_request_time.
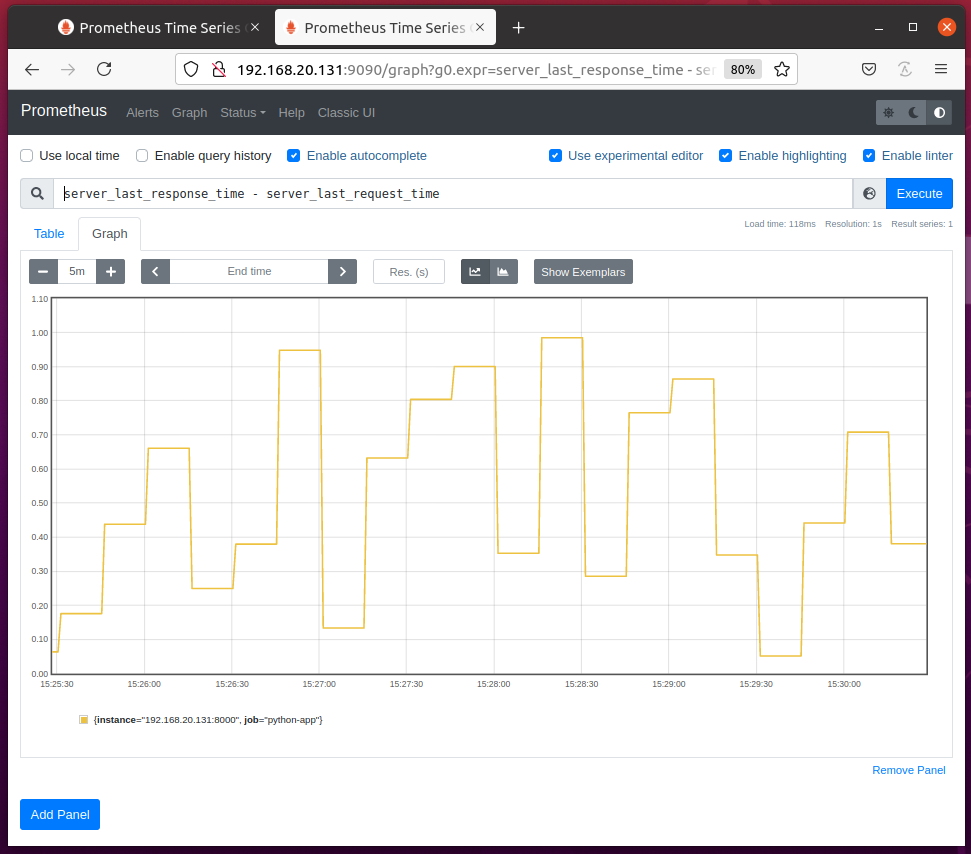
If you query the differences between the server_last_reponse_time and server_last_request_time gauge properties, you should see the following graph on the Graph page of Prometheus. This graph will give you an idea of how long your web server takes to serve a web page.
Using Summary
Summary metric type is used to measure the latency of a function or a block of code.
To experiment with the Summary metric type, create a new Python script summary.py and type in the following lines of codes:
import time
import random
from prometheus_client import start_http_server
from prometheus_client import Summary
LATENCY = Summary('server_latency_seconds', 'Time to serve a web page')
class ServerHandler(http.server.BaseHTTPRequestHandler):
def do_GET(self):
time_request = time.time()
time.sleep(random.random())
self.send_response(200)
self.end_headers()
self.wfile.write(b"Hello World!")
time_response = time.time()
LATENCY.observe(time_response - time_request)
if __name__ == "__main__":
start_http_server(8000)
server = http.server.HTTPServer(('', 8001), ServerHandler)
print("Prometheus metrics available on port 8000 /metrics")
print("HTTP server available on port 8001")
server.serve_forever()
Once you’re done, save the summary.py Python script.

NOTE: The Python script summary.py is almost the same as gauge_track_time.py.
Here, line 5 imports Summary from the prometheus_client library.
![]()
Line 7 creates s Summary object and stores it in the LATENCY variable. The 1st argument is used to define a name for the summary property. In this case, it is server_latency_seconds. The 2nd argument is a hint of what this summary property is for. It can be anything meaningful.
![]()
Line 11 stores the current time in the time_request variable just after entering the do_GET(self) function (when the web server starts serving the request).

Line 13 introduces some random delays using the time.sleep() and random.random() methods.
![]()
At the end of the do_GET(self) function (when web server finished serving the request), line 18 stores the current time in the time_response variable.

Line 19 calculates the difference between time_response and time_request and uses the observe() method of the Summary object to capture it.
![]()
Now, run the Python script summary.py as follows:
Visit the Python web app at the URL http://192.168.20.131:8001 from your favorite web browser and press <F5> (reloads the page) a few times.
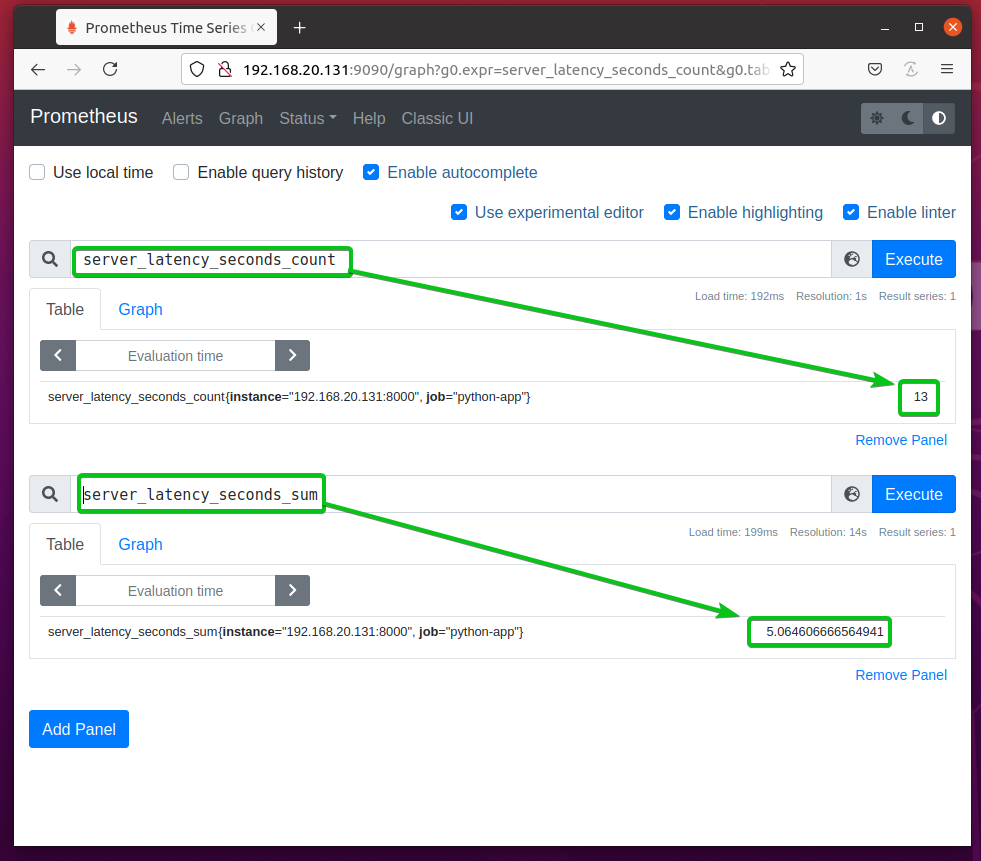
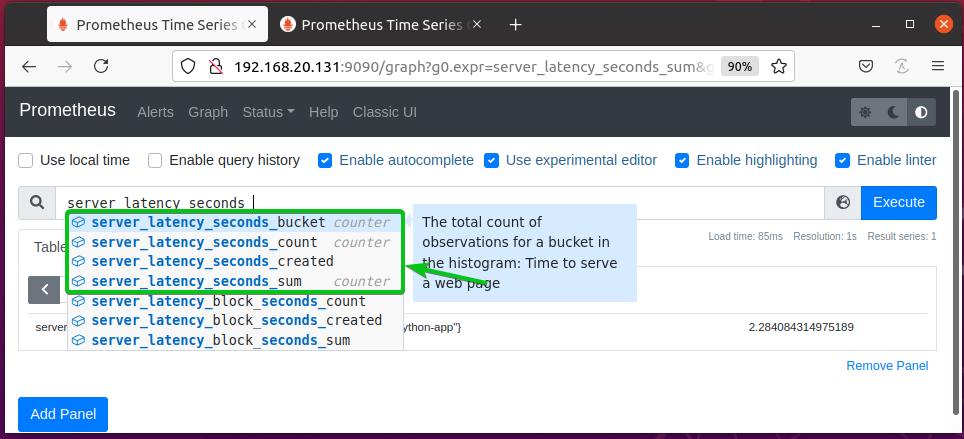
The summary property server_latency_seconds should create 2 new counters: server_latency_seconds_count and server_latency_seconds_sum as you can see in the screenshot below.
server_latency_seconds_count – Stores the total number of observations it has collected from the Python app. In this case, the number of requests to the web server.
server_latency_seconds_sum – Stores the total number of seconds the Python app spent serving the requests.
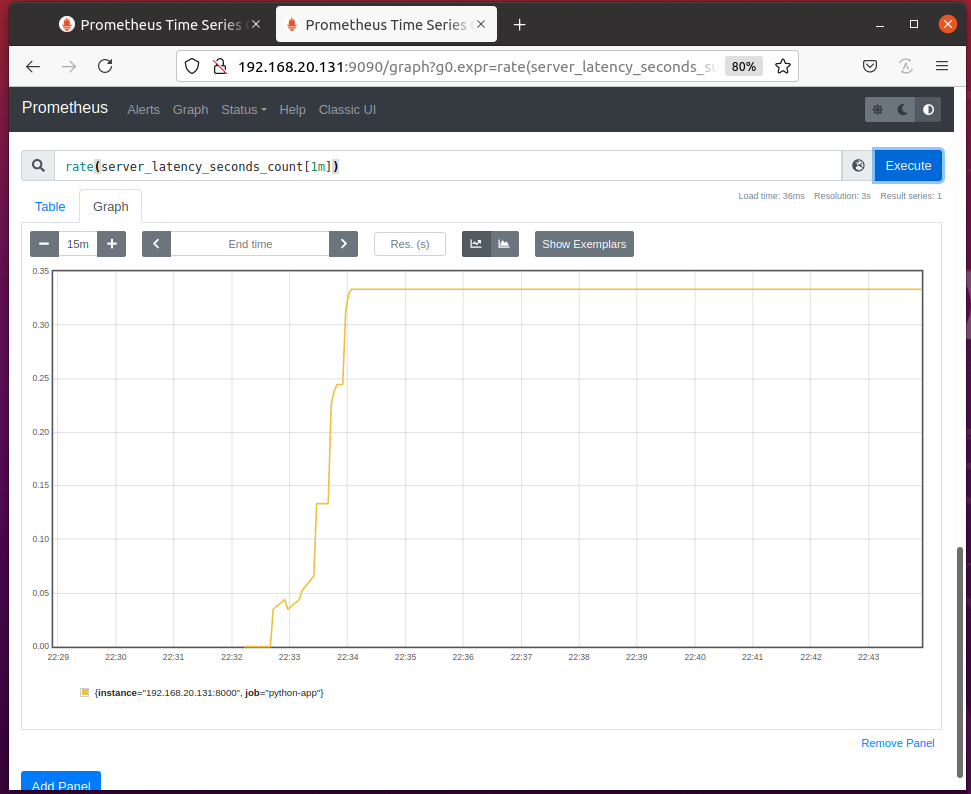
You can graph the time the web server spent serving requests per second with the expression rate(server_latency_seconds_count[1m]) as you can see in the screenshot below.
You can graph the number of requests the web server served per second with the expression rate(server_latency_seconds_count[1m]) as you can see in the screenshot below.
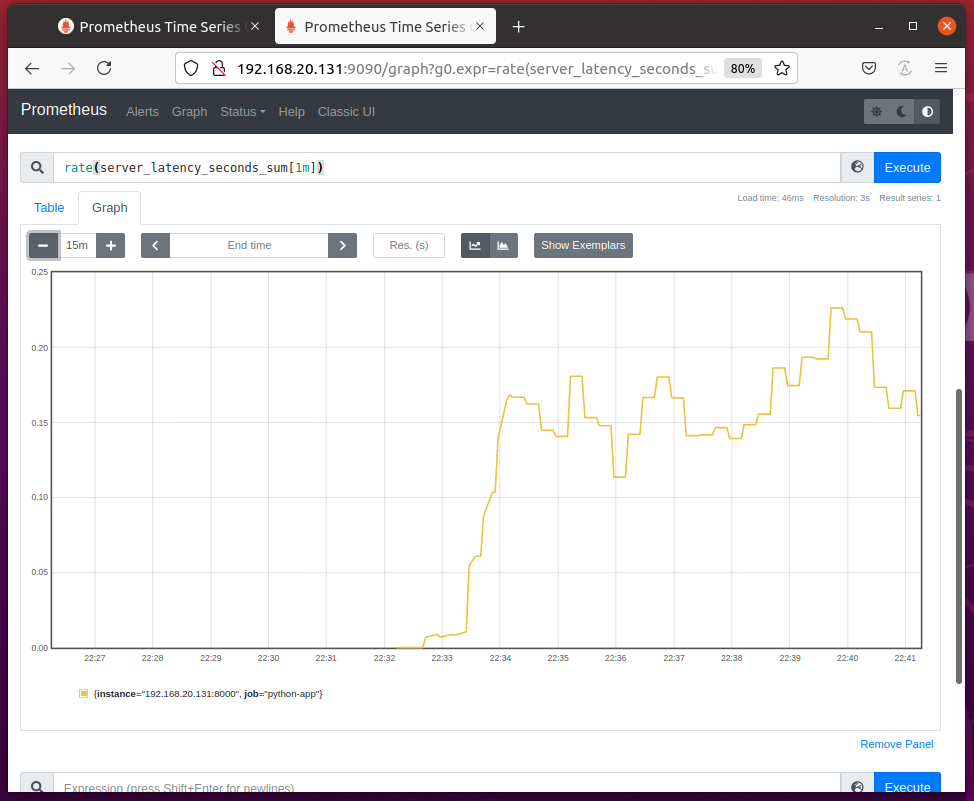
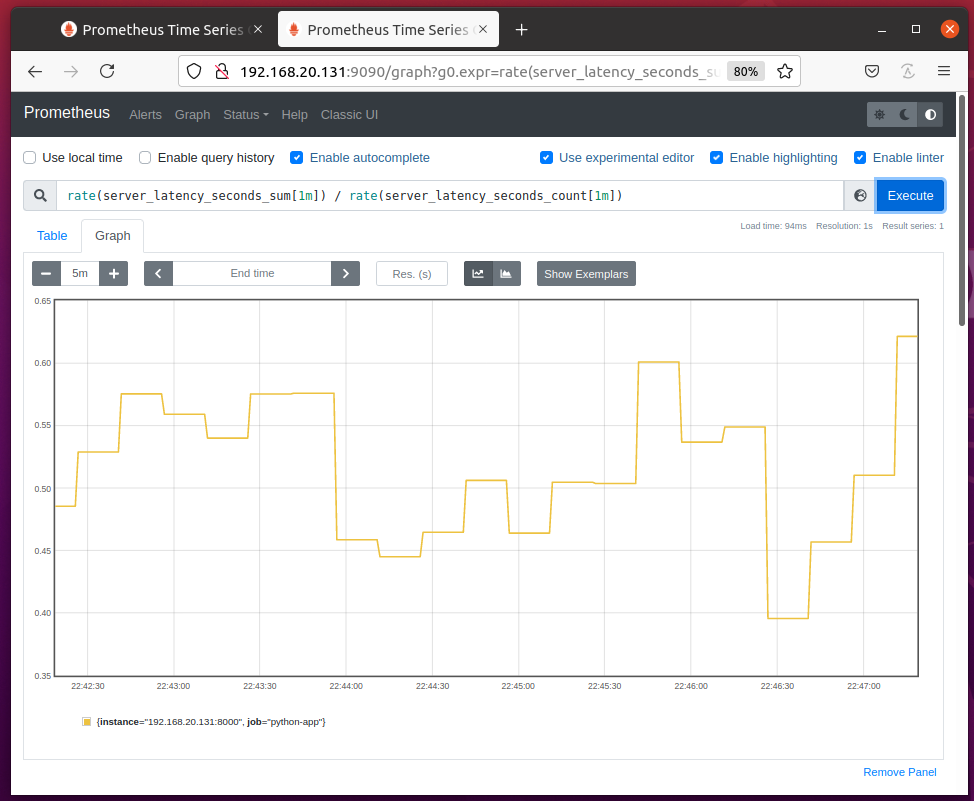
You can divide rate(server_latency_seconds_sum[1m]) by rate(server_latency_seconds_count[1m]) to graph the average time required to serve each request as you can see in the screenshot below.
Tracking Latency with Summary Utilities
You can measure the latency of a function or a block of code using the time() utility method of the Summary object.
To measure the latency of a function, you can use the time() utility as a function decorator for that function.
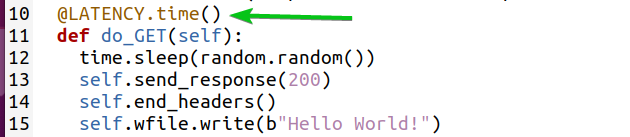
For example, to measure the latency of the requests served by your Python web server, you can rewrite the summary.py Python script using the time() utility as a function decorator for the do_GET(self) method as marked in summary_time.py Python script below:
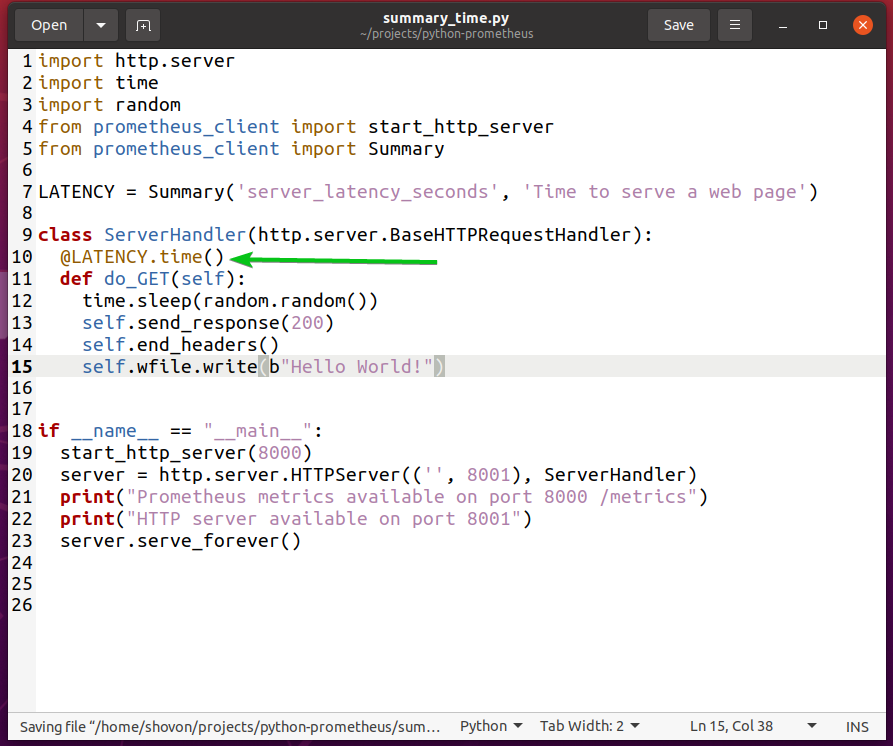
The summary_time.py Python script does exactly the same thing as summary.py but with less code.
Now, run the summary_time.py Python script as follows:
Visit the Python web app at the URL http://192.168.20.131:8001 from your favorite web browser and press <F5> (reloads the page) every 2-5 seconds for a while.
The result should be the same as in the Using Summary section as you can see in the screenshot below.
You can measure the latency of a block of codes as well.
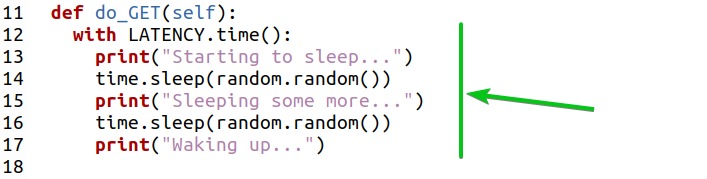
To experiment with that, create a new Python script summary_time2.py and type in the following lines of codes:
import time
import random
from prometheus_client import start_http_server
from prometheus_client import Summary
LATENCY = Summary('server_latency_block_seconds',
'Time to run a block of code')
class ServerHandler(http.server.BaseHTTPRequestHandler):
def do_GET(self):
with LATENCY.time():
print("Starting to sleep...")
time.sleep(random.random())
print("Sleeping some more...")
time.sleep(random.random())
print("Waking up...")
self.send_response(200)
self.end_headers()
self.wfile.write(b"Hello World!")
if __name__ == "__main__":
start_http_server(8000)
server = http.server.HTTPServer(('', 8001), ServerHandler)
print("Prometheus metrics available on port 8000 /metrics")
print("HTTP server available on port 8001")
server.serve_forever()
Once you’re done, save the summary_time2.py Python script.
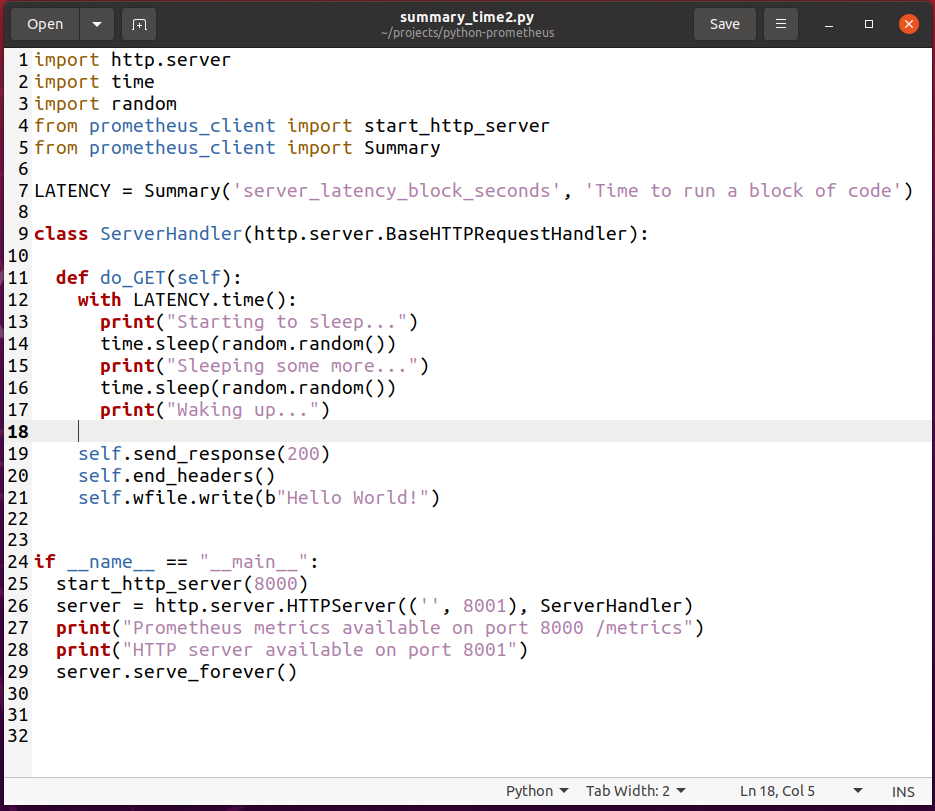
Here, line 7 defines a server_latency_block_seconds summary property.
![]()
Line 12 uses the time() utility method of the Summary object to measure the latency of the code block (from lines 13 to 17) as marked in the screenshot below.
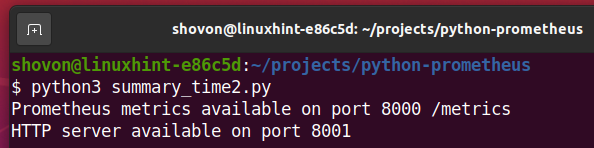
Now, run the summary_time2.py Python script as follows:
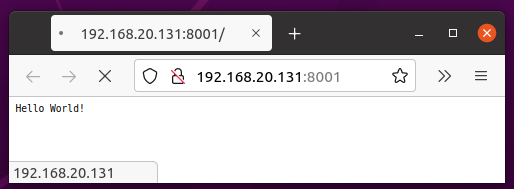
Visit the Python web app at the URL http://192.168.20.131:8001 from your favorite web browser and press <F5> (reloads the page) every 2-5 seconds for a while.
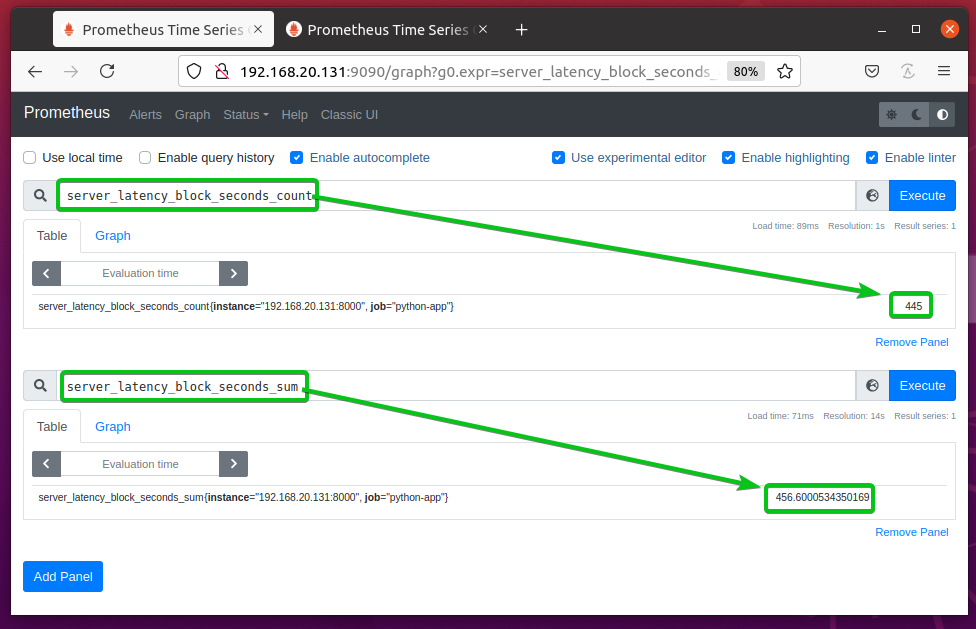
The summary property server_latency_block_seconds created 2 new counters: server_latency_block_seconds_count and server_latency_block_seconds_sum as you can see in the screenshot below.
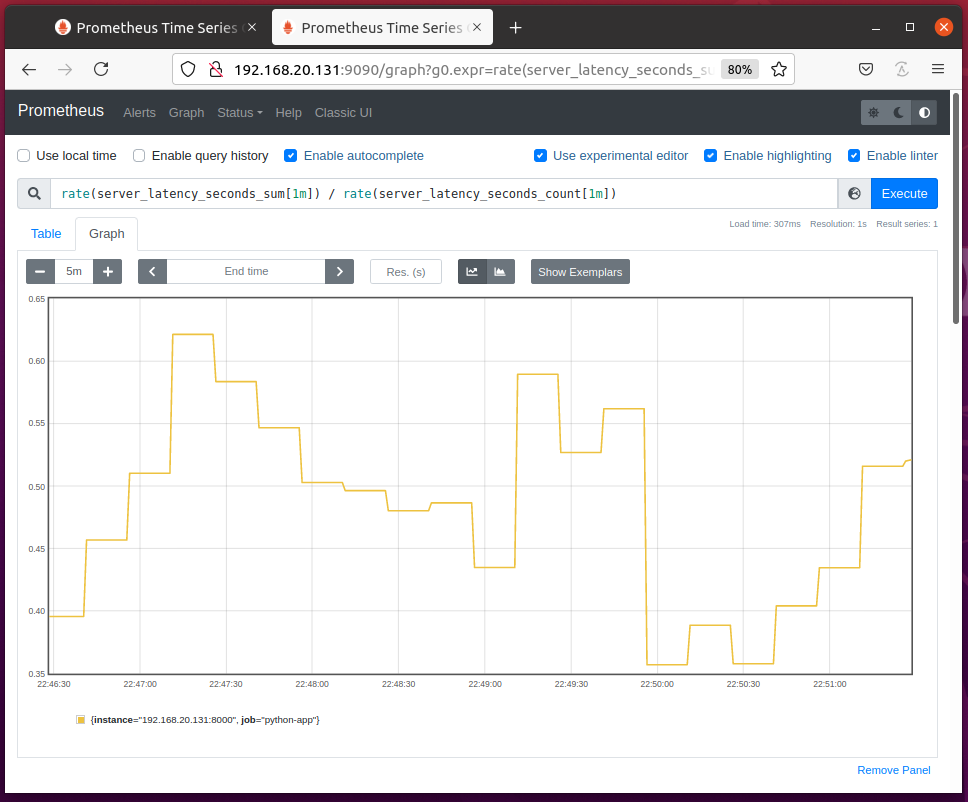
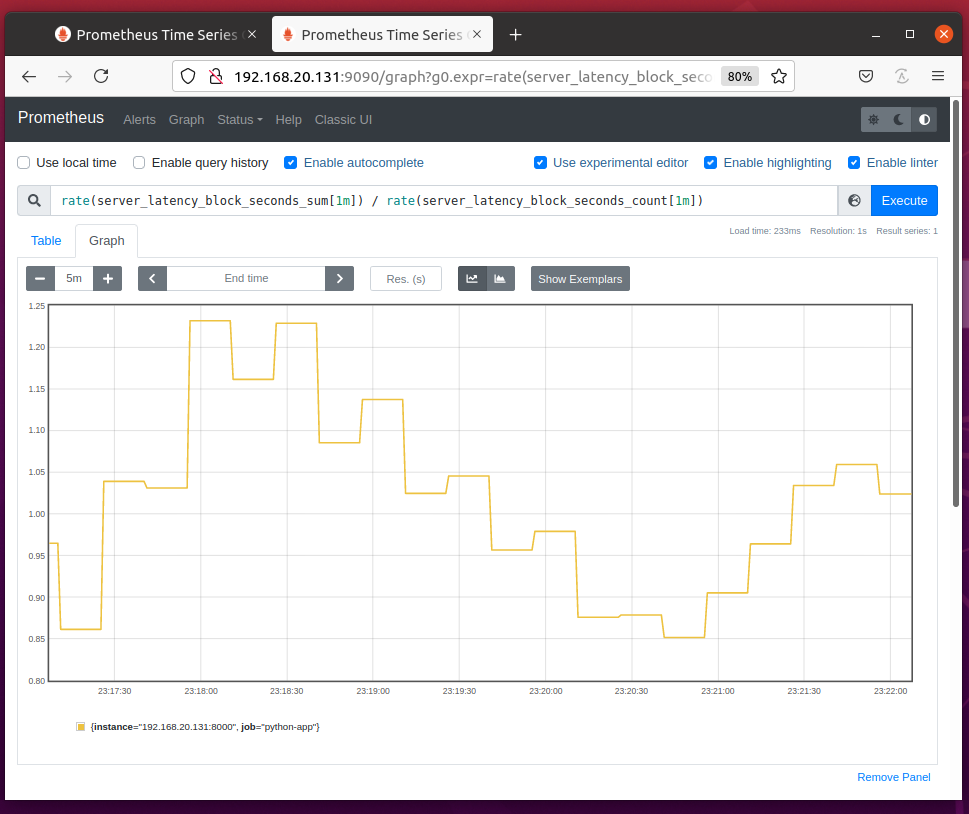
You can graph the time required to run the block of code each time with the expression rate(server_latency_block_seconds_sum[1m]) / rate(server_latency_block_seconds_count[1m]) as you can see in the screenshot below.
Using Histogram
You can use Histogram metric type in the same way as the Summary metric type shown in the earlier sections of this article. The Histogram metric type has the same methods (i.e. observe() and time()) as the Summary metric type. The only difference is that the Histogram metric type can also calculate quantiles and percentiles. So, simply a Histogram is a Summary with quantiles and percentiles calculation feature added.
Histogram categorizes the data into buckets and the data in the buckets are used to calculate quantiles and percentiles.
The Histogram uses default buckets. It is ideal for monitoring typical web/RPC requests. If your application has specific requirements, you can use custom buckets as well. buckets is just an array of sorted numbers (integers and fractions).
To experiment with Histogram, create a new Python script histogram.py and type in the following lines of codes:
import time
import random
from prometheus_client import start_http_server
from prometheus_client import Histogram
LATENCY = Histogram('server_latency_seconds', 'Time to serve a web page', buckets=[
0.11, 0.12, 0.13, 0.14, 0.15, 0.16, 0.17, 0.18, 0.19, 0.20])
class ServerHandler(http.server.BaseHTTPRequestHandler):
@LATENCY.time()
def do_GET(self):
delay = 0.1 + random.random()/10
time.sleep(delay)
print("took %f seconds" % (delay))
self.send_response(200)
self.end_headers()
self.wfile.write(b"Hello World!")
if __name__ == "__main__":
start_http_server(8000)
server = http.server.HTTPServer(('', 8001), ServerHandler)
print("Prometheus metrics available on port 8000 /metrics")
print("HTTP server available on port 8001")
server.serve_forever()
Once you’re done, save the histogram.py Python script.
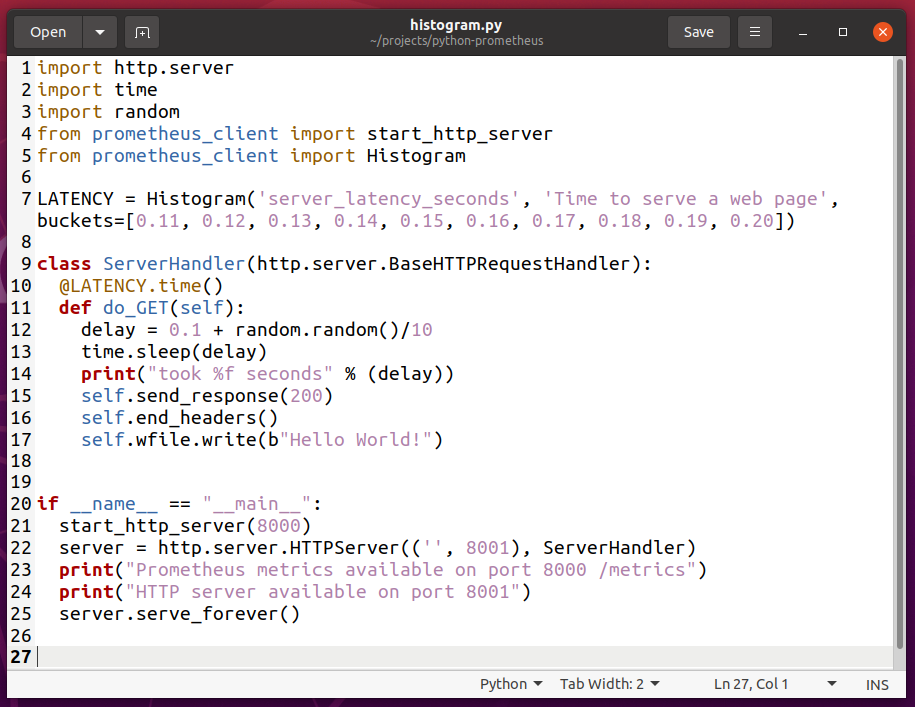
Here, line 5 imports Histogram from the prometheus_client library.
![]()
Line 7 creates a Histogram object and stores it in the LATENCY variable. The 1st argument is used to define a name for the histogram property. In this case, it is server_latency_seconds. The 2nd argument is a hint of what this histogram property is for. It can be anything meaningful.
The 3rd argument is the custom buckets array that you want to use for this histogram property. This buckets is used to measure the latency of the web server and categorize it into 110ms (0.11s) to 200ms (0.20s) at 10ms intervals.
![]()
You can also generate a buckets array using a for loop as marked in the screenshot below.

If you want to use the default buckets, then remove the 3rd argument.
![]()
Line 12 and 13 are used to introduce a random delay to the web server.
![]()
Once you’re done, run the histogram.py Python script as follows:
Visit the Python web app at the URL http://192.168.20.131:8001 from your favorite web browser and press <F5> (reloads the page) every 2-5 seconds for a while.
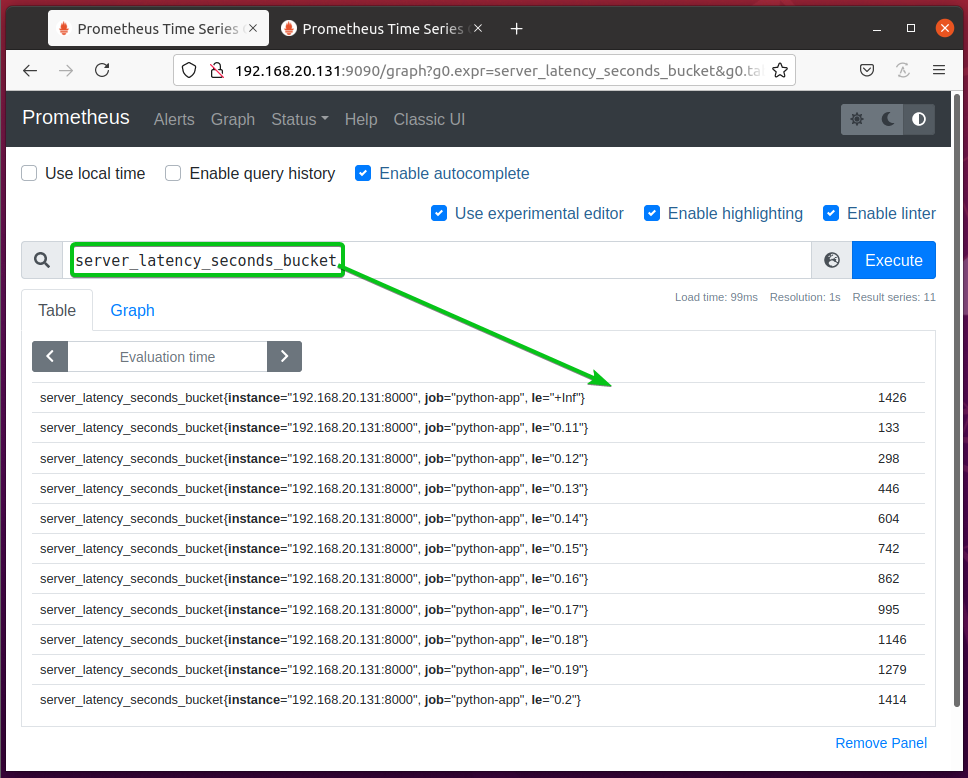
The histogram property server_latency_seconds should create 3 new counters: server_latency_seconds_count and server_latency_seconds_sum, and server_latency_seconds_bucket as you can see in the screenshot below.
server_latency_seconds_count and server_latency_seconds_sum properties are the same as in Summary.
server_latency_seconds_buckets – Stores the number of observations in the buckets. The observation numbers are categorized depending on the value of the data points of the buckets.
The server_latency_seconds_bucket counter should look as shown in the screenshot below.
The server_latency_seconds_bucket{le=”+Inf”} bucket holds the total number of observations.
The server_latency_seconds_bucket{le=”0.2″} bucket holds the number of web pages served in less than 200ms (0.2s).
The server_latency_seconds_bucket{le=”0.19″} bucket holds the number of web pages served in less than 190ms (0.19s).
The server_latency_seconds_bucket{le=”0.18″} bucket holds the number of web pages served in less than 180ms (0.18s).
And so on.
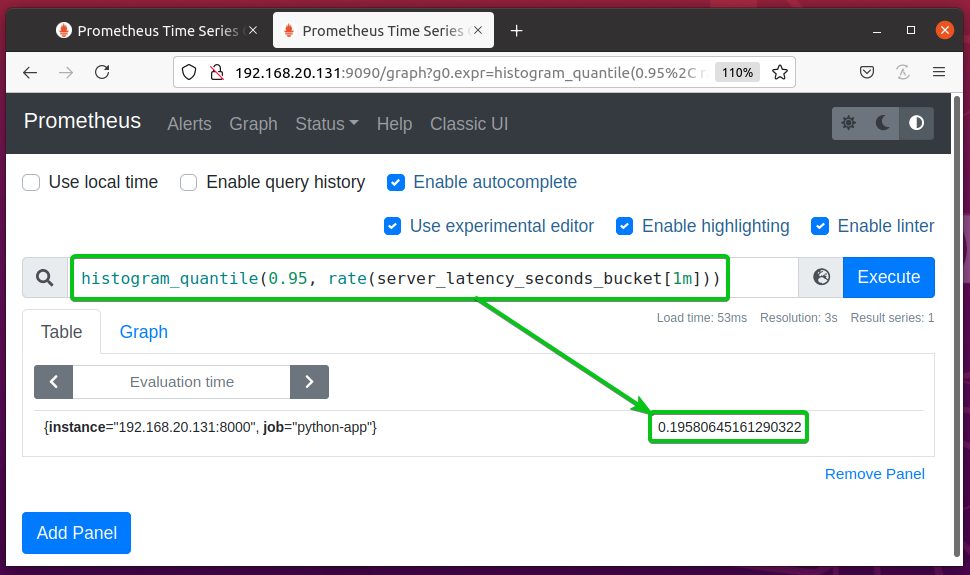
You can calculate the 95th percentile or 0.95 quantile of the server_latency_seconds_bucket property using the expression histogram_quantile(0.95, rate(server_latency_seconds_bucket[1m])). This should tell you, how long 95% of the web server requests took to respond.
In this example, it says that 95% of the requests took less than 0.19580645161290322s or 195ms to respond. This information can help you determine the performance of the web server.
Monitoring Memory Usage
You can monitor the memory usage of your Python app using Prometheus.
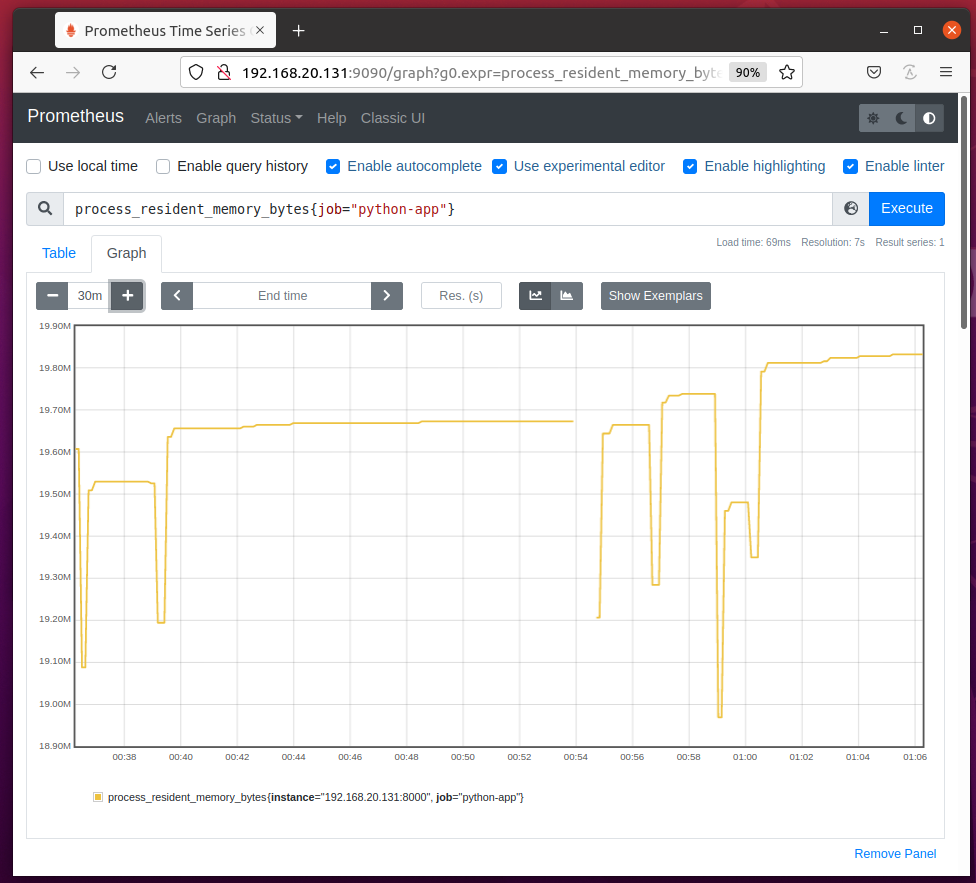
To monitor the memory usage of your Python app configured as the job python-app on Prometheus, run the expression process_resident_memory_bytes{job=”python-app”} and the memory usage of your Python app should be graphed nicely as you can see in the screenshot below.
If you don’t know the job name of your Python app, then navigate to the URL http://192.168.20.131:9090/targets from your favorite web browser and you should find it there as marked in the screenshot below.
Monitoring CPU Usage
In the same way, you can monitor the CPU usage (per second) of your Python app python-app (job name) using the expression rate(process_cpu_seconds_total{job=”python-app”}[1m]) as shown in the screenshot below.
From the CPU usage graph, you should find the CPU time your Python app uses every second.
In my case, the Python app python-app uses about 4ms to 5ms of CPU time on average every second.

Conclusion
In this article, I have shown you how to install the Python Prometheus Client library on your computer and set up your Python app for monitoring with Prometheus and how to use the Prometheus Counter, Gauge, Summary, and Histogram metric types on your Python app.
I have also shown you how to monitor the memory and CPU usage of your Python app with Prometheus. This article should help you get started with monitoring Python apps with Prometheus.
References:
[1] GitHub – prometheus/client_python: Prometheus instrumentation library for Python applications
[2] The 4 Types Of Prometheus Metrics – YouTube
[3] Prometheus Up & Running by Brian Brazil – Oreilly, 2018
[4] Query functions | Prometheus