While working on an extensive project, users deal with different branches. Sometimes, they want to switch branches without committing the half-done work on the current branch. But the problem is that Git does not allow users to switch branches without saving uncommitted work. In this situation, the “git stash” command can be used to temporarily hold the uncommitted changes.
This article will explain the procedure of merging stashed changes with the repositories’ current changes.
How to Merge Stashed Change With Repository’s Current Changes?
To merge stashed changes with the current changes, first, move to the desired repository and create a new file. Then, stage and commit changes. Next, modify the new file and stash changes. After that, add changes in the previously updated file and push them to the staging area. Then, apply the stashed changes, track them, and update the repository status through committing.
Step 1: Redirect to Local Directory
First, switch to the particular repository using the below-stated command:
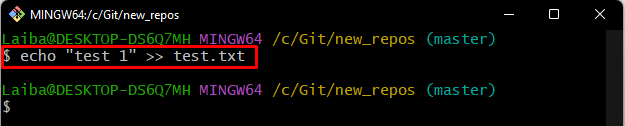
Step 2: Create and Update File
Next, make and modify a new file parallel using the “echo” command:
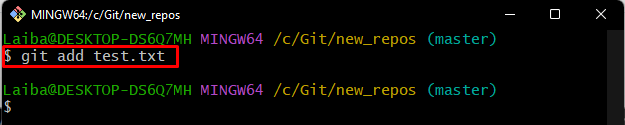
Step 3: Add Changes to the Git Index
Now, track newly added changes from the working area to the Git staging index:
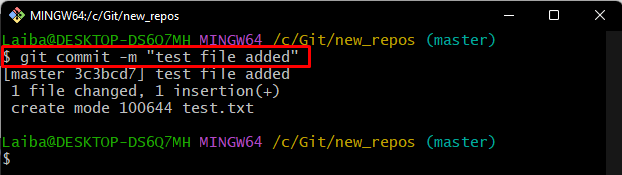
Step 4: Commit Changes
Then, commit changes by typing out the following command along with the desired commit message:
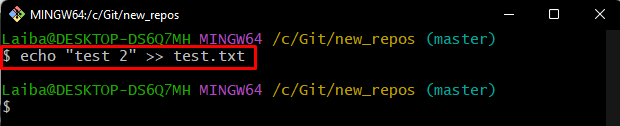
Step 5: Update Existing File
Make changes in the existing file by updating its content with the help of the “echo” command:
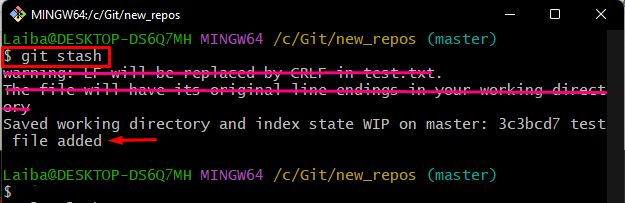
Step 6: Stash Changes
After that, run the “git stash” command to hold the committed changes of the file locally:
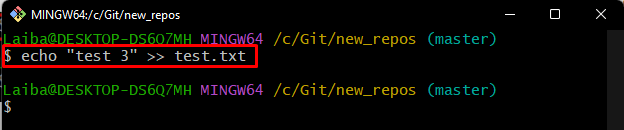
Step 7: Modify Particular File
Similarly, add some changes in the previously updated file using the below-given command:
Step 8: Track Changes
Next, add the recently added changes to the Git tracking index:

Step 9: Apply Stashed Changes
Now, apply the committed local changes to the working directory by running the “git stash apply” command:
The below output shows a merge conflict which indicates that new changes could not merge:
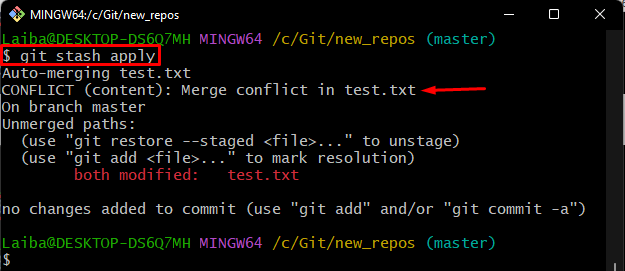
Note: To resolve this conflict, follow the below-provided steps.
Step 10: Add Changes to Git Tracking Index
Execute the “git add” command along with the file name to push the newly added changes from the Git working area to the staging area:

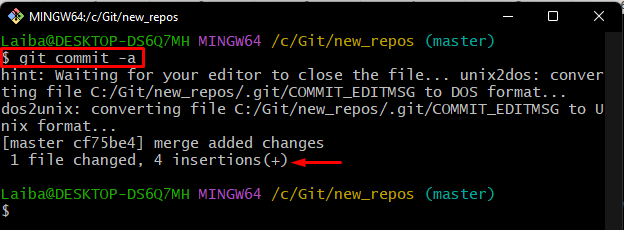
Step 11: Save all Changes
Then, update the Git local repository by committing through the “git add -a” command:
Here, the “-a” option is used to commit staged and unstaged changes to the repository.
The below output indicates that the stashed changes have been merged with the current changes successfully:
That’s it! We have demonstrated the method of merging stashed changes with the Git repository’s current changes.
Conclusion
In order to merge stashed change with the current changes, first, switch to the local directory and create a new file. Next, track and commit changes. Then, modify the existing file and save those changes temporarily using the “git stash” command. After that, update the file again and add new changes to the Git tracking index. Lastly, apply the stashed changes, track, and commit them. This article explained the process of merging stashed change with the Git repository’s current changes.