Users can run Docker on Windows or any other operating system. Docker improves productivity and enables native networking. Docker requires Windows 10, enabling Hyper-V, virtualization. Whenever you install Docker its components are installed automatically, such as Docker engine, Docker compose, Docker Machine, and Kinematic.
This write-up provides help to manage docker containers with PowerShell.
How to Manage Docker Containers With PowerShell?
PowerShell provides cmdlets for interaction with Docker images and containers. Docker is used for creating, deploying, and running applications using containers. Containers of Docker operate on a host operating system and are alternatives to Virtual Machines. Pre-allocated RAM is not required for Containers. When a user normally installs a virtual machine it uses the guest operating system and takes a lot of resources and space. Docker containers contain the operating system itself along with the libraries that are necessary for the performance of the particular application.
Docker has its registry known as the docker registry where you scan and store all of your images and these images can be pulled from your local server. Users can perform push and pull operations to the Docker hub. The Docker hub is the storage of all images. The Docker manager is responsible for checking all the applications are running effectively.
Managing Docker Containers
Step 1: Open PowerShell
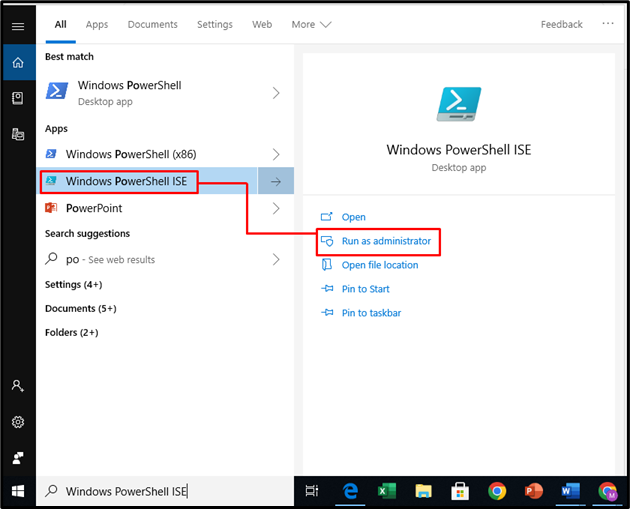
First, press the Windows key, search Windows PowerShell ISE, select it, and click on the Run as administrator:
Step 2: Check Docker’s Version
Then, check whether you successfully installed Docker by using the below-mentioned command:
Step 3: Clear Screen
After successfully installing docker, run a few basic commands but first clear the terminal using the following command:
Step 4: List Docker Images
Afterward, the user can check Docker images in the system by executing the following command:
Step 5: Pull Docker Image
Next, the user can pull a Docker image from the Docker hub with the help of the provided command:
Step 6: Execute Pulled Docker Image
Now, run the above pulled Docker image through the following command:
Step 7: Display Available Containers
To show all the available containers including stopped and on running state, the user can run the following command:
Step 8: Use Docker Bash
Users can use the Docker bash to perform different operations by running the provided command:
Step 9: Display File Content
Now, the user is basically within the container and can perform the command “echo” for displaying the file content. As shown below:
Step 10: Exit Docker Bash
To exit the Docker bash, execute the below-stated command and you can also clear your terminal, by using an “exit” command:
Step 11: Stop Docker Container
To stop any running container, use the following command along with the particular container ID:
Step 12: Create an Image on Local System
Moreover, the user can create a new image on the local system by the below-described command:
Additionally, the user can add their repository. As in the above output, “linuxhint” is the Docker hub username, and “ubuntu” is the Docker image.
Step 13: Check Existing Images
Now, again check the Docker images, you will observe that a new image has been added successfully:
Step 14: Remove a Container
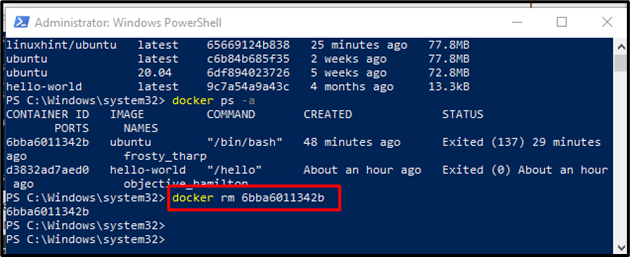
To delete a container, use the “rm” command along with the “CONTAINER ID” that the user wants to delete:
Step 15: Verification
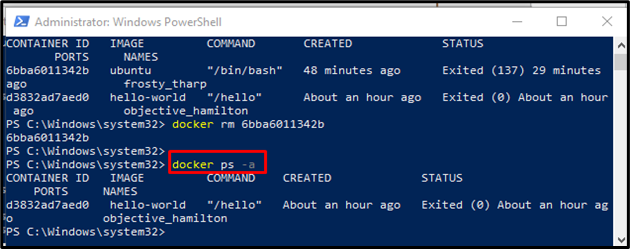
To verify whether the deleted container exists in the list or not, use the following command:
That’s all! We have compiled the easiest way to manage the Docker containers with PowerShell.
Conclusion
PowerShell is used as a configuration and automation framework. Docker containers can be managed using PowerShell commands. Users can create, remove, pull, or commit any image from the Docker hub in PowerShell. This write-up illustrated detailed information about managing the Docker containers with PowerShell.


