Commits are the central procedure of Git usage. It is the snapshot of the development projects, where an updated project version is created in Git’s current working repository. Suppose the user creates some files or adds changes to their project source code files and then tracks them into the staging area. After that, it is required to update the repository for new changes by committing the changes through the “$ git commit” command.
The outcomes from this guide are:
- Differentiate “git commit -m” and “git commit -am” Commands
- How to Git Commit Using “-m” Option?
- How to Git Commit Using “-am” Option?
Differentiate “git commit -am” and “git commit -m” Commands
The “-m” option adds all tracked changes to the current working repository of Git along with the “$ git commit” command. However, the “$ git commit -am <commit-message>” command is needed when developers want to automatically add the tracked and untracked changes to the Git repository without moving into the staging area.
How to Git Commit Using “-m” Option?
Follow the steps below to commit the added changes to the Git repository using the “-m” option.
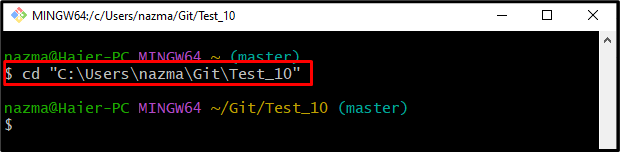
Step 1: Switch to Desired Git Repository
Use the “cd” command to navigate to the desired repository along with its path:
Step 2: Generate Files
Next, create new text files with the help of the “touch” command:
Here, we have created two text files:

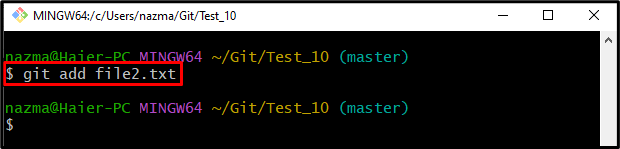
Step 3: Track Changes to Staging Index
Next, add the “file2.txt” newly created file to the staging index by utilizing the following command:
Step 4: Commit Tracked Changes
Now, run the “git commit” command with the “-m” option to update the Git repository:

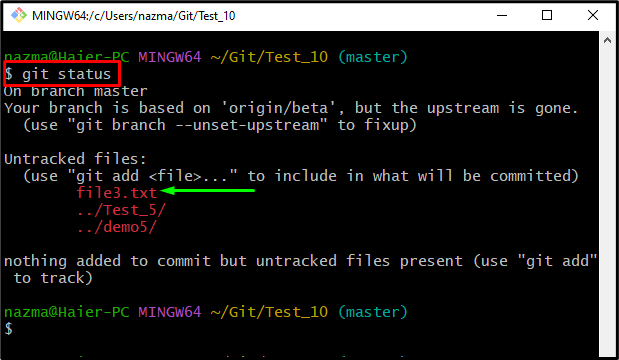
Step 5: Check Git Repository Status
After that, check the Git repository status by running the “git status” command:
As you can see, the untracked file “file3.txt” is not committed to the Git repository:

How to Git Commit Using “-am” Option?
Follow the below-listed steps to commit the added changes to the Git repository using the “-am” option along with the “$ git commit” command.
Step 1: View Repository Status
First, execute the “git status” command to check the Git repository’s current status:
According to the below-listed output, the untracked changes exist in the working area:
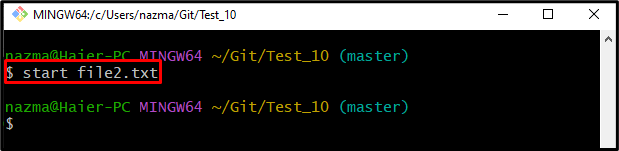
Step 2: Update Existing File
Next, open the required file, update it, and save the changes through the following command:
Step 3: Track Added Changes
After that, use the “git add” command to track the added changes to the staging index:

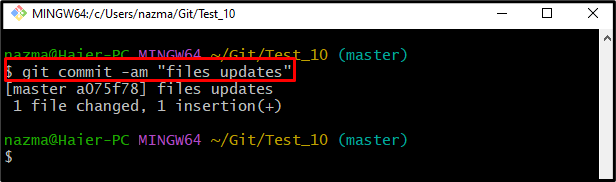
Step 4: Save Changes Into Git Repository
Now, save changes into the Git working repository through the “git commit” command with the “-am” option:
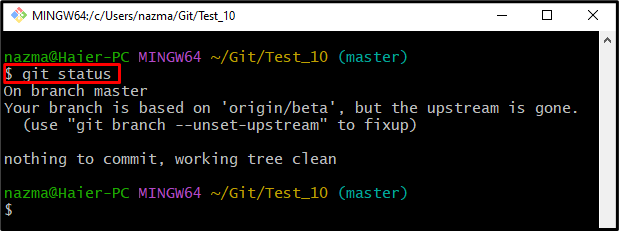
Step 5: Verify Committed Changes
Lastly, check the current repository status and verify whether any tracked or untracked changes exist in the working repository:
According to the below-given output, the working tree is empty, and no changes are existing in it:
We have demonstrated the difference between the “-m” and “-am” options along with the “$ git commit” command.
Conclusion
The “$ git commit -m <commit-message>” command is used to add all tracked changes to the Git working repository. In contrast, the “$ git commit -am <commit-message>” command automatically adds the tracked and untracked changes to the Git repository. This guide illustrated the difference between the “-m” and “-am” options along with the “$ git commit” command.