Loops are sets of commands or instructions that are set to repeat a certain number of times as per user requirements. Loops allow for better control flow in your scripts and remove overall redundancy from them.
Ansible also comes with multiple methods of looping blocks of code. This guide is meant to help you learn about loops in Ansible. We will cover the basics of looping in Ansible, along with syntax and appropriate examples.
That being said, let’s take a look at loops in Ansible.
Keywords for Loops in Ansible
Ansible uses the following keywords for its loop structures:
- “loop”
- “with_<lookup term>”
- “until”
As the name suggests, “loop” is the go-to command for implementing loops in blocks of code.
Similar to “loop”, you have “with_<lookup>”. This command requires you to provide it with a lookup plugin. It is recommended to use with_* rather than loop when lookup plugins are involved.
“Until” allows you to keep on executing a task till the required condition is met. It is the closest to the “while” condition in the control flow.
Now that you have an idea of the keywords for loops, you can proceed to learn about how to implement them in code.
Standard Loops in Ansible
We’ll start by discussing how to implement standard loops in Ansible. For standard loops, we’ll use the “with_” keyword.
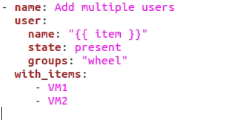
This example demonstrates how we can use loops to add users.
user:
name: "{{ item }}"
state: present
groups: "wheel"
with_items:
- VM1
- VM2
Now, the next step would be to run the playbook. You can do so with the help of the following command in the Linux terminal:
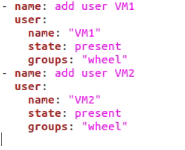
Here, “item” is the lookup term. “with_item” has two hosts, VM1 and VM2 respectively. The loop does the same as the code below:
user:
name: "VM1"
state: present
groups: "wheel"
- name: add user VM2
user:
name: "VM2"
state: present
groups: "wheel"
As you can see, by using “with_item”, we are able to remove redundancy from our code. By adding more users under “with_items:”, we can add multiple users as per need.
The next example will cover how to execute nested loops in Ansible.
Nested Loops in Ansible
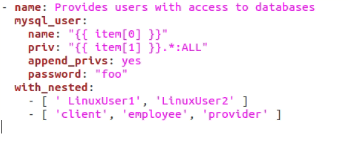
Ansible allows you to implement nested loops in its scripts. An example of such a loop is given below.
mysql_user:
name: "{{ item[0] }}"
priv: "{{ item[1] }}.*:ALL"
append_privs: yes
password: "foo"
with_nested:
- [ ' LinuxUser1', 'LinuxUser2' ]
- [ 'client', 'employee', 'provider' ]
Alternatively, you can write the same code with “loop” as follow:
community.mysql.mysql_user:
name: "{{ item[0] }}"
priv: "{{ item[1] }}.*:ALL"
append_privs: yes
password: "foo"
loop: "{{ [ ' LinuxUser1', 'LinuxUser2' ] | product([ 'client', 'employee', 'provider' ]) | list }}"
The users will be provided access to all databases one by one. As stated earlier, it is easier to understand that the “with_<lookup>” is better with lookup plugins rather than “loop” as the syntax.
Let’s take a look at some other examples highlighting the ability of Ansible.
Using Ansible to Iterate Over Hashes
Ansible allows you to loop over a list of hashes. This can be seen from the example given below.
Let us assume that you have declared a list of users as follows.
VM1:
name: Virtual Machine 1
Serial: 00000001
VM2:
name: Virtual Machine 2
serial: 00000002
To print all names and serials, execute the script below.
- name: Print user info
debug:
msg: "User {{ item.key }} is {{ item.value.name }} ({{ item.value.serial }})"
with_dict: "{{ users }}"
This will print the user names and serials respectively. By adding more users in the “users:” panel, you can print more users without having to write the code again.
Using Loops for Parallel Data Sets
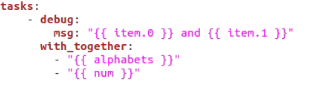
You can also use loops for parallel sets of data. This is demonstrated in the example below:
Let’s assume that you have the following data:
num: [ 2, 4, 6, 8 ]
You can loop these commands as follow:
- debug:
msg: "{{ item.0 }} and {{ item.1 }}"
with_together:
- "{{ alphabets }}"
- "{{ num }}"
The above code will loop both sets of data together as (a,2), (b,4), etc.
Random Choice Loops
One of the features that come with the “with_<lookup>” loops is “random_choice”.
As the name suggests, the random choice feature is used to select items randomly from a given set of instructions.
This example illustrates how to make loops for selecting an action from a given list of strings.
msg: "{{ item }}"
with_random_choice:
- "Execute action 1"
- "Execute action 2"
- "Execute action 3"
- "Execute action 4"

Here, the “Execute action” string is arbitrary and can be replaced with anything. The with_random_choice command would select from the given list of actions at random.
“Until” Loop Examples
This section of the guide will be about the “until” loop syntax.
As stated earlier, the “until” command will repeat a certain set of instructions until it meets a certain condition.
Here is an example of the “until” loop in action.
register: result
until: result.stdout.find("all systems ready") != -1
retries: 10
delay: 7
![]()
This is an example of a recursive loop. The above block of code will continue to run until the shell receives “all systems ready” as text output. If that isn’t the case, it’ll stop after running 10 times as the specified retries are “10”.
The delay corresponds to the delay in seconds. By default, it’s set at 5.
Conclusion
This was a guide on how you can use loops in Ansible. We covered the basics of loops and their syntax in Ansible, and demonstrated their use via different examples. With this, we hope you’re one step closer to automating your processes using Ansible.


