Ping uses ICMP (Internet Control Message Protocol) packets to gather network statistics. The most common tasks that ping command perform are:
- Testing network connectivity, including LAN and internet.
- Checking server status.
- Testing DNS issues.
When you use the “ping” command, your device sends a request to the host device and waits for the connection to establish. The ping command output contains information about packets and the amount of time each package took to reach the host. Terminal keeps on printing the responses until the communication gets interrupted. Let’s check how to use the ping command in Linux:
How to use the ping command:
Firstly, check the basic syntax of the “ping” command:
Let’s ping the linuxhint server, launch Terminal, and type:
The above output is showing various information:
icmp_seq: The sequence number of the packet. If it is the first packet, the icmp_seq number would be 1.
ttl: ttl stands for “Time to Live”, the ttl number represents the number of hops (routers) a packet takes to reach the destination before it is discarded.
time: The amount of time a packet takes to reach the destination and then return to the host device.
To stop the ping process, press “Ctrl C”, the command will tell the number of packets it transmitted/received, the number of packets lost, and time.
If you don’t get a ping reply, then there is no network connectivity between your device and the host server.
How to change the time interval between packets (ping command):
Ping command sends packet after one second by default, but this time duration can be altered. To change the time, use “-i” after “ping”:
To decrease the time:
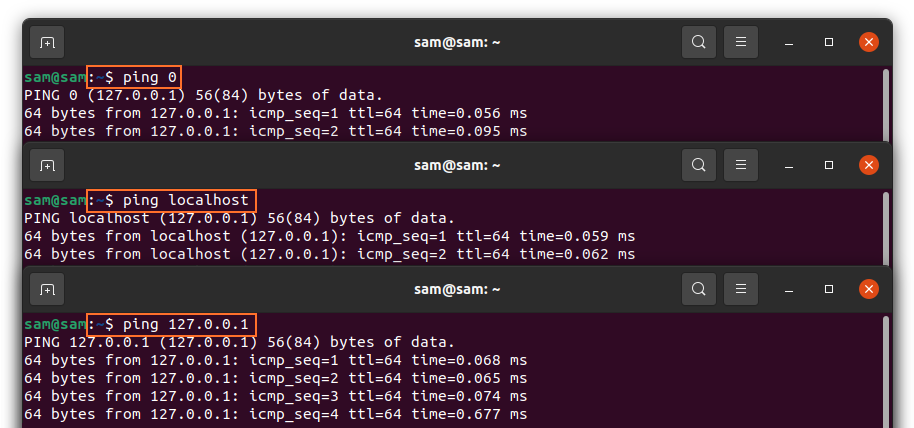
How to check the status of a local network (ping command):
If you have issues accessing a website, then via ping command, you can also diagnose your local network. There are various approaches use any of them:
The quickest way is:
Or:
and some users prefer:
How to limit the number of packets (ping command):
Ping command keeps on sending packets until it manually stopped, but the number of packets can be limited using “-c” and then the number of packets because hostname:
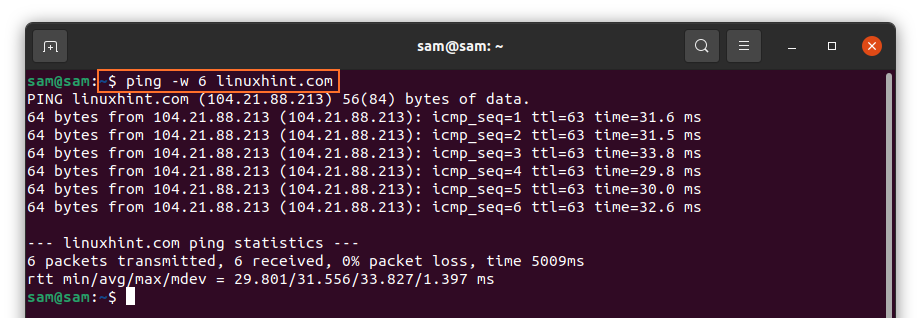
The above output was indicating that the command only sent 4 packets. The other option of limiting the number of packets is setting the time:
The above command will stop pinging after 6 seconds.
How to flood the network (ping command):
To check the performance of the network under heavy load, ping command can also be used to flood the network:
In the output, every dot represents the sent packet and backspace for every response.
How to get a summary of statistics (ping command):
If you are only interested in getting a summary of packets transmission, then use “-q”, q is this operator stands for quiet:
How to make ping audible (ping command):
To enable the sound of each ping, use the “-a” operator:
Commonly used ping options:
Some other commonly used ping options and their usage are mentioned below:
| Option | Description |
| -b | Allows to ping broadcast IP |
| -l | Sending packets without waiting for a reply (Requires sudo permission to send more than 3 packets) |
| -V | It shows the current version of the ping |
| -v | Displays additional ICMP packets along with echo responses |
| -T | Allows to set time to live (ttl) |
| -d | For socket debugging |
| -r | Allows to the bypass routing table and sends directly to the host. |
| -s | Sets the packet size |
Conclusion:
Ping command is a well-known utility to diagnose/troubleshoot and to get network information. This post is focusing on some essential commands of ping and their usage. If you still need more information about Ping, then execute “man ping” in the terminal.


