- Introduction to Network Bonding
- Configuring Network Bonding wired & wireless on Debian 10 Buster (DHCP)
- Configuring Network Bonding wired & wireless on Debian 10 Buster (Static)
- Testing if Bonding is working
- Troubleshooting wpa_supplicant error when restarting networking services
Introduction to Network Bonding
Network Bonding is the bonding or combination of two different physical network interfaces to increase the bandwidth or backup connectivity in case an interface fails.
The addition of a network interface in order to backup connectivity is called “network redundancy”, in short network redundancy is when a network interface fails, the second (it may be more than 2 interfaces) replaces its functionality preventing connectivity failure. On the other hand, Network Bonding can be useful to distribute traffic between different network interfaces increasing the bandwidth capability, this is called “Load Balancing” and there are different types to provide both network redundancy and load balancing, or both of them.
There are different types of network bonding, in the first place you can combine you ethernet and wifi cards to achieve network redundancy, or load balancing (it won’t increase the speed provided by your ISP), there are also available devices to achieve network balancing bonding 4g connections from mobiles, but you can also turn your Linux computer into a Network Bonding device.
There are 7 types of Network Bonding:
- mode=0 (Balance Round Robin)
- mode=1 (Active backup) ⇒ Explained in this tutorial.
- mode=2 (Balance XOR)
- mode=3 (Broadcast)
- mode=4 (802.3ad)
- mode=5 (Balance TLB)
- mode=6 (Balance ALB)
This tutorial explains how to configure Network Bonding on Debian and Ubuntu Linux distributions in a way the wired connection is the default while the wireless is the backup when the wired isn’t connected. This is the mode 1 (Active Backup) and the Wireless device will work only when the wired fails. Both network devices will be bonded through bond0 interface.
Configuring Network Bonding wired & wireless on Debian 10 Buster (DHCP)
Before starting you need to install the ifenslave package to attach and detach slave network devices to a bonding device. Run:

Just in case load the bonding modules

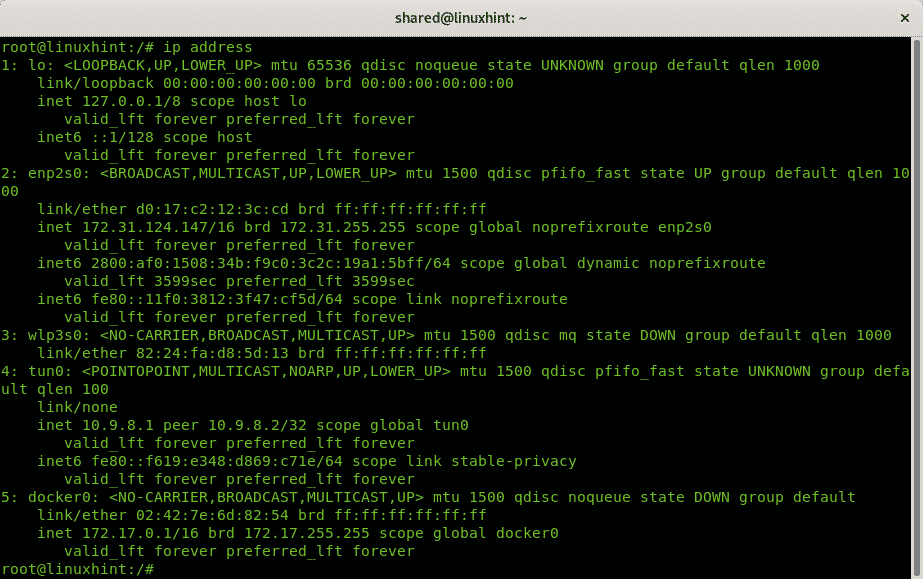
The second step is to check your network interface names, run:

In my case I want to bond the ethernet card, identified as enp2s0 and the wireless card, identified as wlp3s0. While following this tutorial replace both names for your network card names.
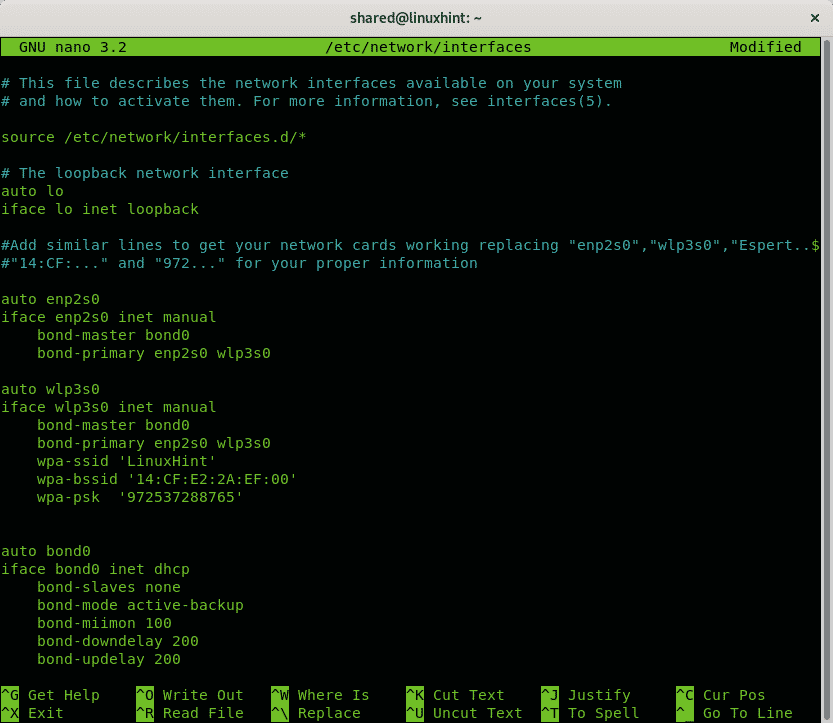
Now you must make sure your network interfaces are present in the file /etc/network/interfaces. If they are not , open the file with nano:

Add similar lines to these I added below the comment “#Add similar lines to get your network cards working…” replacing my network card names (enp2s0 and wlp3s0) for yours:
#"enp2s0","wlp3s0","LinuxHint...",
#"14:CF:..." and "972..." for your proper information
auto enp2s0
iface enp2s0 inet manual
bond-master bond0
bond-primary enp2s0 wlp3s0
auto wlp3s0
iface wlp3s0 inet manual
bond-master bond0
bond-primary enp2s0 wlp3s0
wpa-ssid 'LinuxHint'
wpa-bssid '14:CF:E2:2A:EF:00'
wpa-psk '972537288765'
auto bond0
iface bond0 inet dhcp
bond-slaves none
bond-mode active-backup
bond-miimon 100
bond-downdelay 200
bond-updelay 200
Save and exit by pressing CTRL+X
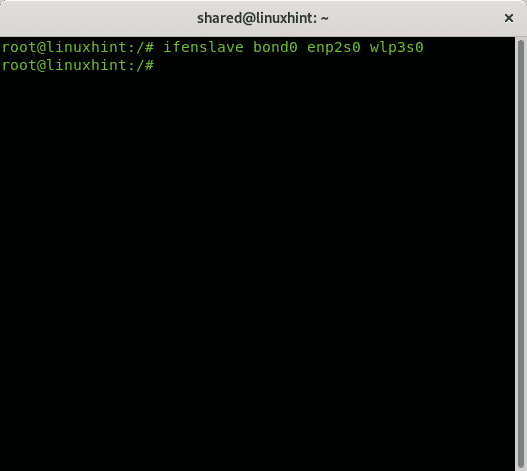
Start the bonding devices by running:

Restart the networking service by running:

Bonding should be working now, but it wasn’t my case…an error preventing me from restarting the networking services appeared, if that was your case too check Troubleshooting wpa_supplicant error when restarting networking services, if you didn’t see errors then jump to Testing if Bonding is working to confirm everything went ok.
Configuring Network Bonding wired & wireless on Debian 10 Buster (Static)
If you already followed the steps above and want to change your configuration into static ignore the following steps and jump to the /etc/network/interfaces file edition to update it, if you started this tutorial from this section to setup a static configuration from 0 then follow all next steps starting by installing the ifenslave package to attach and detach slave network devices to a bonding device by running:

Just in case load the bonding modules

The second step is to check your network interface names, run:
In my case I want to bond the ethernet card, identified as enp2s0 and the wireless card, identified as wlp3s0. While following this tutorial replace both names for your network card names.
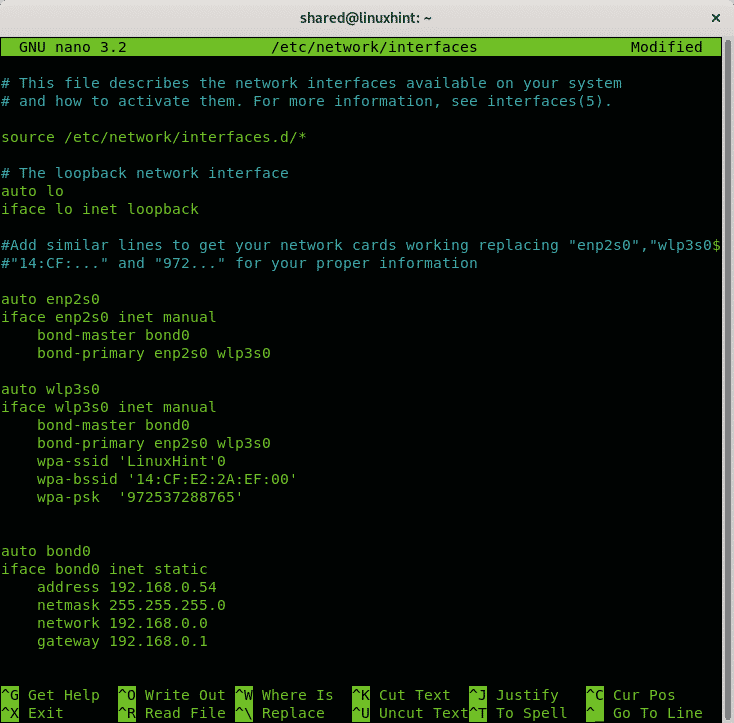
Now you must make sure your network interfaces are present in the file /etc/network/interfaces. If they are not , open the file with nano:

/etc/network/interfaces file edition for static configuration:
Add similar lines to these I added below the comment “#Add similar lines to get your network cards working…” replacing my network card names (enp2s0 and wlp3s0) for yours, also replace the IP addresses according to your network class (e.g 10.0.0.X, 192.168.1.X, etc.)
#"14:CF:..." and "972..." for your proper information
auto enp2s0
iface enp2s0 inet manual
bond-master bond0
bond-primary enp2s0 wlp3s0
auto wlp3s0
iface wlp3s0 inet manual
bond-master bond0
bond-primary enp2s0 wlp3s0
wpa-ssid 'LinuxHint'
wpa-bssid '14:CF:E2:2A:EF:00'
wpa-psk '972537288765'
auto bond0
iface bond0 inet static
address 192.168.0.54
netmask 255.255.255.0
network 192.168.0.0
gateway 192.168.0.1
Save and exit by pressing CTRL+X
Start the bonding devices by running:
Restart the networking service by running:

Bonding should be working now, but it wasn’t my case…an error preventing me from restarting the networking services appeared, if that was your case too check Troubleshooting for errors when restarting networking services, if you didn’t see errors keep reading the next section to test your configuration and ignore the last one for troubleshooting.
Testing if bonding is working
To confirm bonding is working properly run:

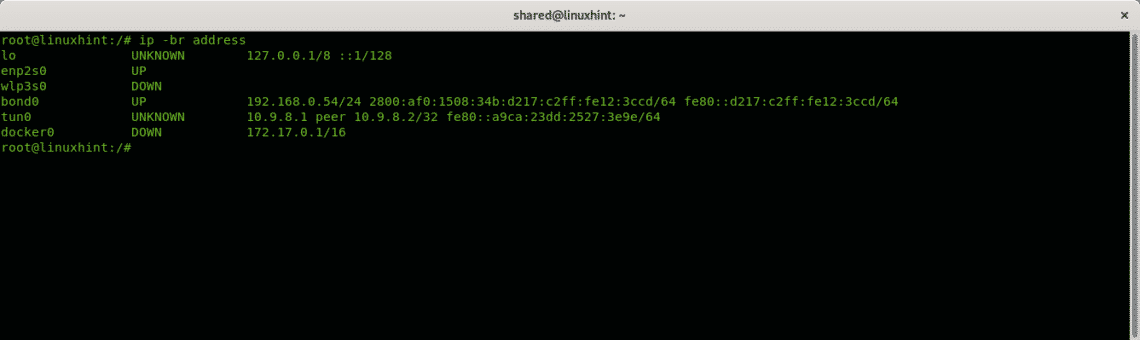
To check your network settings you can also run

If your configuration was set properly you’ll see a similar result, if you’d set a static IP you’ll see it. In my static configuration I’d set IP 192.168.0.54:
Troubleshooting wpa_supplicant error when restarting networking services
Troubleshooting note (ignore this step if you didn’t get errors when restarting networking services)
When restarting the networking service I got the error:
“ Failed to initialize control interface ‘/run/wpa_supplicant’.You may have another wpa_supplicant process already running or the file was left by an unclean termination of wpa_supplicant in which case you will need to manually remove this file before starting wpa_supplicant again.“
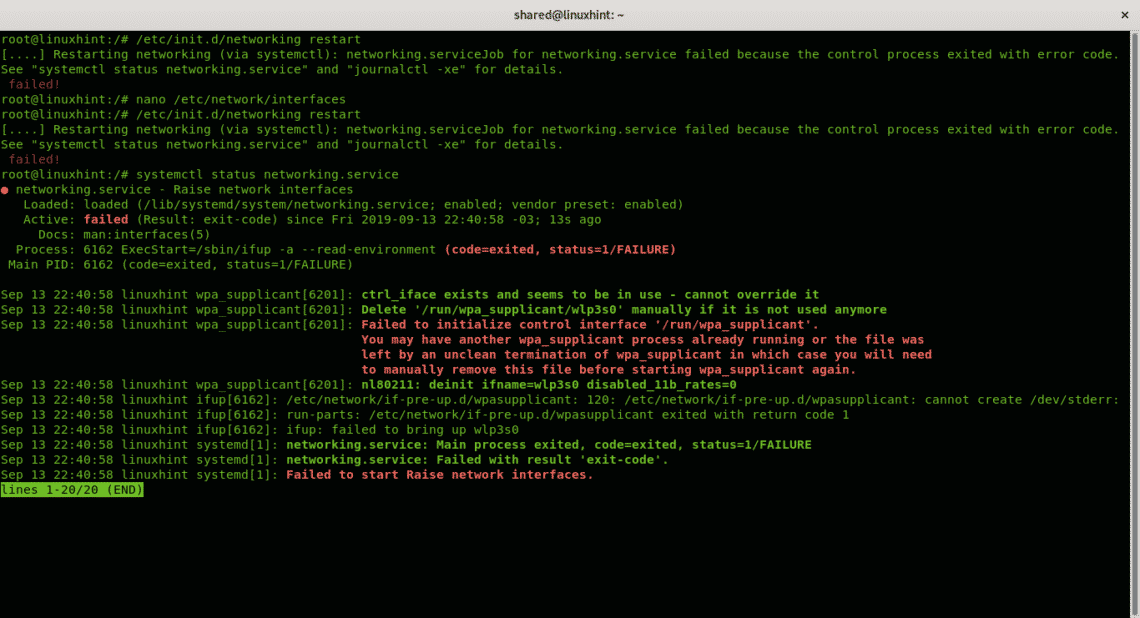
To solve it just rename the file /run/wpa_supplicant/wlp3s0 (replace wlp3s0 with your wifi card name)

If you got the error I mentioned above probably when trying to restart your networking services some interfaces went down, repeat the step to start the bonding devices (ignore this step if you didn’t get the error and services restarted properly):
And then restart the networking services again

And then restart the networking services again

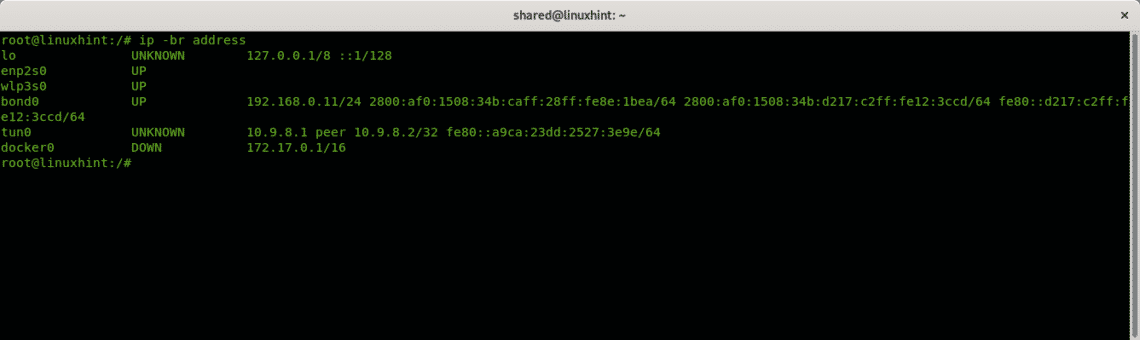
This should be working now, to confirm it run:

To check your network settings you can also run
 I hope you found this tutorial useful to get your Network Bonding working on Debian 10 Buster and Ubuntu Linux distributions, keep following LinuxHint for more tips and updates on Linux.