Most of the fresh users to Linux are searching for a way via the command prompt to modify the file/directory permissions. Those users would be pleased to know that there is a command – dubbed or chmod, e.g. change mode – that help you do this quickly. Chmod modifies each document’s rights by mode, in which the mode specifies the privileges to be updated. You may designate a mode with octal numerical or letters.
Understand the Mode Privileges
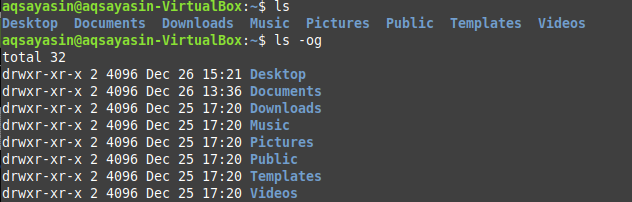
To understand the chmod, you have first to understand simple things regarding it. Open the command terminal and list all the directories or folders to check the privileges assigned to owners, groups, and others. You have to use the list command followed by the –og keyword. It will display the folder type, e.g. d belongs to a directory, r means to read, w means to write, and x means execution.
$ ls -og
Navigate to the Desktop directory using the cd command and list the privileges assigned to any particular file using the ls command. In our case, the file is index.html. First ‘-‘ means this is not a directory. After that rw, this file has read and writes privileges assigned to the owner but no execution rights. Next rw- refers to assigned privileges to the group and last r– means privileges assigned to others for this particular file index.html.
$ ls –lart filename

Numeric Mode
You have to simply understand that numeric mode includes numbers to assign privileges to owners, groups, and others. Number 4 is for reading, number 2 is for write, number 3 is for execution, and number 7 is for all, e.g. read, write, and execution privileges. Now navigate to the Desktop directory and create a new file named sample.txt. List all the files residing in the Desktop directory using the simple list command and display the newly created file.
$ touch filename
$ ls

Read Privileges
To assign read privileges only to the owner, you have to add number 4 in first place in the chmod command followed by the filename. When you execute the list command for this file, you will see that only read privileges have been assigned to an owner.
$ ls –lart filename

To give reading privileges to a group, add number 4 in second place. Read privileges have been assigned to a group.
![]()
To allocate read privileges to others, add number 4 in the third location. Read privileges have been assigned to a group.

To grant read privileges to the owner, group, and others at the same time, add number 4 at all locations.

Writing Privileges
To offer the write privileges to the owner, you will have to add number 2 in first place in the chmod command. When you execute the list command for this file, you will see that only writing privileges have been assigned to an owner.
$ ls –lart filename

To allocate writing privileges to the group, add number 2 in the second residence. Read privileges have been assigned to a group.

To assign writing privileges to others, add number 2 in third place. Read privileges have been assigned to a group.

To grant writing rights to the owner, group, and others at the same time, add number 2 at all places.

Execution Privileges
To grant the owner’s execution rights, you will have to add number 1 in the first place.
$ ls –lart filename

To allocate execution rights to the group, add number 1 in the second residence.

To assign execution rights to others, add number 1 in third place.

To grant execution rights to the owner, group, and others at the same time, add number 4 at all locations.

To grant all read, write, and execution rights to the owner, group, and others simultaneously, you have to add 7 on all the places.

Symbolic Mode
In this mode, you will be using symbols to give rights.
Use the +x symbol to give everyone the execution rights.

To take back, the execution rights add the -x symbol.

To grant execution rights only to the current user, which is the owner, add the u+x symbol.
Similarly, groups use g+x, and others use o+x.

Take back the execution rights from all, add the ugo-x symbol. You can use a-x instead of ugo-x.
$ chmod a-x filename

If you want to copy group rights and assign them to the user, you can use the g=u symbol.

You can use the rights of one file as a reference for another file. For this, simply use the reference keyword followed by the names of files.

If you want to assign all rights to the owner, no writing privileges to the group, and don’t want to assign any rights to others, you can simply do that by a simple concept of Read=4, write=2, and execution=1. Assign 7 to the owner as 4+2+1=7. Assign 5 to the group as 4+0+1 and assign 0 to others.
![]()
To assign read permissions to all, add a+r symbol.

To give read and write permissions to groups and others, add the go+rw symbol.

If you want to give everybody privileges for reading, write, execute and setup Group-ID, add the =rwx,g+s symbol.

Conclusion
We had to bring up the basic concepts of chmod instruction in this tutorial and provided examples demonstrating how it will be used in possible situations.