These shared libraries require means of managing them. It’s the work of the ldconfig to create the needed links and cache useful to manage shared libraries. Let’s see how to use the ldconfig command.
How To Use the ldconfig Command
The ldconfig checks the file names and the header for different libraries to determine which has the most updated links when updating link files.
Furthermore, it creates the file, /etc/ld.so.cache, helpful in speeding up the linking of libraries by the run-time linker.
The configuration file containing shared libraries used by ldconfig is located at /etc/ld.so.conf. The configuration file dictates the ldconfig to use all the configuration files in the specified directory. If you open the file, it contains one line.
1. Using ldconfig To Show Libraries From the Cache
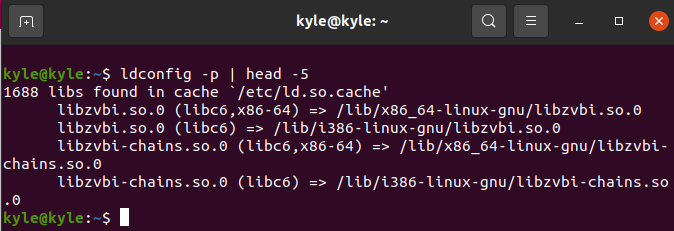
The ldconfig can display all the currently located files in the cache. It shows the entire library and lists its location on the command line.
The command to use is:
We are adding “head” to reduce the output of the libraries by printing the first five lines.
2. Show All Libraries
You can display every library in every directory using the “-v” option. The command goes through each directory in the system, printing the directory’s name and the corresponding links created under it.
However, some directories listed under the /etc/ ld.so.conf don’t exist. You may notice some error messages in the output.
3. Adding New Libraries
When a new program gets installed by compiling it from the source, you must inform the system about this new library. There are two ways to go about it.
The first is to use the ldconfig command using the “-n” option and directly update the links using the new library only. However, this method doesn’t build the cache. It only updates the link to the new library. For instance, if you’ve installed a program like veil in the /opt directory, using the following command will directly update the library’s link:
Alternatively, you can use an editor, like vi, and add the /veil/lib to the /etc/ld.so.conf to execute the ldconfig to update all links.
The command below will open the configuration file where you get to add the /opt/veil/lib. Note that veil is our example program. Replace it with the one you need to add in your case.
To update the cache, run the following command as root:
You can verify that the library was added by running the “-v” option and grep the library’s name. For instance, we can check if the libFLAC library is available using the following command:
If it’s present, it should return an output similar to the one below:
ldconfig has other commands, and you can access them from its man page. However, the ones we’ve listed using the previous examples are what you need to know when working with libraries and programs.
ldconfig helps deal with shared libraries. In addition, it’s also possible to see the shared libraries used by a given command. You can use the “ldd” command followed by the program—for instance, a program like echo.
Conclusion
The ldconfig uses the contents of the /etc/ld.so.conf file to create symbolic links and a cache, /etc/ls.so.cache. This is read by programs, especially executable and shared programs. This guide covered the different files that ldconfig worked with and showed examples of using the ldconfig Linux command to display and add libraries.


