As a result, for filesystems that employ journaling, only if the superblock indicates that additional verification is required, it will often playback the journal and quit. In this article today, we will be discussing the use of the Linux e2fsck command to solve the above-mentioned issues.
Let’s commence by applying this topic to our Ubuntu 20.4 Linux operating system. Make sure to update your system before doing anything after a successful login. For this, you need to open your terminal application with the simple “Ctrl+Alt+T” shortcut. If this shortcut doesn’t work for you, try using the Activity menu from the desktop of your system. Search for the required application and tap on the application after it pops up on your search screen. The terminal shell will be launched in a few seconds. Typically, it’s not advised to use this program (e2fsck) on a fixed file system because it could result in more issues. The results given by e2fsck won’t remain accurate even if you decide to run it on a secure file system. So, we will be using this command to restore some file systems, but if that file system is found to be okay and not corrupted, we will be avoiding restoring it.
Check and Restore Partition
The first thing that comes to our mind when we think of a corrupted system can be a system partition. So, we have decided to perform the use of the e2fsck command for some specific partitions of the Ubuntu 20.04 Linux operating system. Firstly, we will take a look at the use of the simplest form of this instruction on our shell to perform the restoration of a specific partition. For this, use the keyword e2fsck with the original path of a partition, i.e., /dev/sda1. The “dev” refers to the “device” folder of your Ubuntu 20.04 Linux operating system.
On execution of this instruction on the shell, we have got to know that this partition is not malfunctioning and is already mounted with 0 corrupted data to date. Along with that, the execution of this command has been showing the warning that “if you try to remount or restore the partition, it may cause harm to our current file system” as we already have a good file system working properly. But, if you don’t get the same warning after the execution of this instruction, just go with the restoration process. So, we have pressed the keyword “n” as “No” to the question: “Do you want to continue?”, asked by the system as a warning or confirmation of the execution of this e2fsck command. On pressing “n”, the execution of this command will be aborted and we are no longer part of the restoration process of partition “sda1”.
You can also try the same e2fsck instruction with the “/sbin” path to restore the malfunctioned partition, i.e., “/dev/sda1”, as we have done in the shown-below image so far.
Repair Via Different Options
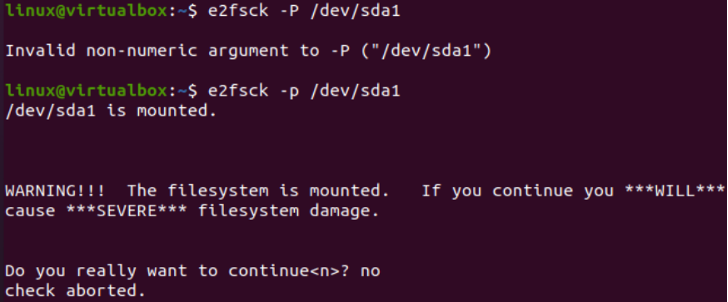
Within this section of the article’s implementation, we will discuss the use of some useful options of e2fsck commands. If you want to let the “e2fsck” instruction automatically search for the issues in a file system and repair them along with them, you need to use the –p option. We have tried this option with a capital “-P” in the e2fsck command and got the invalid non-numeric argument error. After executing the e2fsck instruction with the lowercase –p option, we got the very same output as we have got with the use of the e2fsck command’s simple format. It tells us that the system has already been mounted and is free of any breaches. So, it shows the warning and asks a question if you want to continue the restoration. We have pressed “n” to discontinue it.
If you want to do a read-only scan for the particular device on your Ubuntu 20.04 Linux operating system, you can do so by using the “-c” option in the e2fsck command in the shell. Quite a similar output has been displayed for the “-c” option of the e2fsck instruction.
If you already know that your system device, or “file system,” is already cleaned and without any issues, but you still want to enforce the cleanup check on your file system, you can do so by the use of the –f option within the e2fsck instruction. It shows that the system is already mounted and, hence, the e2fsck system cannot continue this process. It leads to the automatic aborting of the clean-up process. The use of the “-C” option with “-f” might show you a progress bar while checking up.
Conclusion
This article was all about the use of the e2fsck command instruction in the terminal of the Ubuntu 20.04 Linux operating system to check for malfunctioned file systems and automatically clean them up along with the restoration. We have discussed different options available to be used for the clean up in this instruction. There are other options that are also available online that you can search for.


