What is REPL in Kotlin?
The Read- Eval- Print- Loop (REPL) abbreviation stands for Read- Eval- Print- Loop in Kotlin. It’s an interactive shell tool for quickly running a section of code without having to run the entire app. The REPL in kotlin is a user-interactive programming environment that accepts single user inputs and single expressions. Then evaluates them, and returns the output to the user.
Way of Accessing the REPL session in Kotlin
The Kotlin REPL (Read-Evaluate-Print-Loop) can be accessed on a command-line interpretation that we utilize in a “playground” environment to test our Kotlin programs. Simply run kotlinc as a command at Ubuntu 20.04 terminal screen to start a REPL mode, and we will see something like this:
As the REPL is a command-line interpreter, it simply waits for us to type something into it. We can write Kotlin expressions to check how they operate once you’re in the REPL. The auto-generated kotlin repl keyword “res” will be used to display the resultant value.
How to Use REPL in Kotlin
To understand the usage of the repl Kotlin language, we should take these examples given below:
Example # 1: Program of Using println() Function in REPL in Kotlin
We have simply used the println function in the Kotlin REPL session which will print the values of the specified variable and the strings passed in the function.
In the above example code, we have just given a command of “kotlinc” which allows us to enter into the repl mode. We are then able to write and execute our code. The Kotlin repl mode has a variable created as “var” keyword and assigned a name “character”. The variable character is initialized with the character “z”. We have also created a variable as “integer” for passing the integer value. The variable “integer” stores the number “99”. Then, we have called println function which will print the character value and integer value stores in the variables. Here, we have called the variable “character” and the “integer” in the form of string interpolation with the string. The string interpolation variables will be the corresponding values present in them. You can see the printed value side by side.
Example # 2: Program of Performing an Arithmetic Operation in REPL in Kotlin
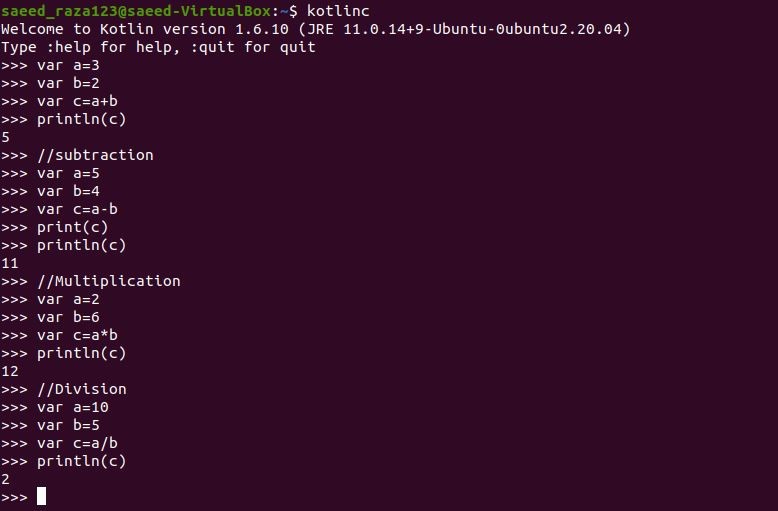
We have performed some arithmetic operations in the Kotlin repl mode, requiring no file existence for the program to execute. It just simply prints the value of the specified operation.
In the above code, we have defined the variables as “a” and “b” which we have passed the different values for the different operations. We have performed basic operations i.e., addition, subtraction, multiplication, and division. We have also written the strings which is the name of the performed operation with the sign “//”. Note that the repl compiler reads these strings as comment line strings. Then, we have operated the new variable as “c”. The variable “c” is passed in the println function and will print the result returned from the specified operation. The output is shown on each println function execution.
Example # 3: Program of Type Conversion in REPL in Kotlin
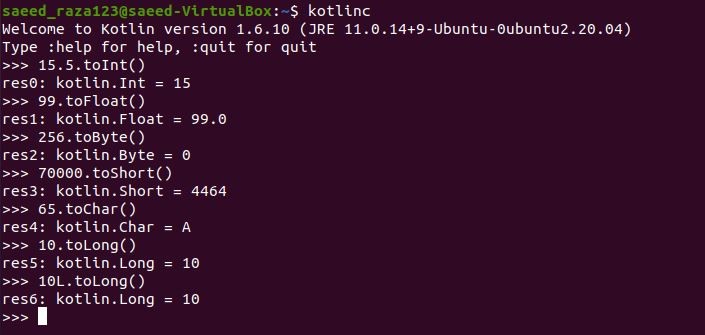
The type conversion is quite simple in the repl mode of Kotlin as we don’t have to initialize the value first or then declare its type in another variable. Let’s have an overview of how we simply convert the data type of values.
In the above example code, we have some data type conversion of values. At first, we have converted the float value “15.5” into the Int data type by calling the conventional way of “toInt”. You can see the output with the “res” keyword with the Kotlin unit mentioned. Then, we have converted the Int value “99.0” to float value by using the “toFloat” method. We have also converted the value “256” to byte value and the value “70000” to short type by using “toByte” for the conversion in byte and using “toShort” for the conversion in “short”. Here, we have a number value as “65” which we have converted into the character value by using the “toChar” method and it converts the number into the character “A”. In the end, we have the conversion of the long value to type Int.
Example # 4: Program of Creating Class and Its nstance in REPL in Kotlin
We have taken quite an advanced example code of creating a class and calling its instance to show in the repl Kotlin.
In the above example, we have created a class with the name “color” and created its constructor there. The constructor is taking a class instance which is represented as “cName”. The instance “cName” has a property of string type and has an empty value. Then, we have declared a variable as “c” which is calling the class “color” and initialized a value “indigo” for the class instance. The variable “c” is used with the class instance to show or display the value of the instance “cName” of the class “color”.
Conclusion
The main aim of the article is to familiarize you with the feature of the Kotlin repl mode. Working with Kotlin repl mode has the advantage of storing all commands in a script and getting all output lines in one place. We have demonstrated a way to access the repl mode on Kotlin. Then, we have various examples of how we can write our codes in the Kotlin repl mode. It’s simple to run big chunks of code. In repl mode, editing the script is much easier which both novices and experts can benefit from it.


